The Lion, the Witch and the Washroom: Part 5/6

We’re back to the One Room Challenge for Week 6 after skipping Week 5 for a much-needed time out during massive unrest rolling through our country and the beginning, I hope, of a sea change in our views towards racism, the media, politicians and the so-called elite. I discussed my take on this in yesterday’s Instagram post and thus will not repeat it here.
As for our bathroom status, errrrr, it's predictably behind schedule. That’s what happens when your renovation is DIY and one party to the transaction is an engineer accustomed to working with tolerances in the range of 1/10th of a thousandth of an inch and the other is a full-stop scatterbrain who’s lucky on most days to find matching socks.
I’m sure you can guess who’s who in that scenario.
Anyhoo, back to el baño. This week’s post is short as I’m addressing only one thing and that’s the fabulous tin ceiling from American Tin Ceilings.
We’ve installed tin ceilings before (four before this, to be precise, and all of them from American Tin) and LOVE them for practical and aesthetic reasons.
The material is practical because, for us, plaster repair on the ceilings is a royal pain in THE ARSE and we’ve no interest in that kind of nonsense. Tin is easier. (The same would be true for popcorn ceilings, btw). It’s much easier AND more beautiful to whack up tin than it is to have a plain ceiling, painted or otherwise.

American Tin has numerous mix-and-match options for their ceiling products, including 39 historic patterns and 52 different colors and finishes. You can order 6” sample tiles to help visualize how the product will work in the space. These are the samples we selected.

Winner winner chicken dinner! We ended up ordering Pattern 29 in oil rubbed gold because the ornate detail is dramatic and ups the ante for what’s evolving into a very theatrical space. The color ties in with black and gold used elsewhere in the bathroom and I like the feeling of weight and drama on the ceiling.

Carmine Red, pictured here, was a one of my favorites but I felt with the rosy colors I was considering for the walls, this would not have provided sufficient contrast.

I also loved Pattern 29 in Artisan Silver Patina, but the color was not right for the space. In the right space, however, this would be a stunner. Like maybe with black walls. Or deep purple ones. Or a fresh green. Sheesh. The mind reels.
As for the aesthetics, I think tin speaks for itself as it's just plain FANCY and it enhances the overall design of our bathroom by reinforcing the unapologetically maximalist vibe. At the same time, it’s an historical pattern and material which is unexpected for a non-traditional, whimsical space. It’s more or less a bridge between the traditional historical aspects of the house (which is a 1902 Victorian) and the more eclectic and fanciful flourishes we’ll have in this space and throughout the house.
Installation is far less complicated than you’d imagine, mostly because the product is forgiving. Most mistakes can be fudged. The first step we take when installing these ceilings after selecting the pattern and finish is to do a scaled layout so we know the right quantities of tiles, filler, crown and molding to order. This also gives us a plan and understanding of how the proportions will look given the size of the room. Mike does his layouts on Auto-CAD, but of course a layout can be done simply on a yellow pad.
We recommend Snap Lock tiles for ease of installation by a DIY-er. Of course, this falls into the category of “do what we say and not what we do,” as we made a mistake and accidentally ordered the regular nail-up version. This made installation more difficult, but because this was Mike’s fifth ceiling and he’s one of those engineer-y types, he figured things out.
In addition to the central decorative tiles, we ordered “filler” tiles which are installed between the more ornately patterned tin and the crown molding.

Here's the filler we ordered in Pattern #2. While the filler tiles have either texture or pattern depending on which style you order, the patterns are forgiving so it doesn’t matter where the tile is cut – it simply fills the space nicely and gives a great balanced, layered and finished look to the ceiling.
We also ordered crown molding and inside flat molding which is installed where the filler tile meets the patterned tile to give it a more finished look. The crown molding is necessary, because it will cover crooked cuts and any flaws on the edges of the tile, as it’s very difficult if not impossible to have an evenly cut edge on the last row of filler tiles adjacent to the ceiling/wall juncture. Mike recommends crown molding with pre-cut corners, as this alleviates many headaches.

This is the C1 crown molding in oil rubbed gold.

And here we have the M2 flat molding in the same finish.
Once the tin was in the house and ready for installation, Mike snapped chalk lines diagonally on the ceiling to establish the center point. Using a nailer, he then began installing the center tiles in the middle of the diagonal and then worked his way outward. His preferred nail gun for this type of project is a battery-operated 18-gauge brad nailer. Pressure settings must be adjusted to ensure you don’t shoot nails completely through the tin.

This photo shows the snap lines and the first couple of tiles installed.
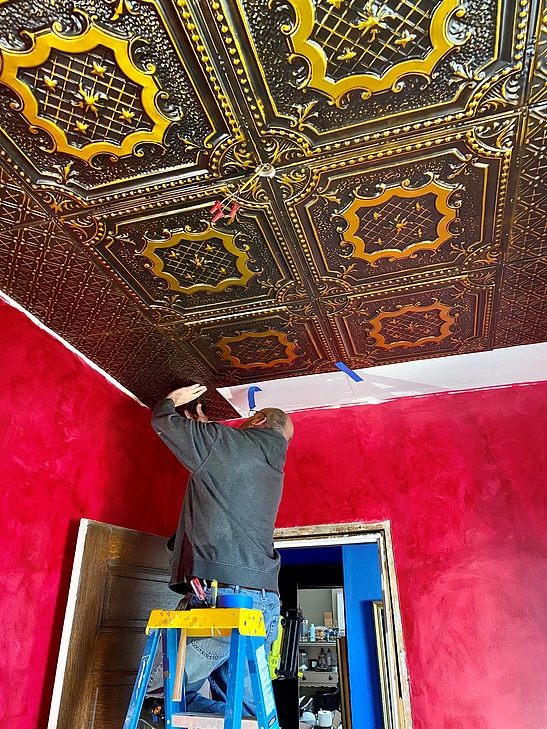
This picture shows Mike installing the filler tiles which abut the wall. As you can see, perfection is not required in regard to the spacing against the wall as the crown molding will cover this gap.
Mike cut the filler tiles to size using garden variety tin snips which you can purchase at a home improvement or hardware store or on American Tin's website (they carry all the materials necessary for the project and also have installation videos that will walk you through the process).

Mike and the tin snips.
The crown and interior moldings are the last step and these are nailed up in the same manner as the tin. There are measurements and cutting involved, but other than that, the installation is less complex than installing wood or polyurethane molding.

Installation of the crown was more efficient with with Mike's brother holding the material in place while Mike shot the nails.

The current view.
That's all for this week. Mike is still tiling the shower and starting the cabinet surround in the next day or two. If we make it to the finish line by the end of the challenge it will be MIRACULOUS.
But miracles have been known to happen.
