how to turn a plain chrome chandelier into a bejeweled statement piece

Forgive me, friends. It’s been almost three years since my last blog post. Not that we haven’t been doing stuff to the house this whole time. We’ve been doing SO MUCH STUFF.
But I had a few requests on Instagram to do a tutorial on how I embellished our over-the-top attic chandeliers, so there’s no better place to start than these particular pieces of bedazzled nonsense.
Nonsense to the fifth power, that is.
It all started with the costume jewelry artists at Erickson Beamon. I’m of the moderately humble opinion that ALL jewelry must double as home décor. This necklace is Exhibit A in support thereof.
Can’t you just see this doubling as statement lighting?

Photo credit: raymondleejewelers.net
Not surprisingly, Erickson Beamon had the idea long before I did. Behold their gloriously glitzy assemblage otherwise known as The Glam Rock Chandelier.

The Erickson Beamon Glam Rock Chandelier
I can’t remember how I stumbled on this masterpiece, but likely I was searching Pinterest or Google images, looking for “unique chandeliers” or “extraordinary chandeliers” or something completely out of my price range. (Indeed, putting aside the fact neither this piece nor anything like it was available for sale, the price was about half of what we paid for our house.)
No problem.
For me, budget restrictions lead to the most creative endeavors.
I saved the photo and packed a copy away in the basement of my mind palace, which is apropos because stuffed in the actual basement of our house were two banal and overly contemporary crystal chandelier that we originally bought for the parlor. We never hung them in that room, mostly because they couldn’t be more wrong for the house.
(Don’t ask me why I kept them, let alone why I ordered them in the first place.)

Image credit: Lamps Plus. This is the Grace 30” 12-light chandelier with a comparable value of $1,199 and a retail price of $799. However, it’s priced at $499 as part of Lamps Plus’ Daily Sale, which has been going on 365 days a year for at least the past six years (lol).
When we stashed these lights in storage back in 2016, I promised Mike that we’d install them in the attic after we finished the conversion. Fast forward to 2022, and the dread of actually hanging them loomed like the worst impending doom.
The attic would be artistic and magical and beeyooootiful.
These chandeliers would be WARTS on the ass of fancy.
Desperation is the mother of invention.
THE PRACTICE RUN
After inspecting photos of the few Glam Rock Chandeliers I could find online, I was pretty sure I could do a semi-competent knock off using costume jewelry and rhinestone trim.
As it turns out, the Lamps Plus chandeliers weren’t my only ill-fated light purchase. I also had a chrome floor lamp shoved in one of my Corners of Shame that would serve as the perfect trial run.

P.S. The lamp didn’t start out this way, but had a large silver drum shade which I could not abide. As it turns out, I couldn’t abide the lamp at all.

Collage components on the ready.
I won’t belabor the steps I took to transform this since I’m doing that for the chandeliers below, but long story short, here’s how the floor lamp turned out.

Again, the process to make this is the same as for the chandeliers below. I wrapped the base in rhinestone mesh from Planet Rhinestone and then layered on trims from the fabric section of Hobby Lobby.

All of the materials I used to embellish this are mentioned below, as I repeated the same process for the chandeliers.

The base is embellished completely with trim from the fabric section. You’d think this would be a nightmare to clean, but truth told, it’s been finished for a year and a half and hasn’t shown signs of needing a cleaning. I have thought through how I’ll do that when the day comes, and the plan is to use a soft-bristled brush dipped in rubbing alcohol or glass cleaner. I may blow off dust before doing that with one of those compressed air canisters used for sensitive electronics.
The Tower Chandelier
My plan was to hang both Lamps Plus chandeliers in the attic bedroom suite (which is an ongoing project) before embellishing them. One would live in the “tower room” and the other in the bathroom.
I started with the tower chandelier, but failed to take a picture of how it looked when I started. So, as an example, below we have the Lamps Plus chandelier in the attic bathroom, stripped down to its basics, which looked exactly like the tower chandelier after I removed all the crystals.

This is so SAD.

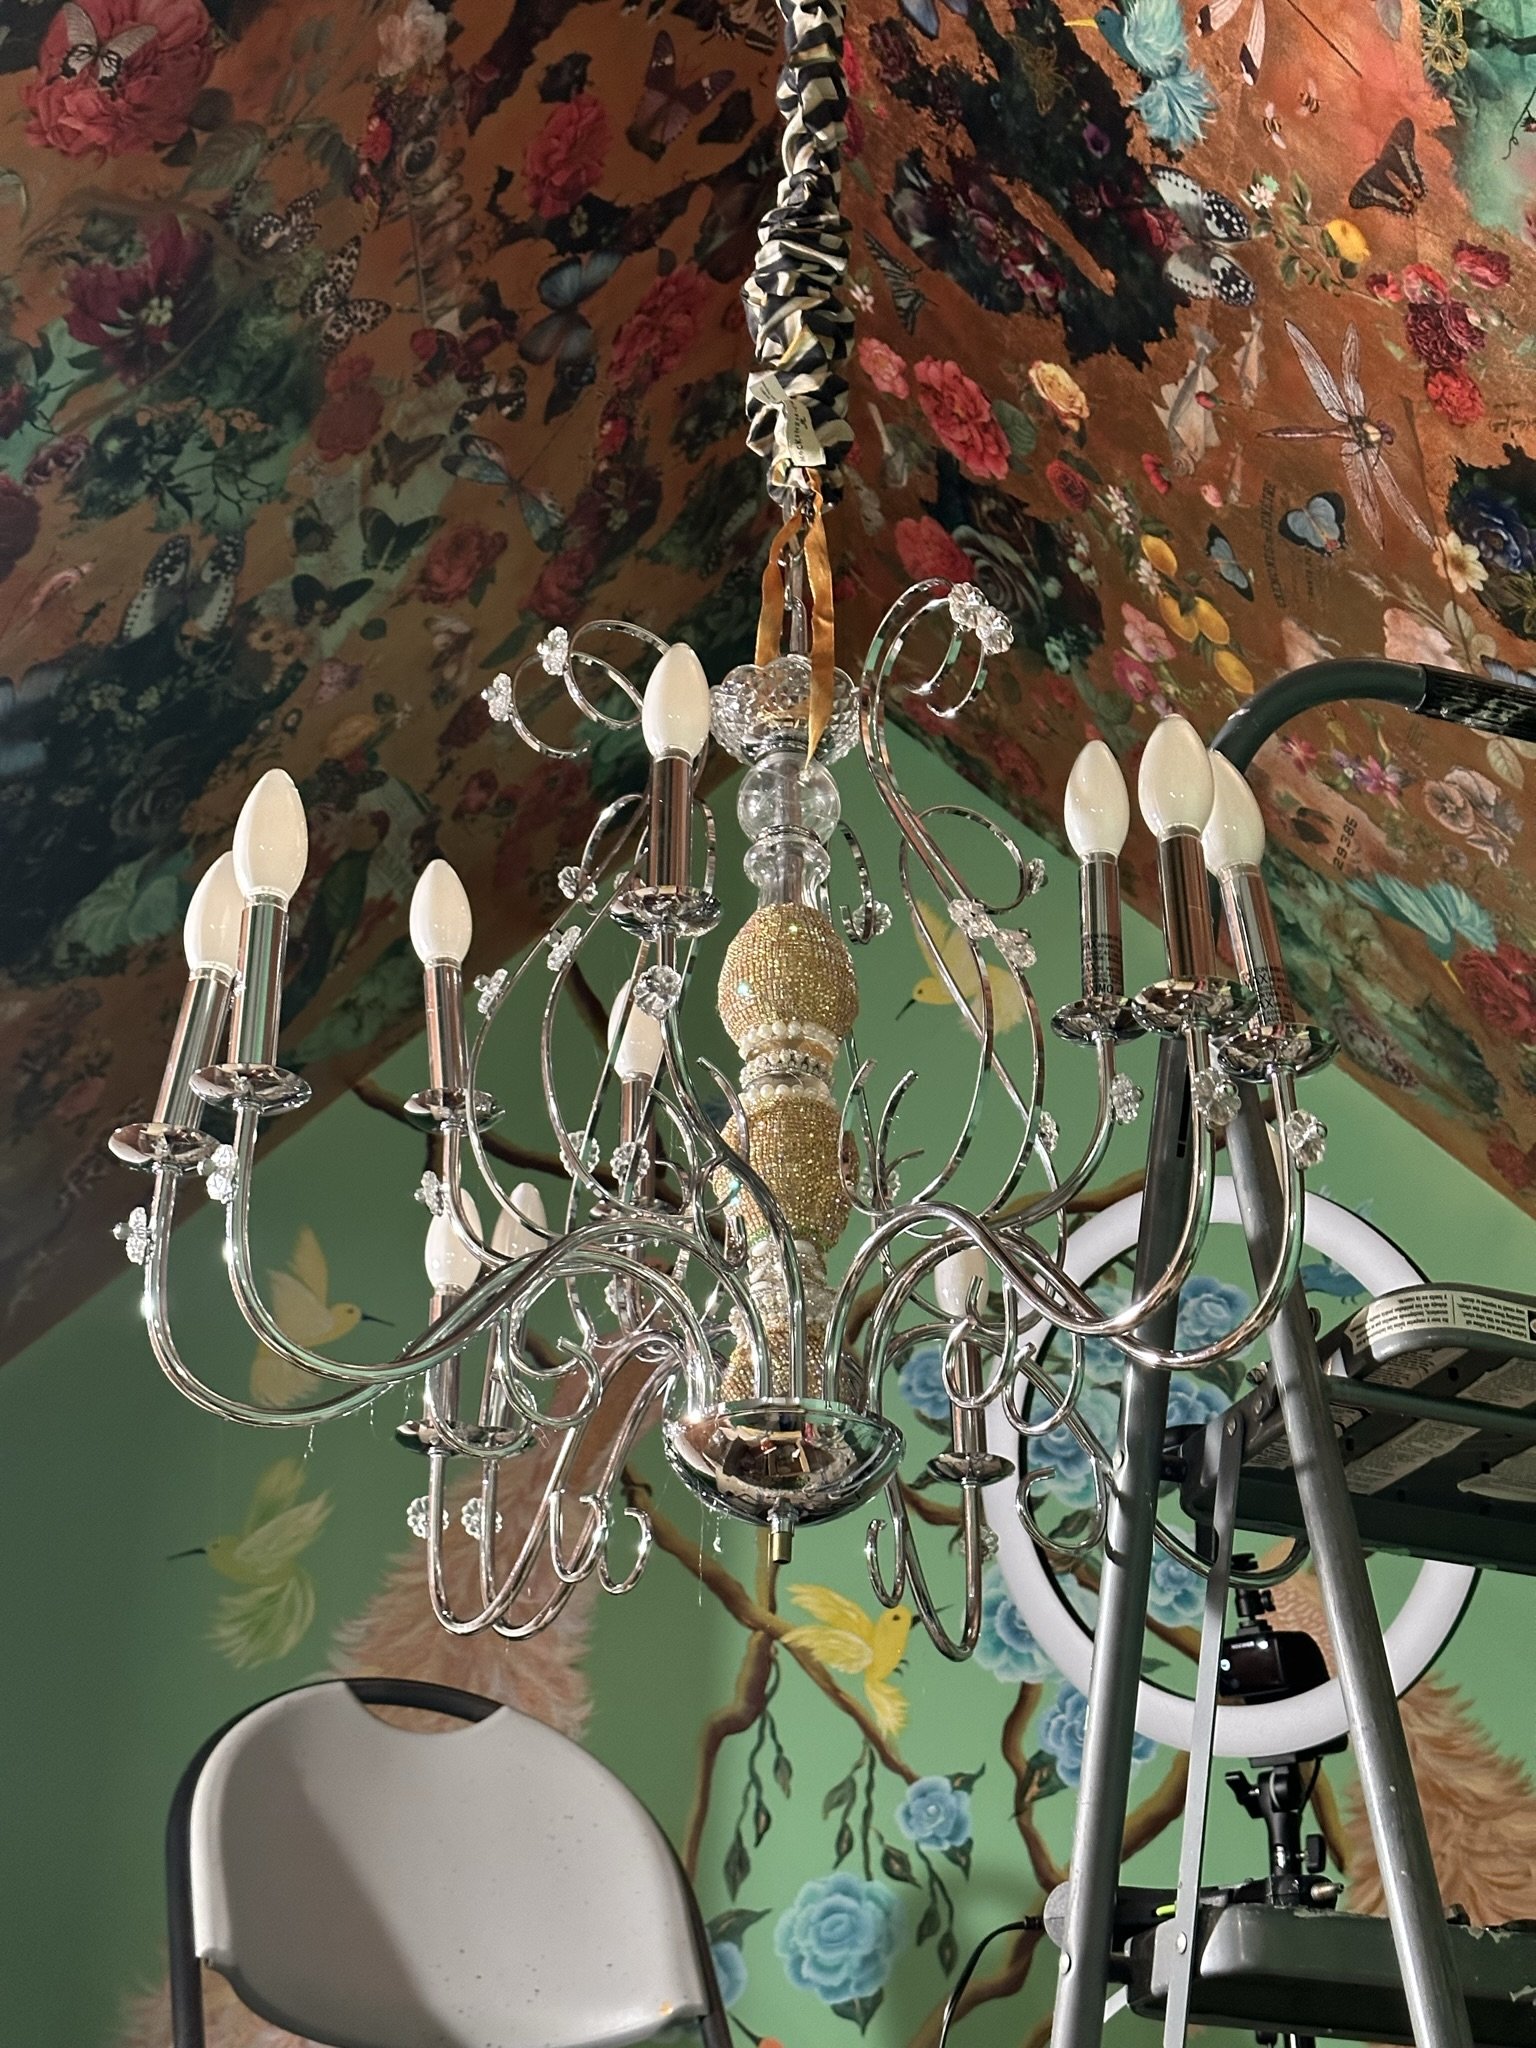
Back to the tower chandelier. Here, we have Mike and his brother, Greg, hanging the chandelier on scaffolding after I finished painting the ceiling (another blog post I should do, but haven’t).
I worked on scaffolding, which I highly recommend. Otherwise, I recommend removing the chandelier and hanging it somewhere low where you can work on it and have access to all of the materials.
Obviously, you’ll be adding a significant amount of weight to the fixture, so unless you’re an electrician or otherwise knowledgeable and able yourself, you need to have an electrician or your super-handy significant other ensure there is sufficient mounting support for a heavy chandelier.
The basic tools you’ll need include scissors, a mini hot glue gun and plenty of glue sticks, jewelry tweezers, wire cutters, and a soft art brush for brushing away those spider webby dried hot glue strings when you’re done.
You’ll also need to create a working area to lay your tools so they’re within reach. For this purpose, I found a three-step ladder served the purpose. The ladder also worked as a stop for the chandelier to keep it in place as I turned it (rather than me walking around the chandelier, since I was on scaffolding and didn’t have much extra room for frivolous things, like walking).

I took this picture while I was working on the second chandelier, but the tools are the same. I started with a full-sized battery-powered glue gun, but it was too big for tight spaces so I switched to the mini. Some people on Instagram pointed out that I should’ve used E6000 adhesive, but I didn’t have the time or patience for taping during the dry time (and the insufferable wait). I used hot glue on the floor lamp, which I finished over a year ago, and I’ve only had one piece of trim start to pop off. Easy peasy. I just reattach it with hot glue.
As for the supplies, I’ll link below to my Amazon store (I do get commissions for the Amazon links) and also Etsy. The rest of the supplies, which I’ll mention without linking, I bought at Hobby Lobby’s brick and mortar store here in town.
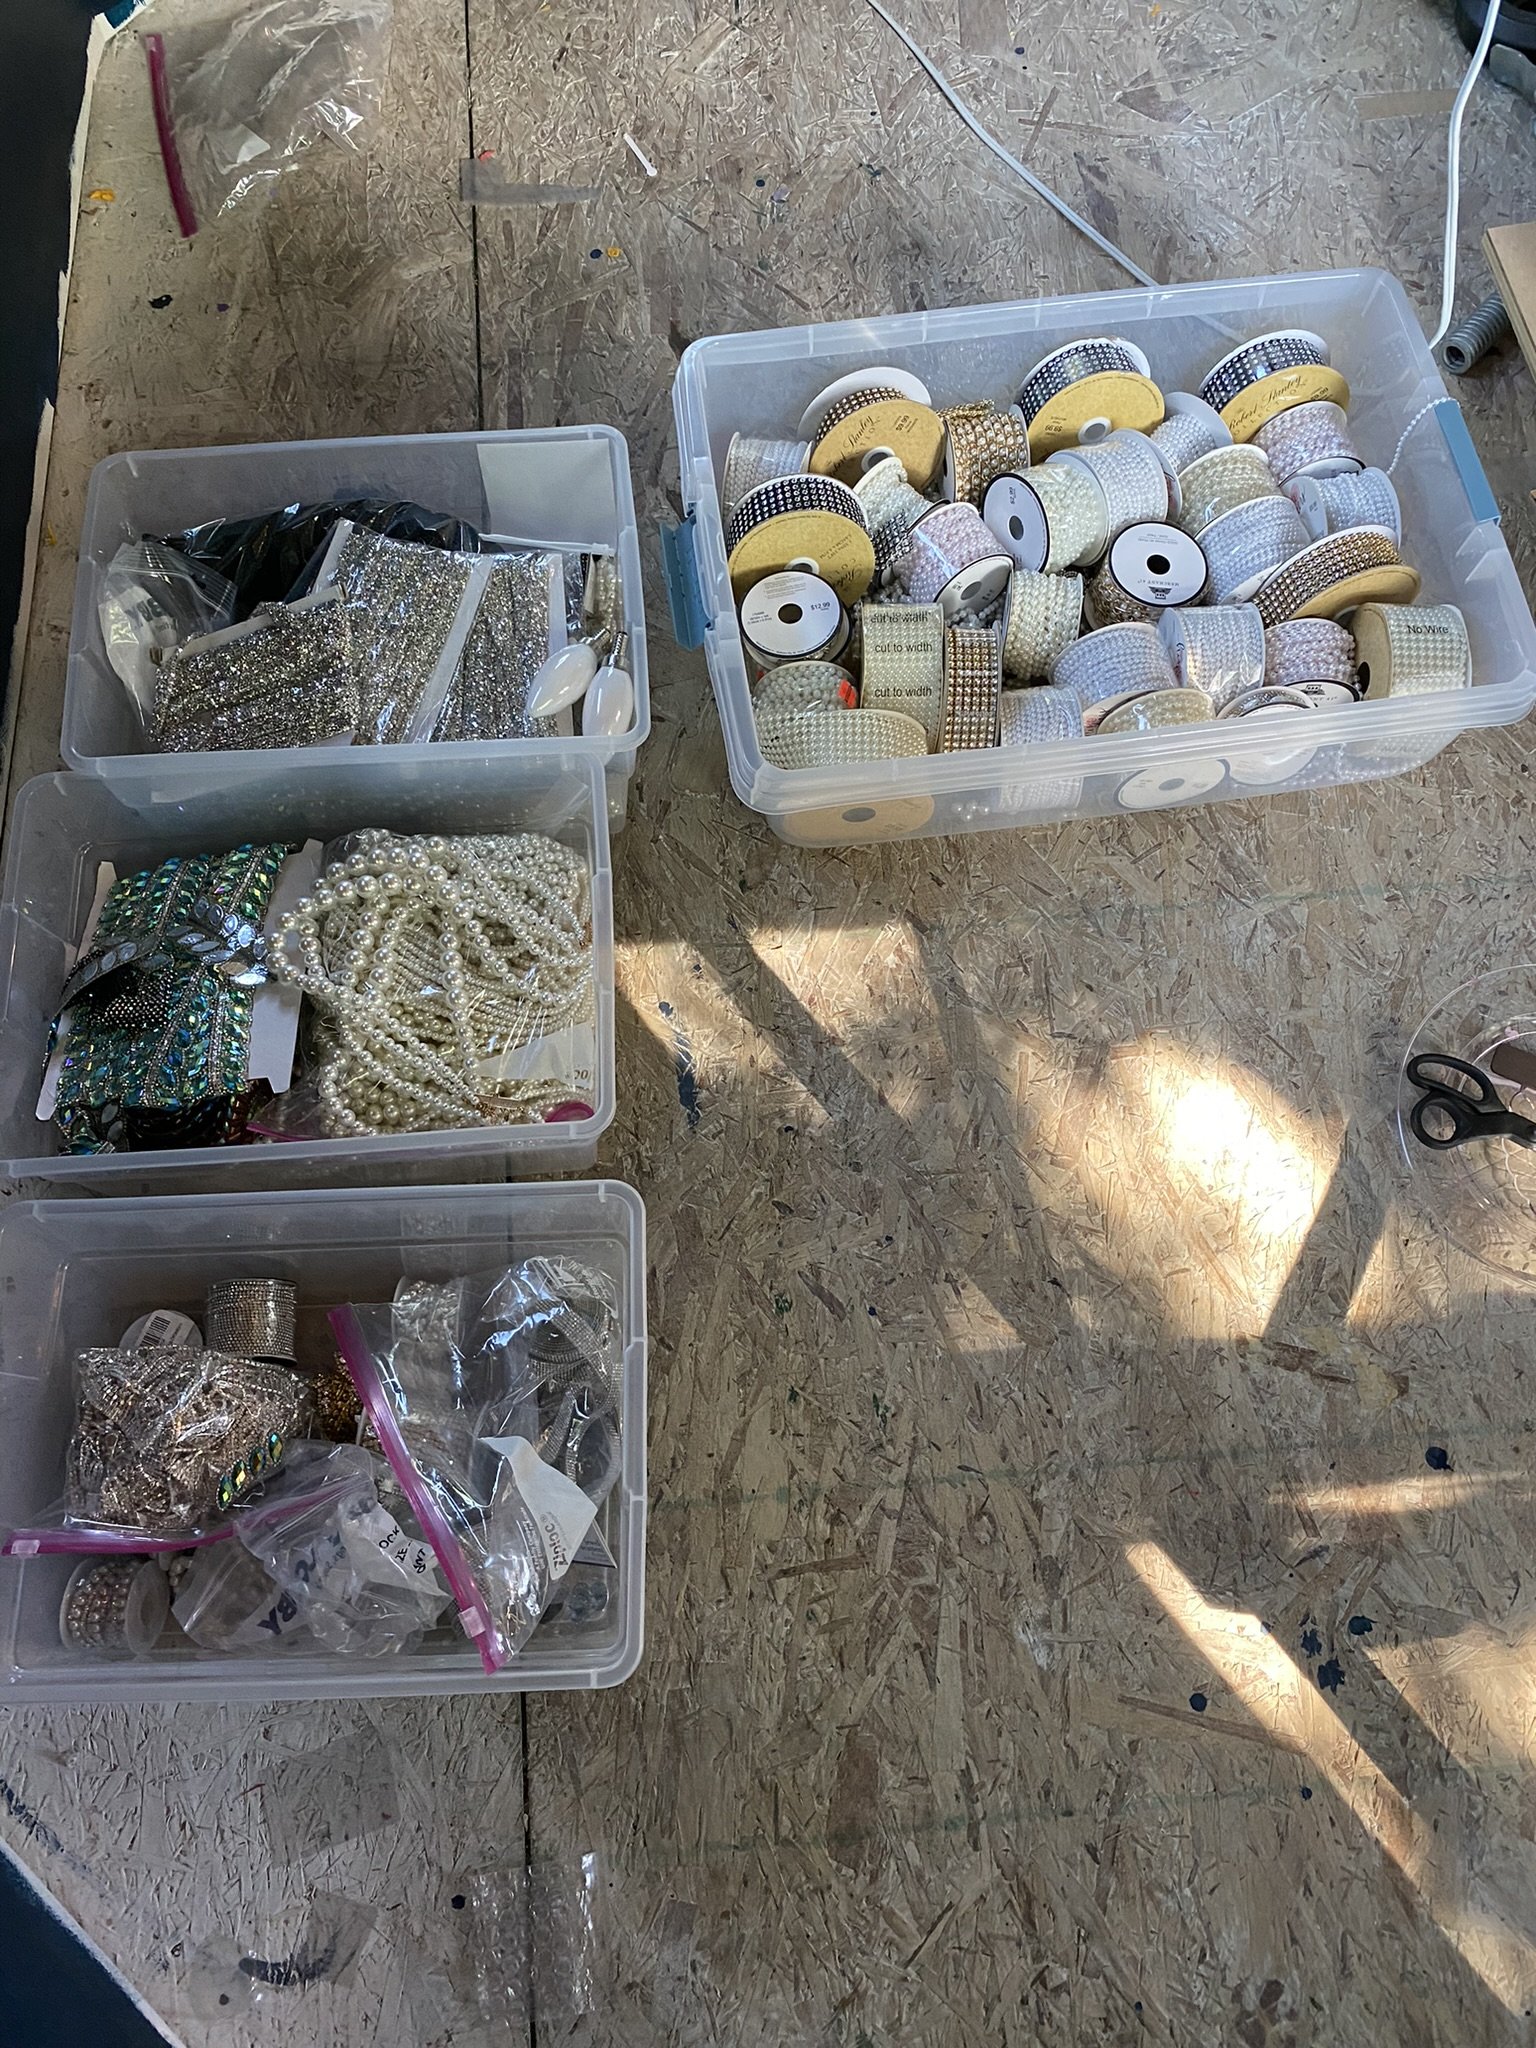
Some of my collaging stash. (I do pick up whatever I can when it’s on sale, knowing that eventually I’ll have use for it).
And off we go.
Here was my first step after removing all of the crystals, which was wrapping the top of the column with pearl trim I bought in the fabric section of Hobby Lobby. My modus operandi for wrapping with the faux parl trim, regardless of the chandelier part involved, is to tack on the first part of the trim with hot glue and then add beads of glue periodically and the at the end of the run. It’s not necessary to tack down every bit of the run, as it will hold itself up.

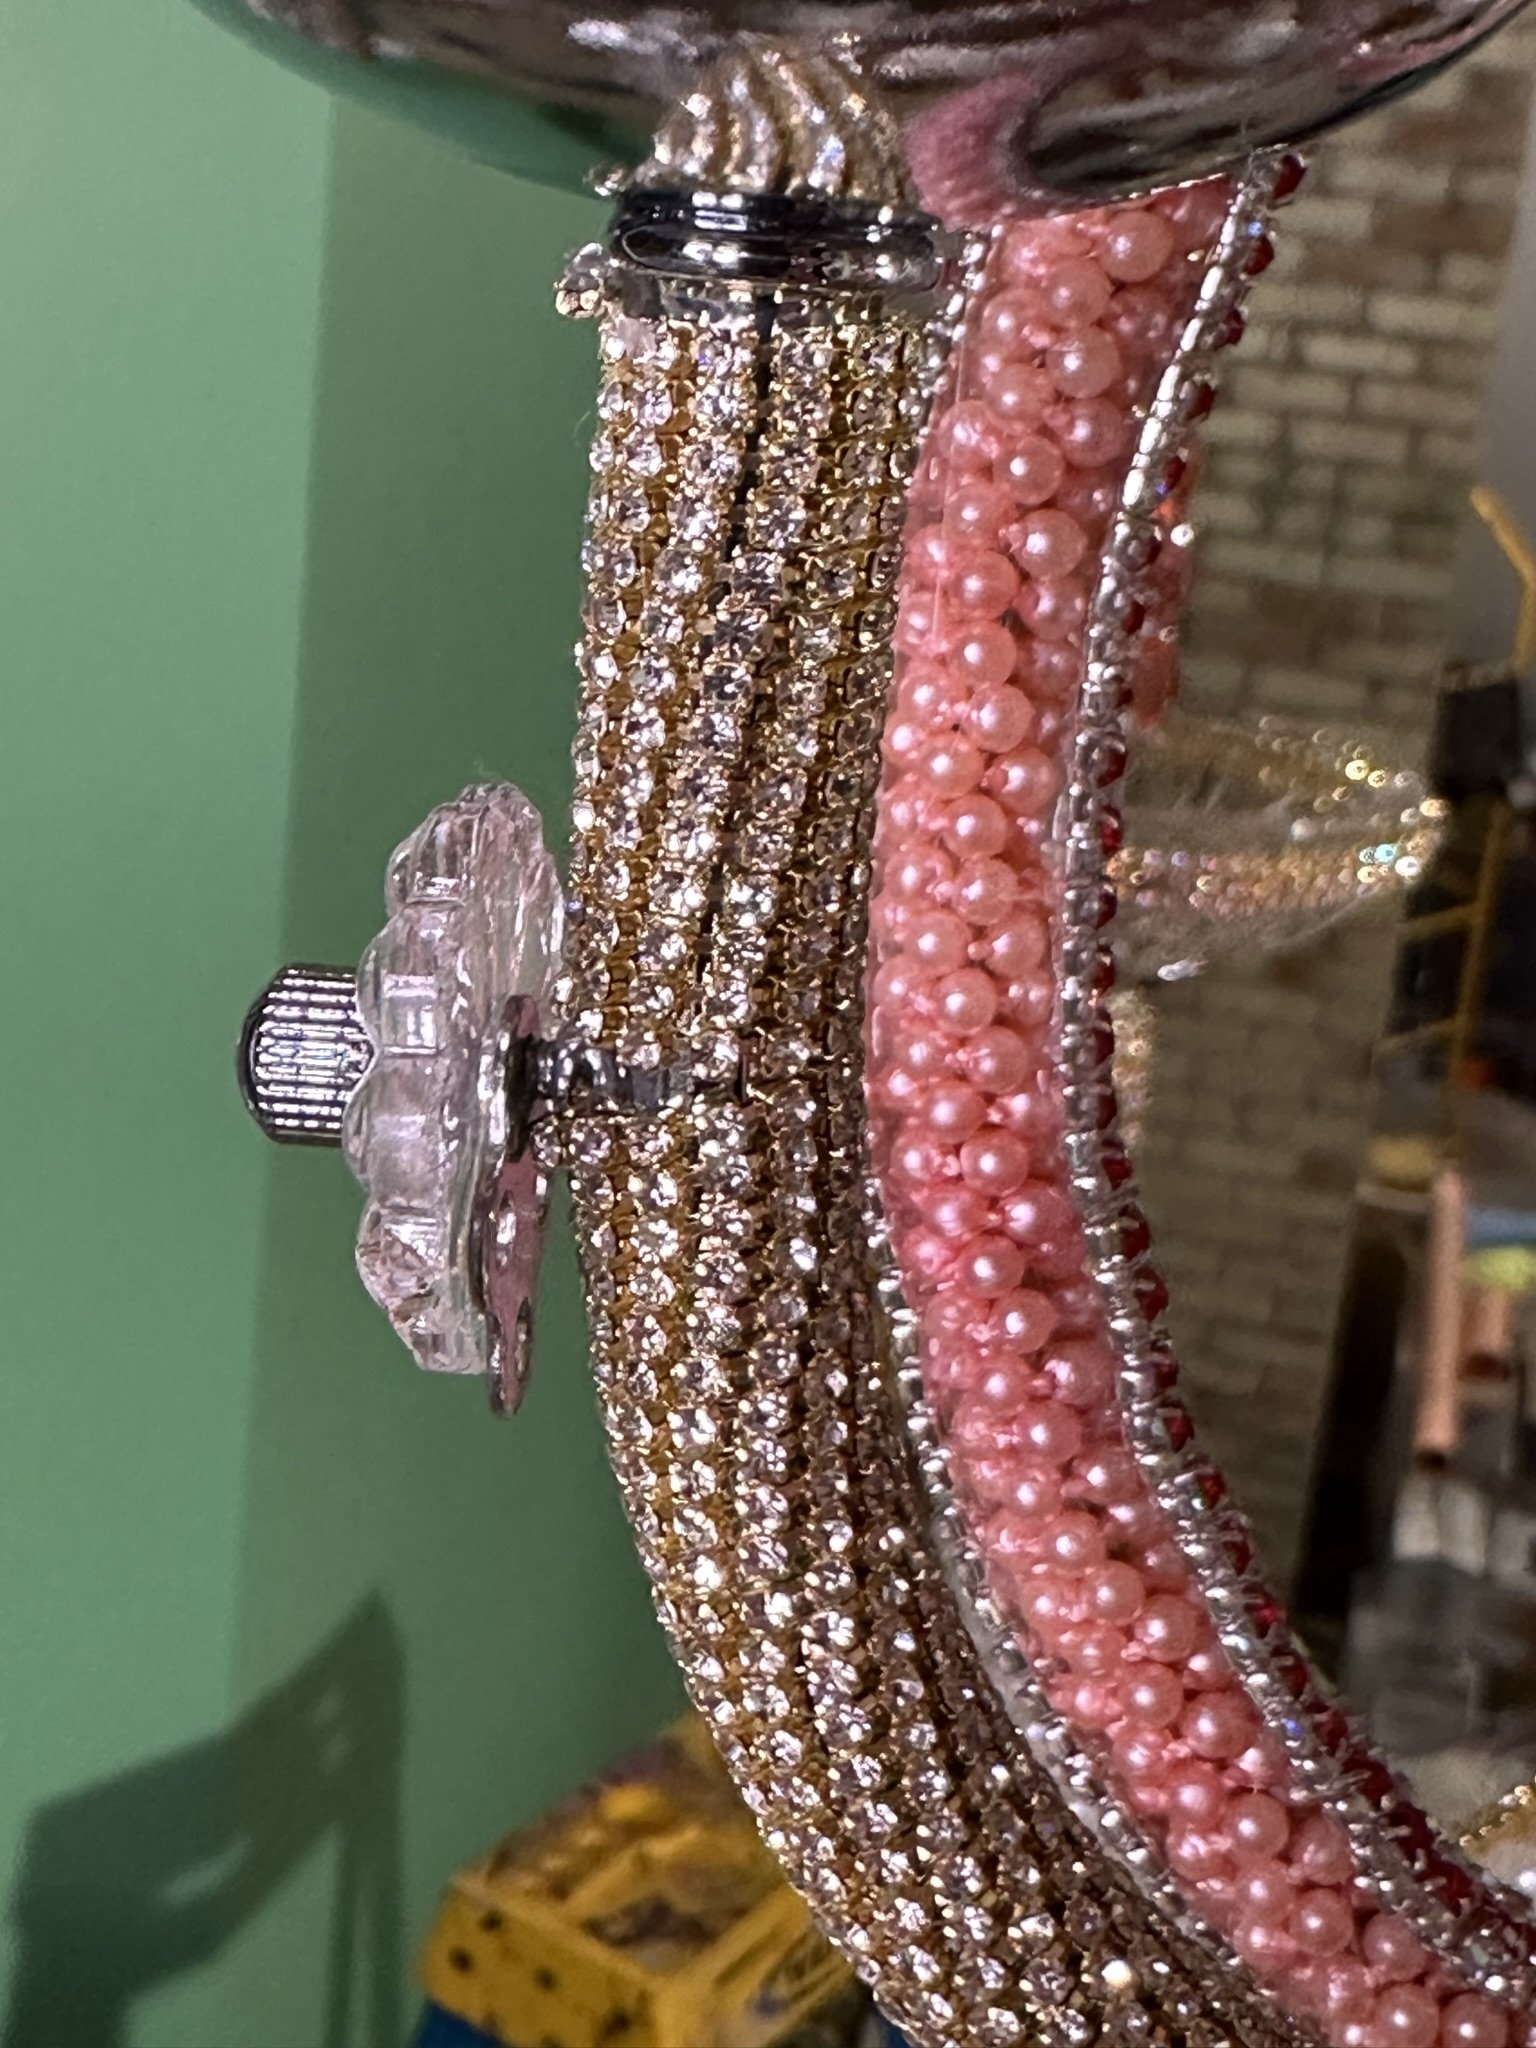
I felt the pearl trim alone wasn’t opaque enough. And it looked cheap. So over the pearls, I layered elaborate rhinestone trim from Hobby Lobby’s fabric section. I learned during the process of collaging both chandeliers that layering is essential to create depth and interest.

Here, after layering the rhinestone trim over the pearl strand, I worked upward. The aqua trim with the diamond shaped stones is inexpensive iron-on trim I bought from an Etsy shop and trimmed down to fit this section. Above that is clear-colored iron-on trim I bought at Hobby Lobby. And above that on the crown is colored (red and gold) three-row cup chain which you can purchase here.
As I learned, it’s important to test the flexibility of the trim you’re using on any particular part of the chandelier before tacking it down with glue. The iron-on trim is by far the most flexible of the trims and is easy to work with, plus it covers more area and goes on much faster than the more persnickety rhinestone trims.

This is the aqua iron-on trim I found on Etsy. I cut it down for easier and gap-free wrapping. As for the finger bandage, I wrapped some of my fingers when I first started the project to avoid getting burned by the hot glue. As I became more experienced, I didn’t need the bandages.

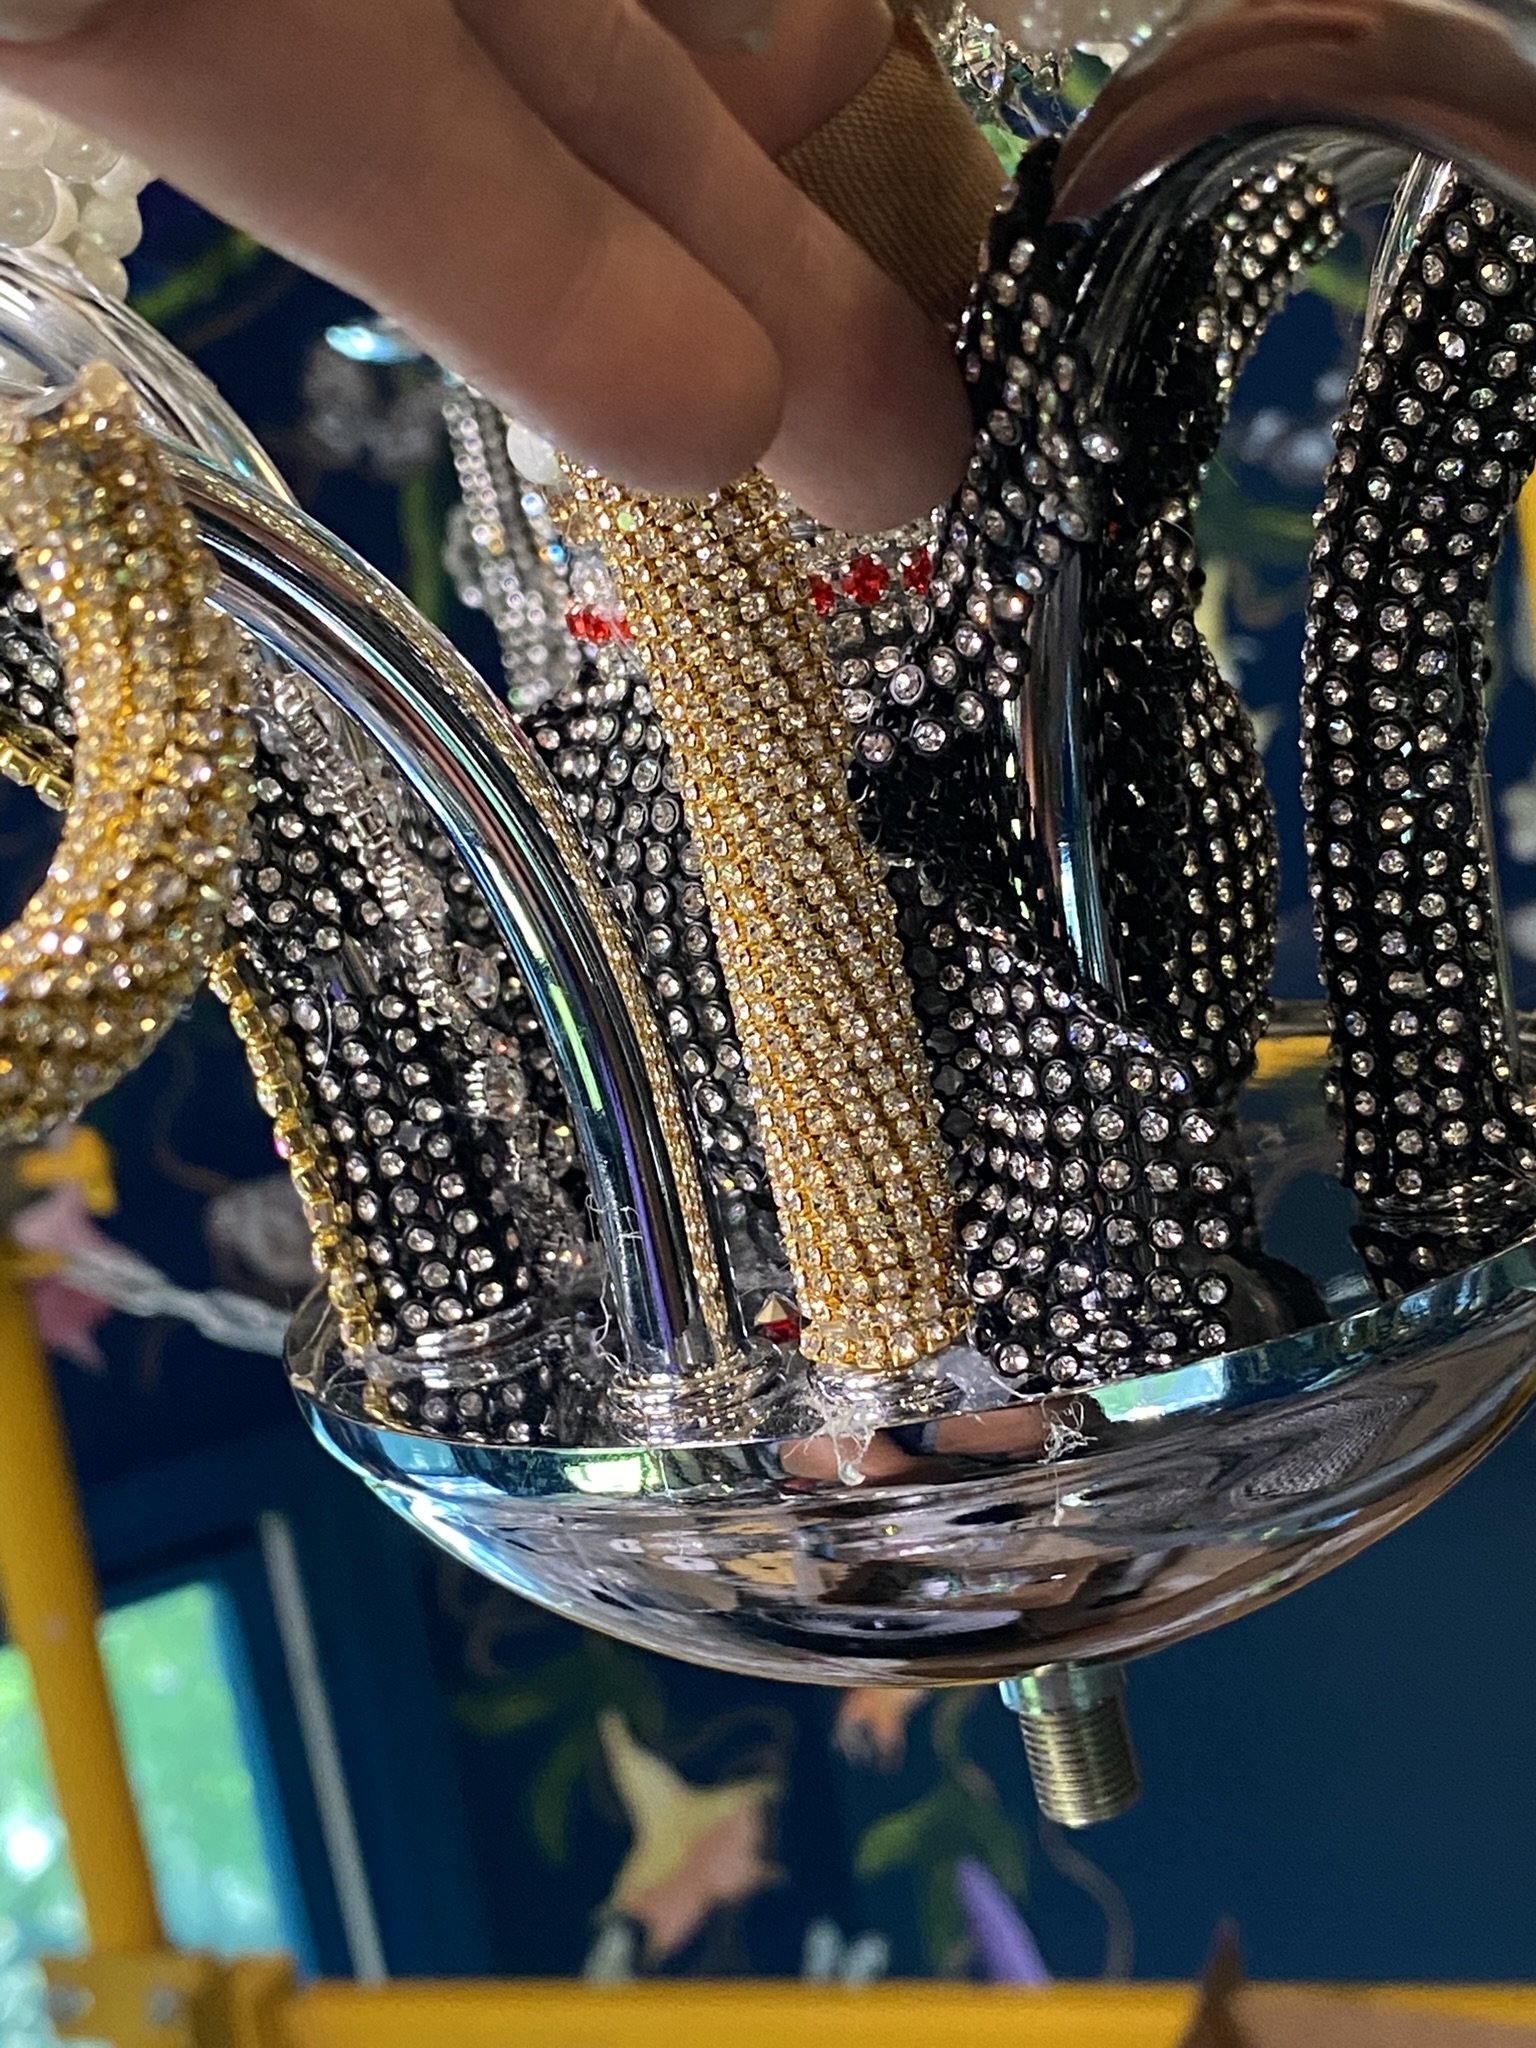
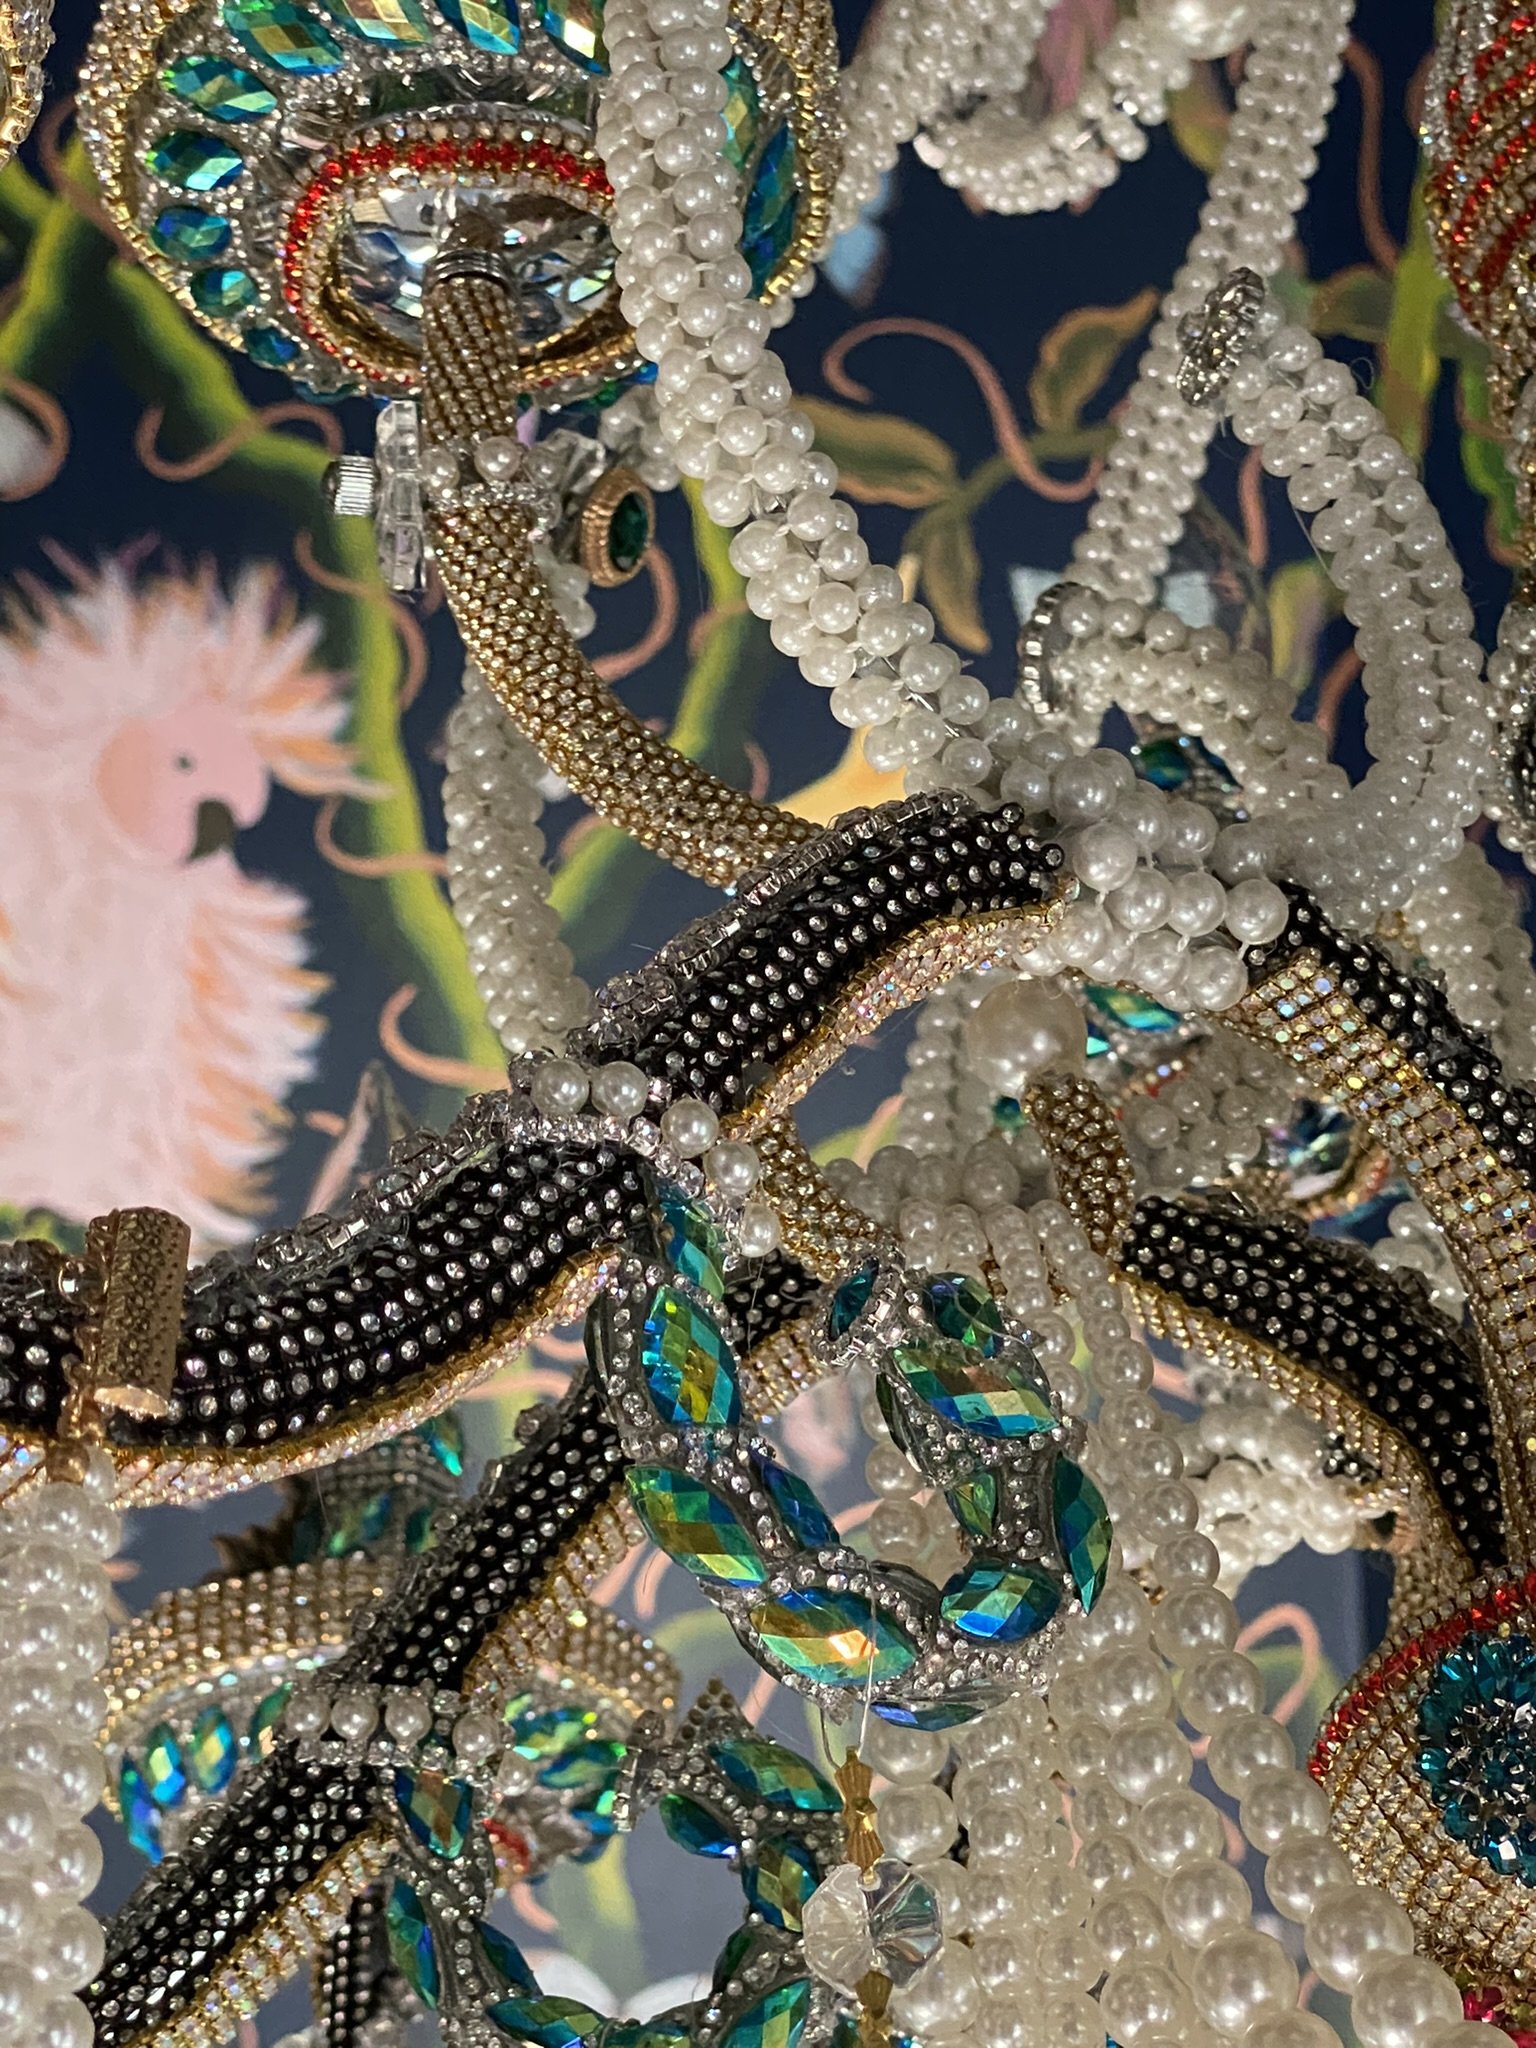
After finishing the crown, I continued downward with the column. The section with a black background covered with clear rhinestones (where arrow number 1 points) is rhinestone mesh (think disco skirt). The mesh is surprisingly easy to work with and is flexible, although you can’t cover large curvatures with it without gaps. Thus, it’s essential to test first to ensure you cut the right amount of mesh for the section. I bought the mesh from Planet Rhinestone, but learned later it can be purchased in smaller quantities and more economically here from Amazon.
After that, I worked downward where depicted at arrow 2, using the same red and gold three-row cup chain. You will need to cut the three-row cup chain in sections rather than trying to wrap it, as it’s too thick to wrap without gaps. And you will need to glue down every bit of the three-row trim.
Moving downward, at arrow 3, the aqua section, is the iron-on trim from Etsy and then at arrow 4 pearl-colored iron-on trim from Hobby Lobby. Over the rhinestone mesh, I’ve layered three-row pearl and rhinestone trim I bought on Amazon. Arrow 5 points to more rhinestone mesh with the same three-row pearl and rhinestone trim layered on top.
For all of the trim, and the mesh, I used scissors for cutting. Wire cutters will damage the rhinestones.
I was too intensely into this project to take pictures of every step, unfortunately. I did a better job documenting my work with the second chandelier described below.

A close-up of the wrapped scrolls and some of the trims described above. As you can see, I’ve started wrapping the arms. These were easy and fast to wrap, as you just wind the material around and around, tacking it down every couple of inches and at the beginning and end.
Because I ran out of the pearl trim, for the lower arms I used both gold rhinestone cup chain and rhinestone mesh. I like working with rhinestone mesh because once you determine how many rows you need to wrap an arm, you can just cut the same amount for each one without having to remeasure.
Wrapping the lower arms with rhinestone mesh. As mentioned above, I purchased enormous sheets of this from Planet Rhinestone before I saw it available in smaller quantities here on Amazon.

Here I’m wrapping the arms with cup chain. This process goes pretty fast. After gluing down the starting point, you twirl upward, letting the chain drop down onto the arm as you wrap. It’s easier than it looks, and I only tacked it down with glue every three inches or so, and then at the end of the wrap.

To cover the seams in the rhinestone mesh where I glued the edges together, I layered on gold rhinestone four-row trim which I bought on Amazon (where the number 1 arrow is pointed). The number 2 arrow points to fancy rhinestone trim I layered over the top of the arms on the rhinestone mesh (this is from Hobby Lobby). Arrow 3 points to an open spot where the mesh wouldn’t work, so I wrapped these areas with pearl trim similar to what is shown at arrow 4. Arrow 5 is the aqua iron on trim and arrow 6 are ends which I finished by gluing on aqua and rhinestone buttons from Hobby Lobby. Arrow 7 are ends that I finished by gluing on jewel table scatters from Hobby Lobby’s bridal section (these are very economical).

When wrapping with the cup chain, I had open areas like this.
I finished/closed these open areas using rhinestone and pearl trim from Amazon.

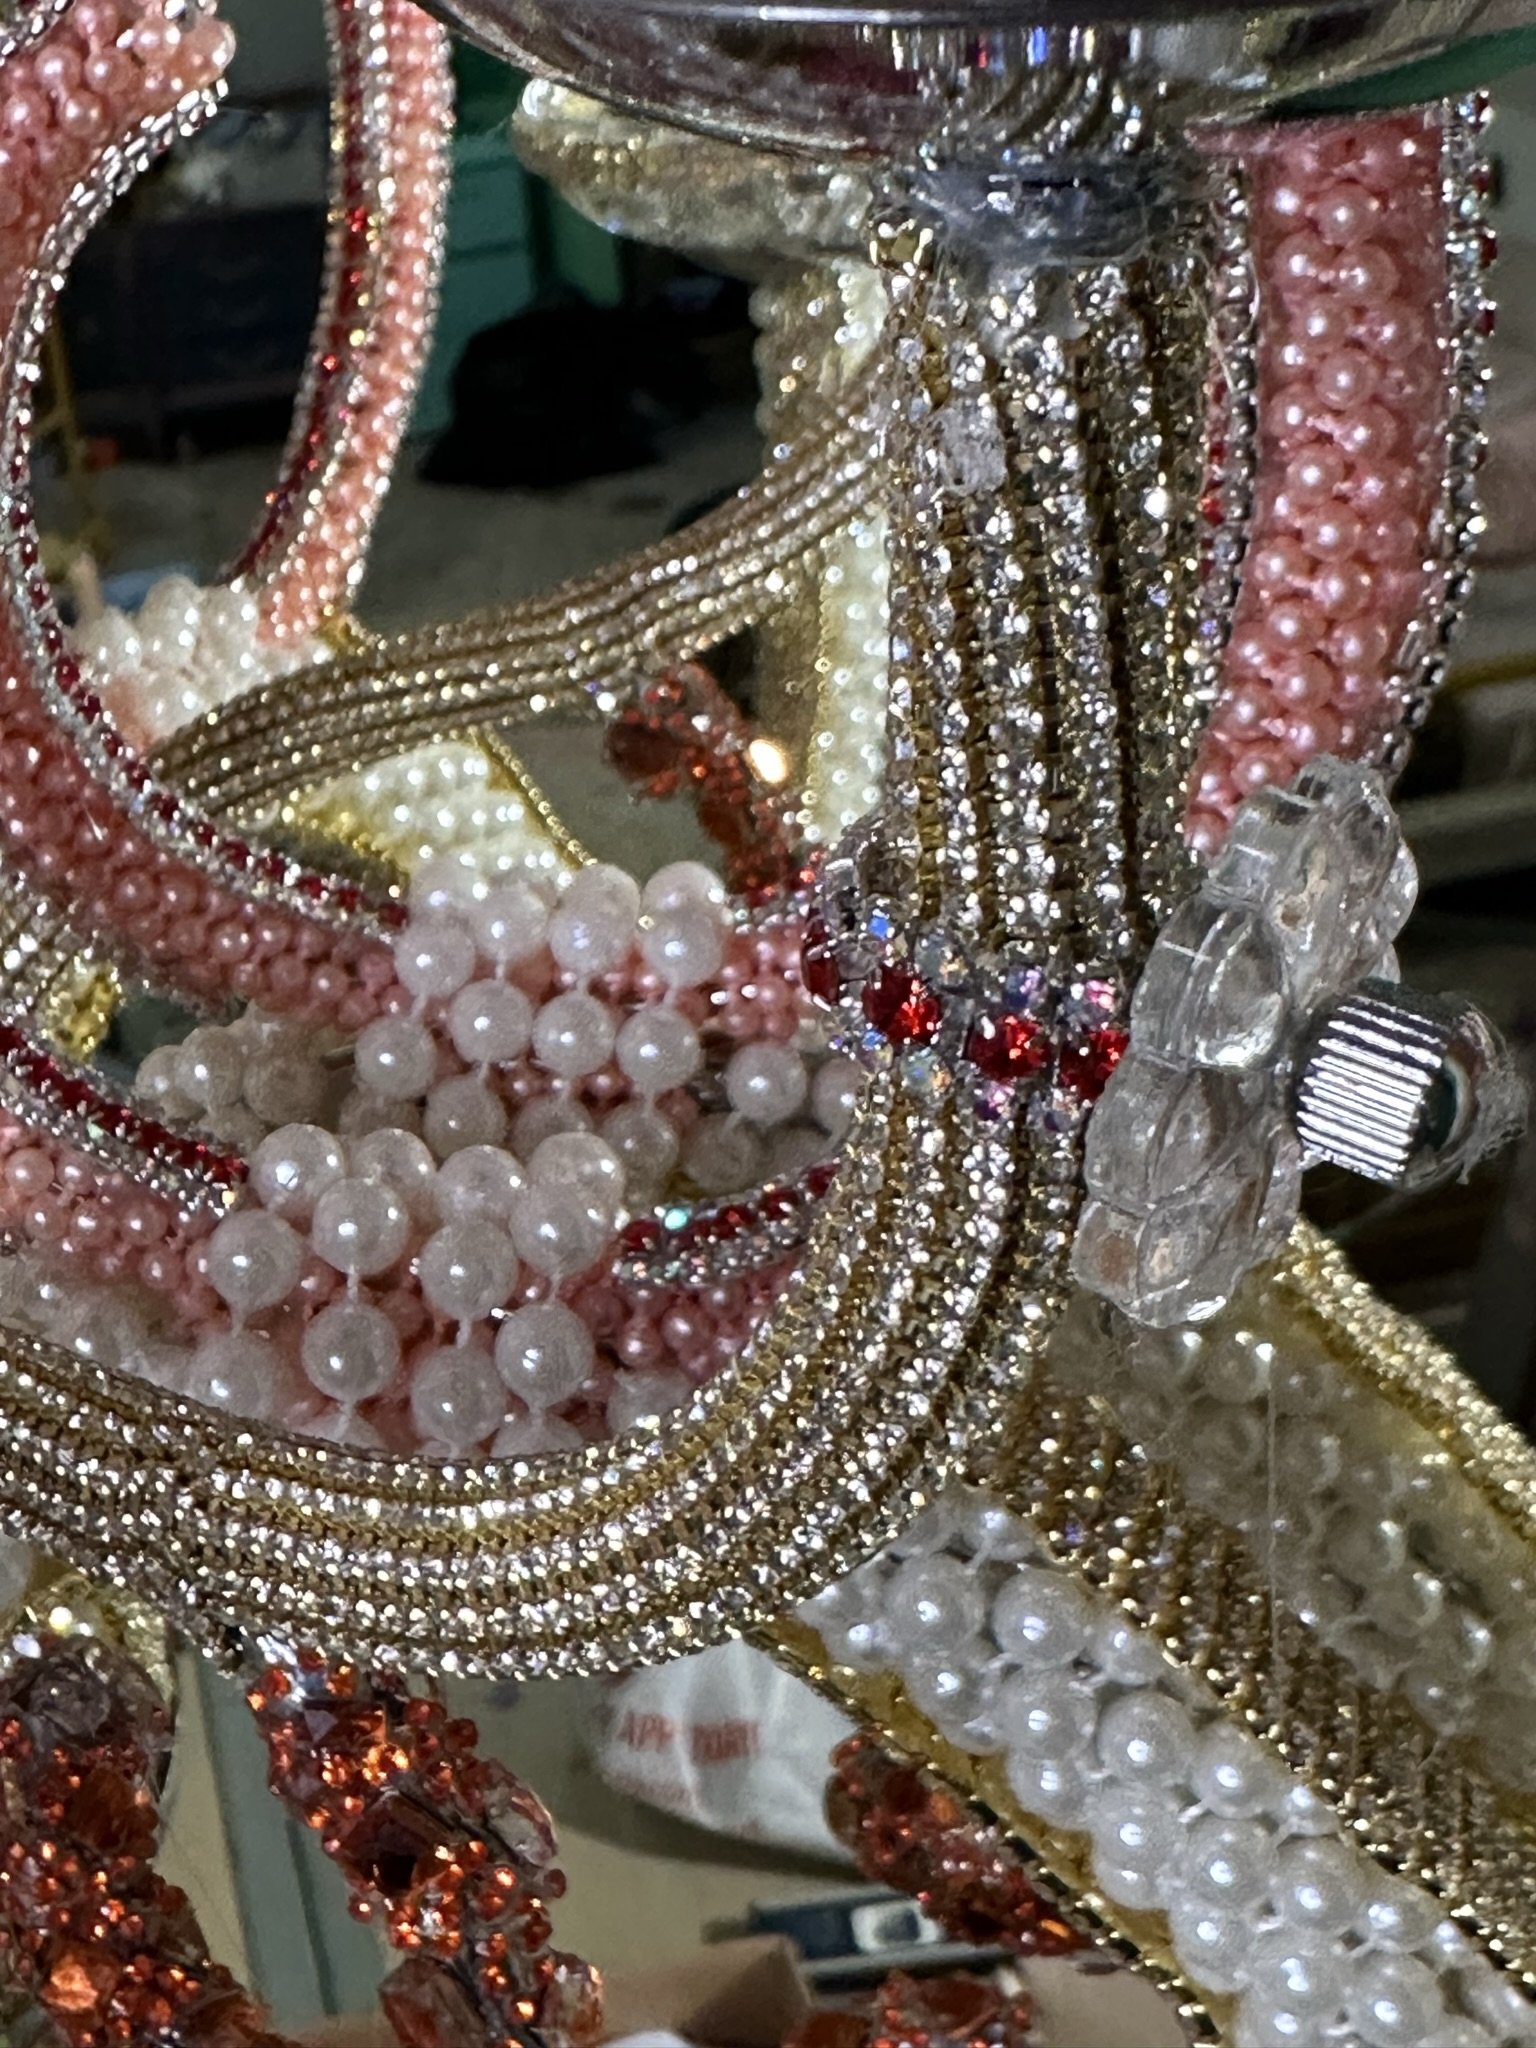
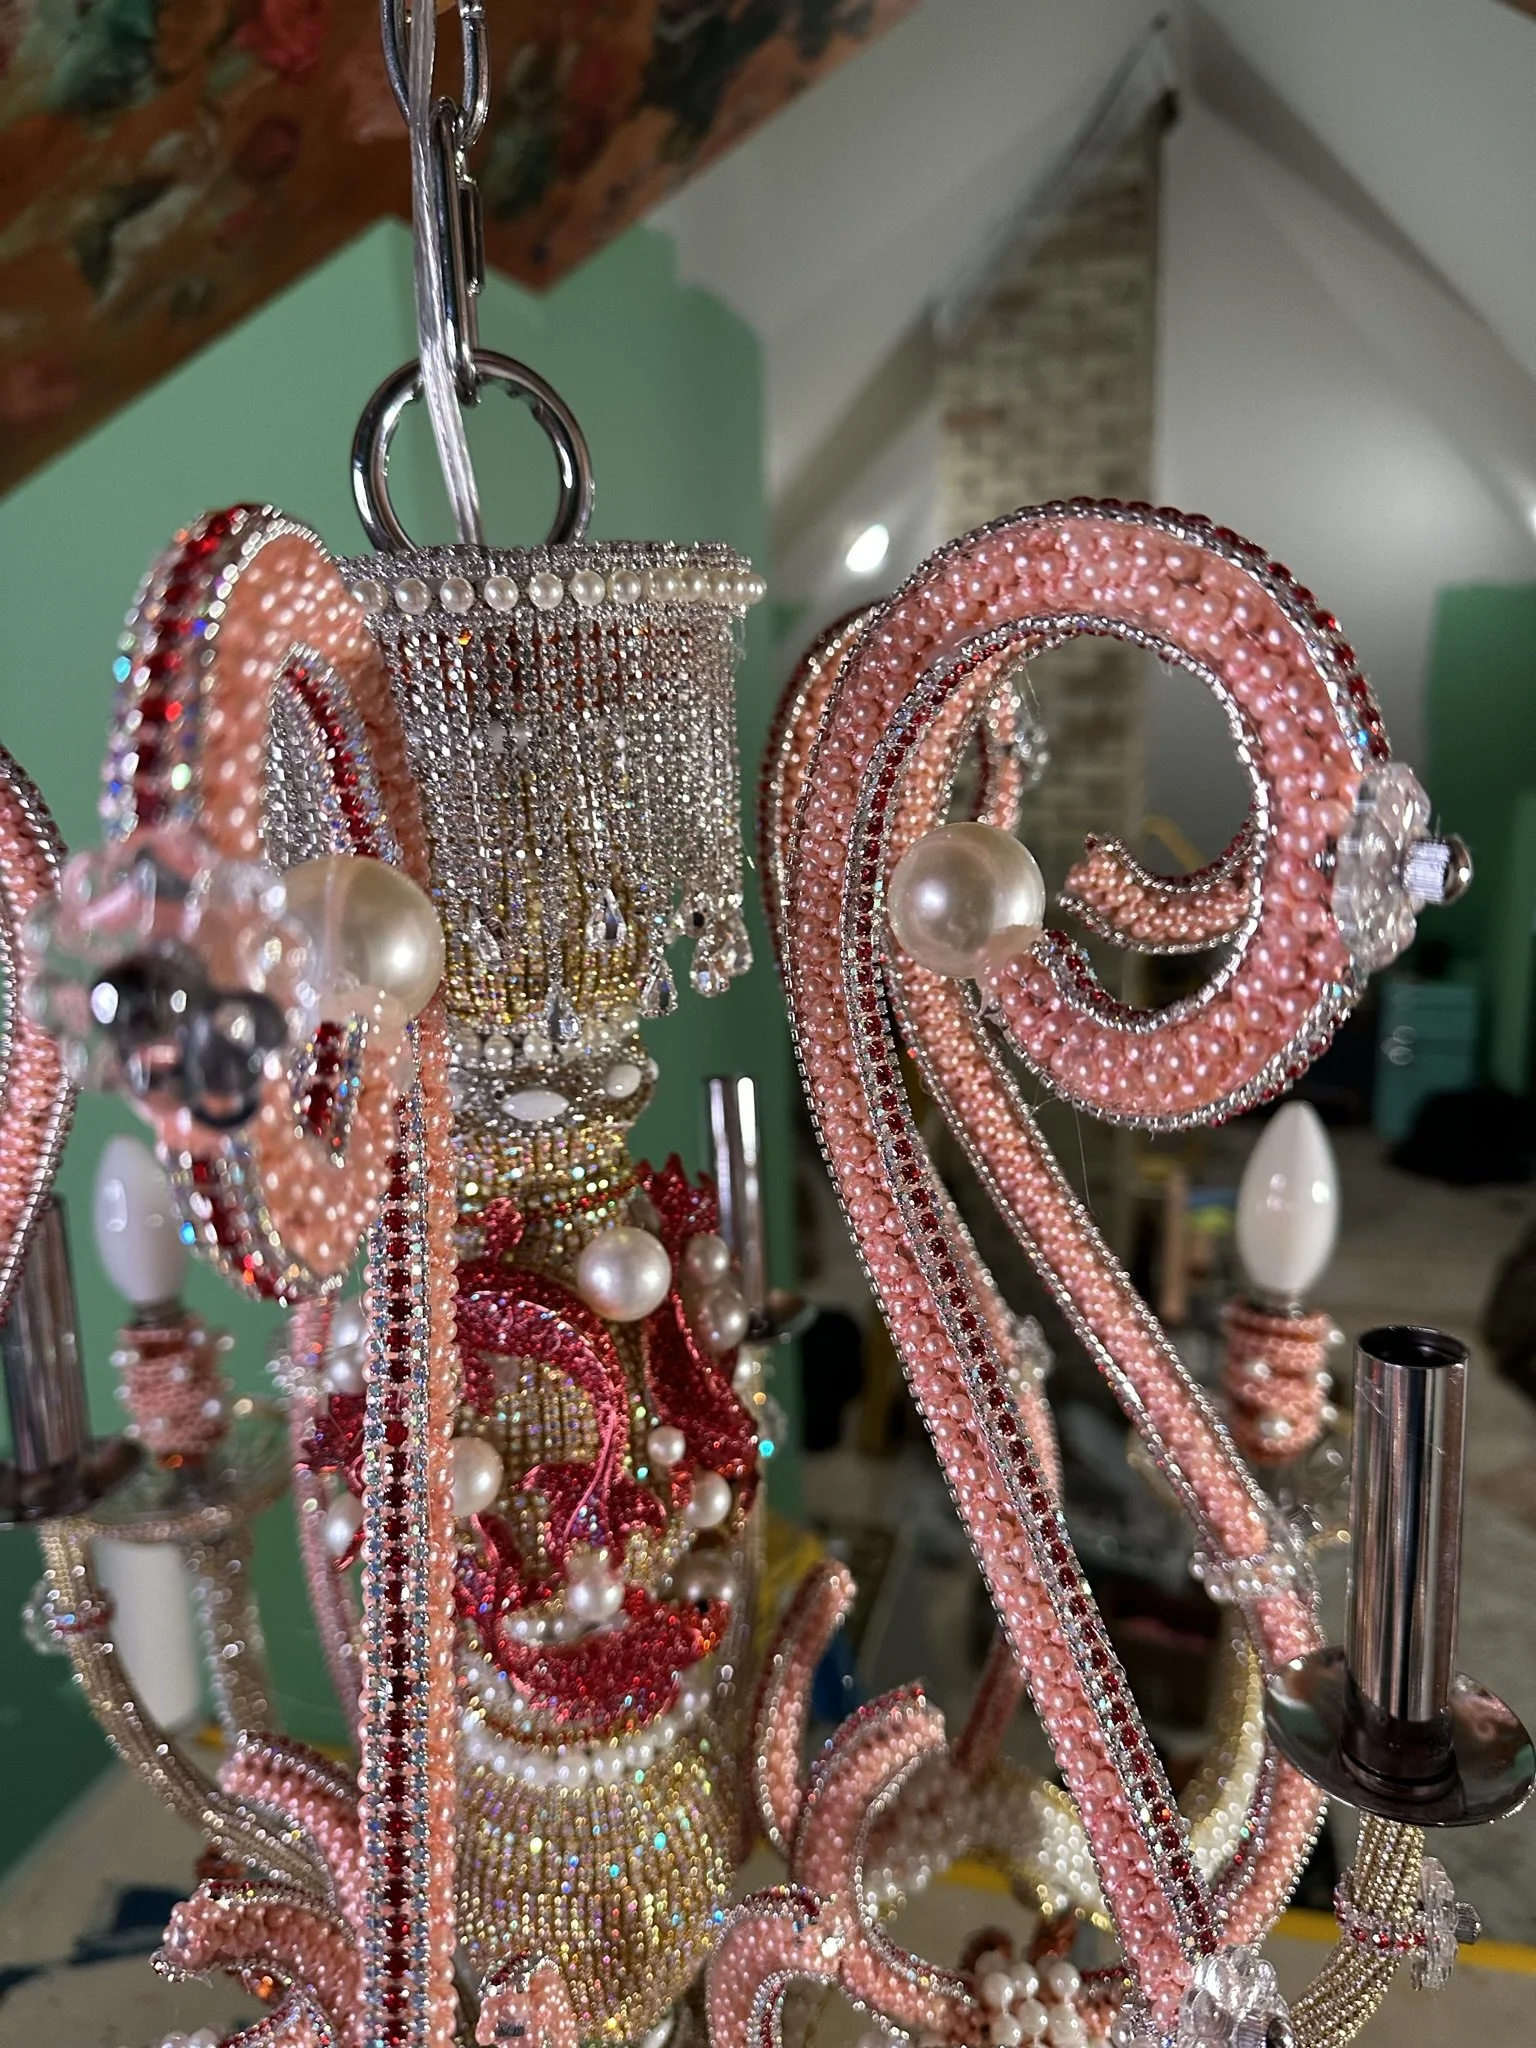
This photo shows my layering process to add more interest to the piece. Arrow 1 points to rhinestone chain with drops, and I can’t remember where I found this online, possibly Planet Rhinestone. Arrow 2 shows layering of fancy gold and rhinestone trim from Hobby Lobby over the aqua iron-on trim, and on top of that is the pearl and rhinestone trim. Arrow 3 points to random pearls I glued over several layers of pearl and rhinestone trim. The pearls can be found here on Amazon.

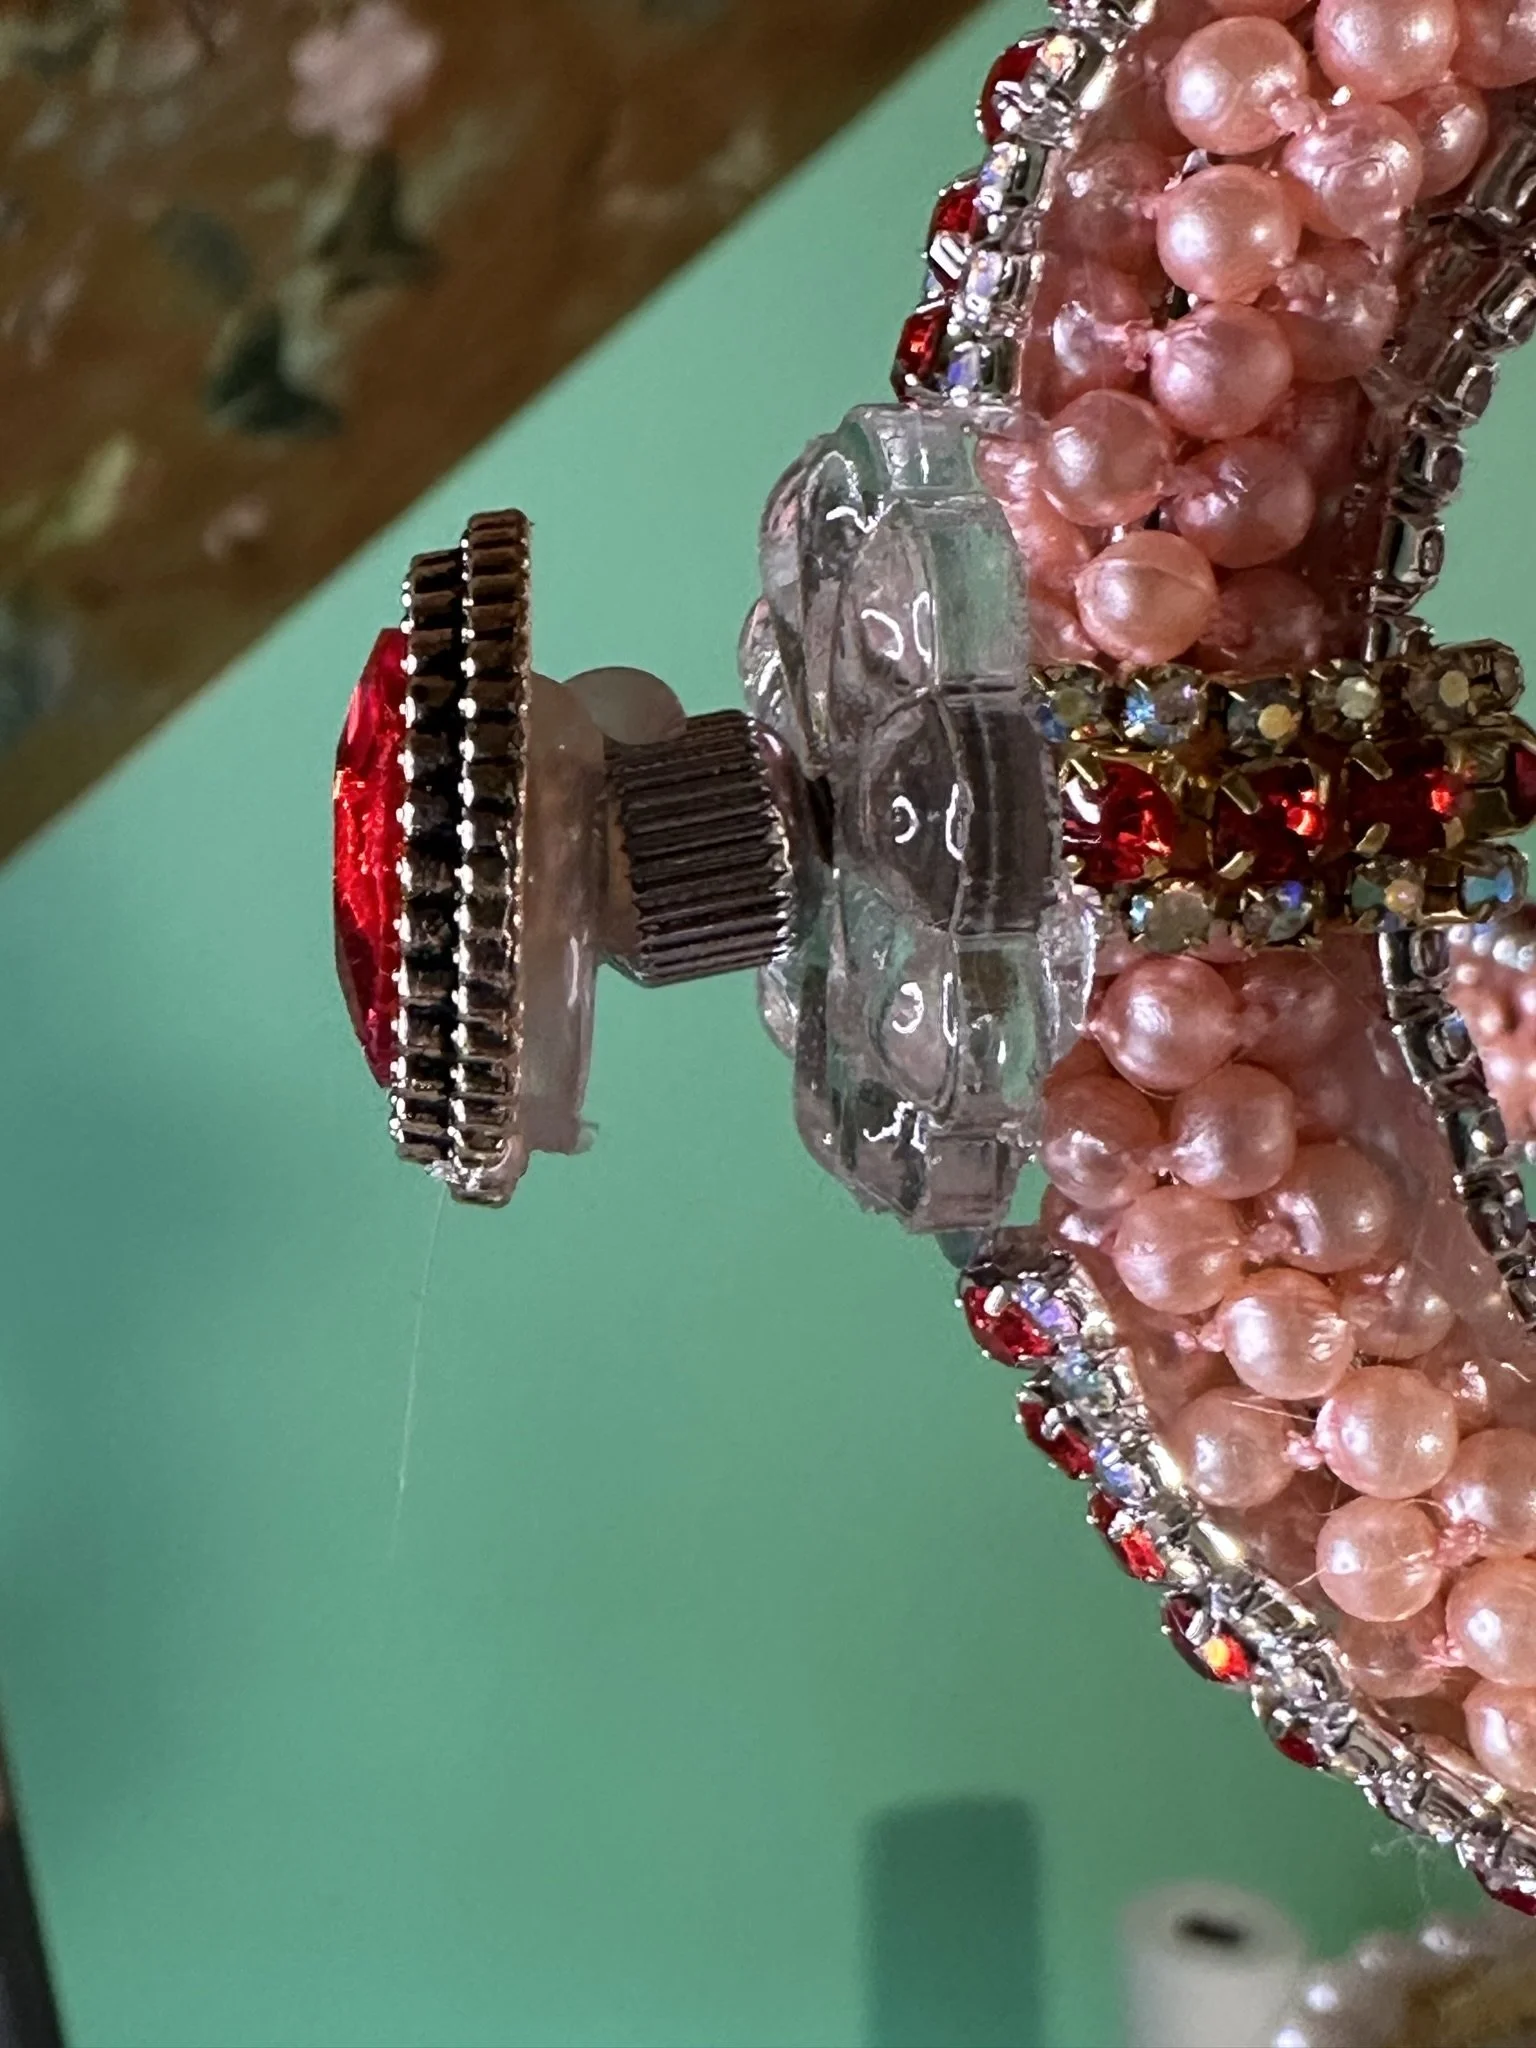
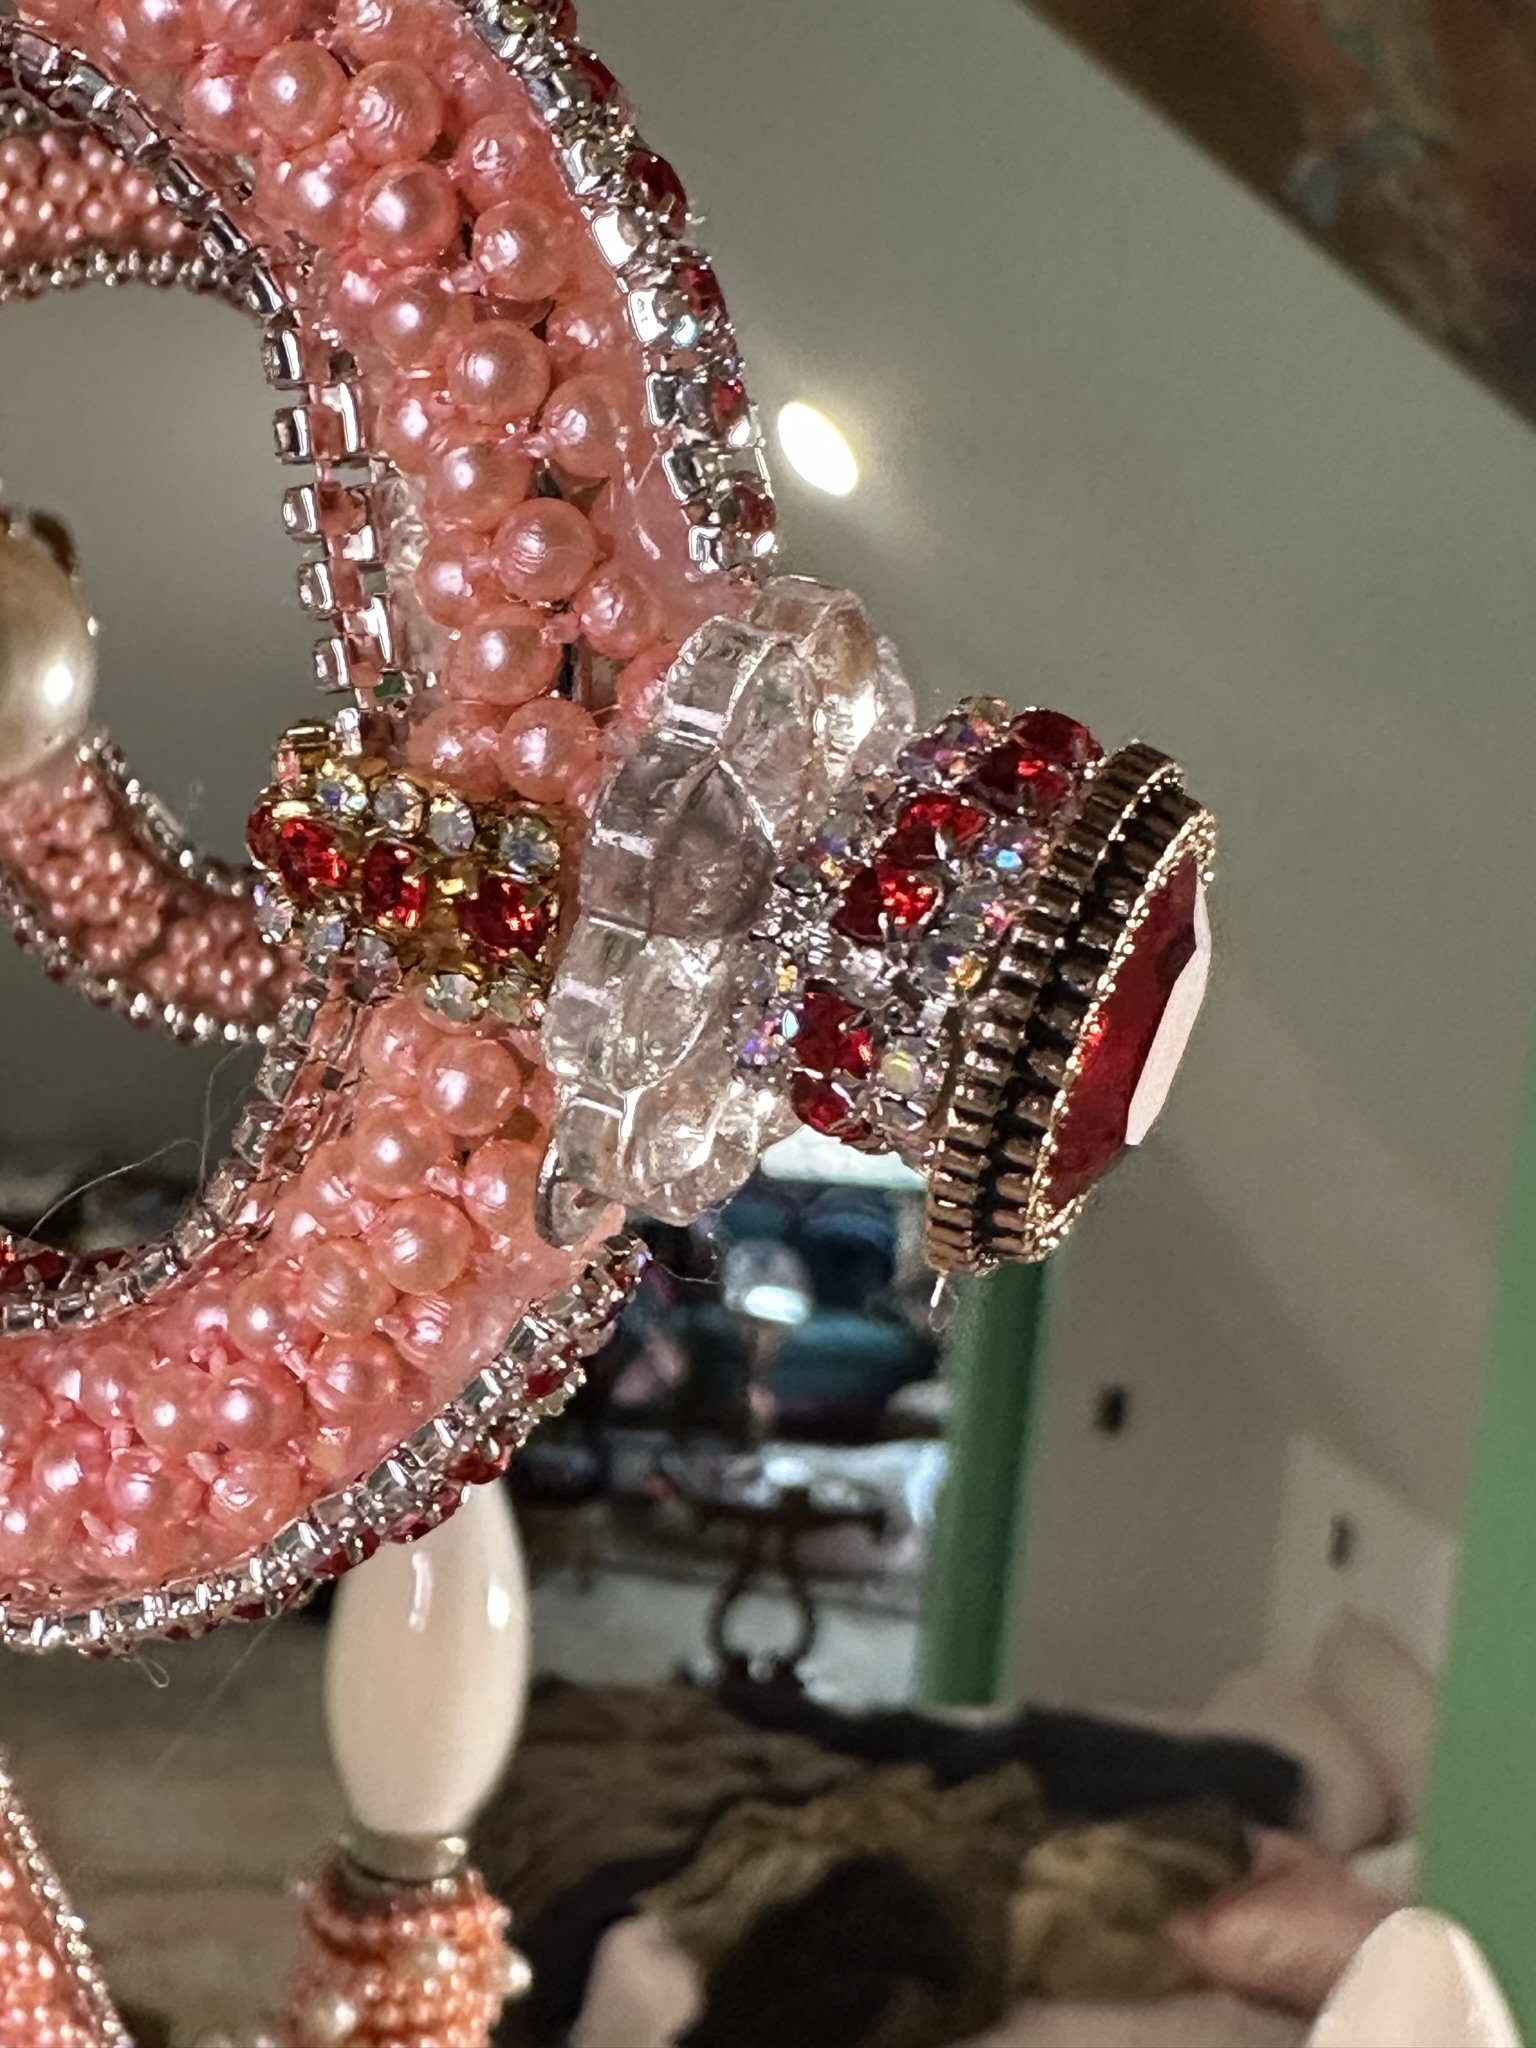
A close up with arrow 1 showing the layering discussed above. It just creates more depth and visual interest. Arrow 2 points to the jewel scatters glued on the ends of the arms. 3 is iron-on trim from Hobby Lobby. 4 is fancy trim from Hobby Lobby over the mesh, and 5 are the rhinestone buttons glue don the ends of the hooks. Arrow 6 points to emerald buttons I found on Amazon and used to cover open gaps. Sometimes these aren’t available in this color but can be found in other colors as discussed below. For all buttons, you’ll want to cut the metal loops on the back off with wire cutters so they sit squarely on the fixture.

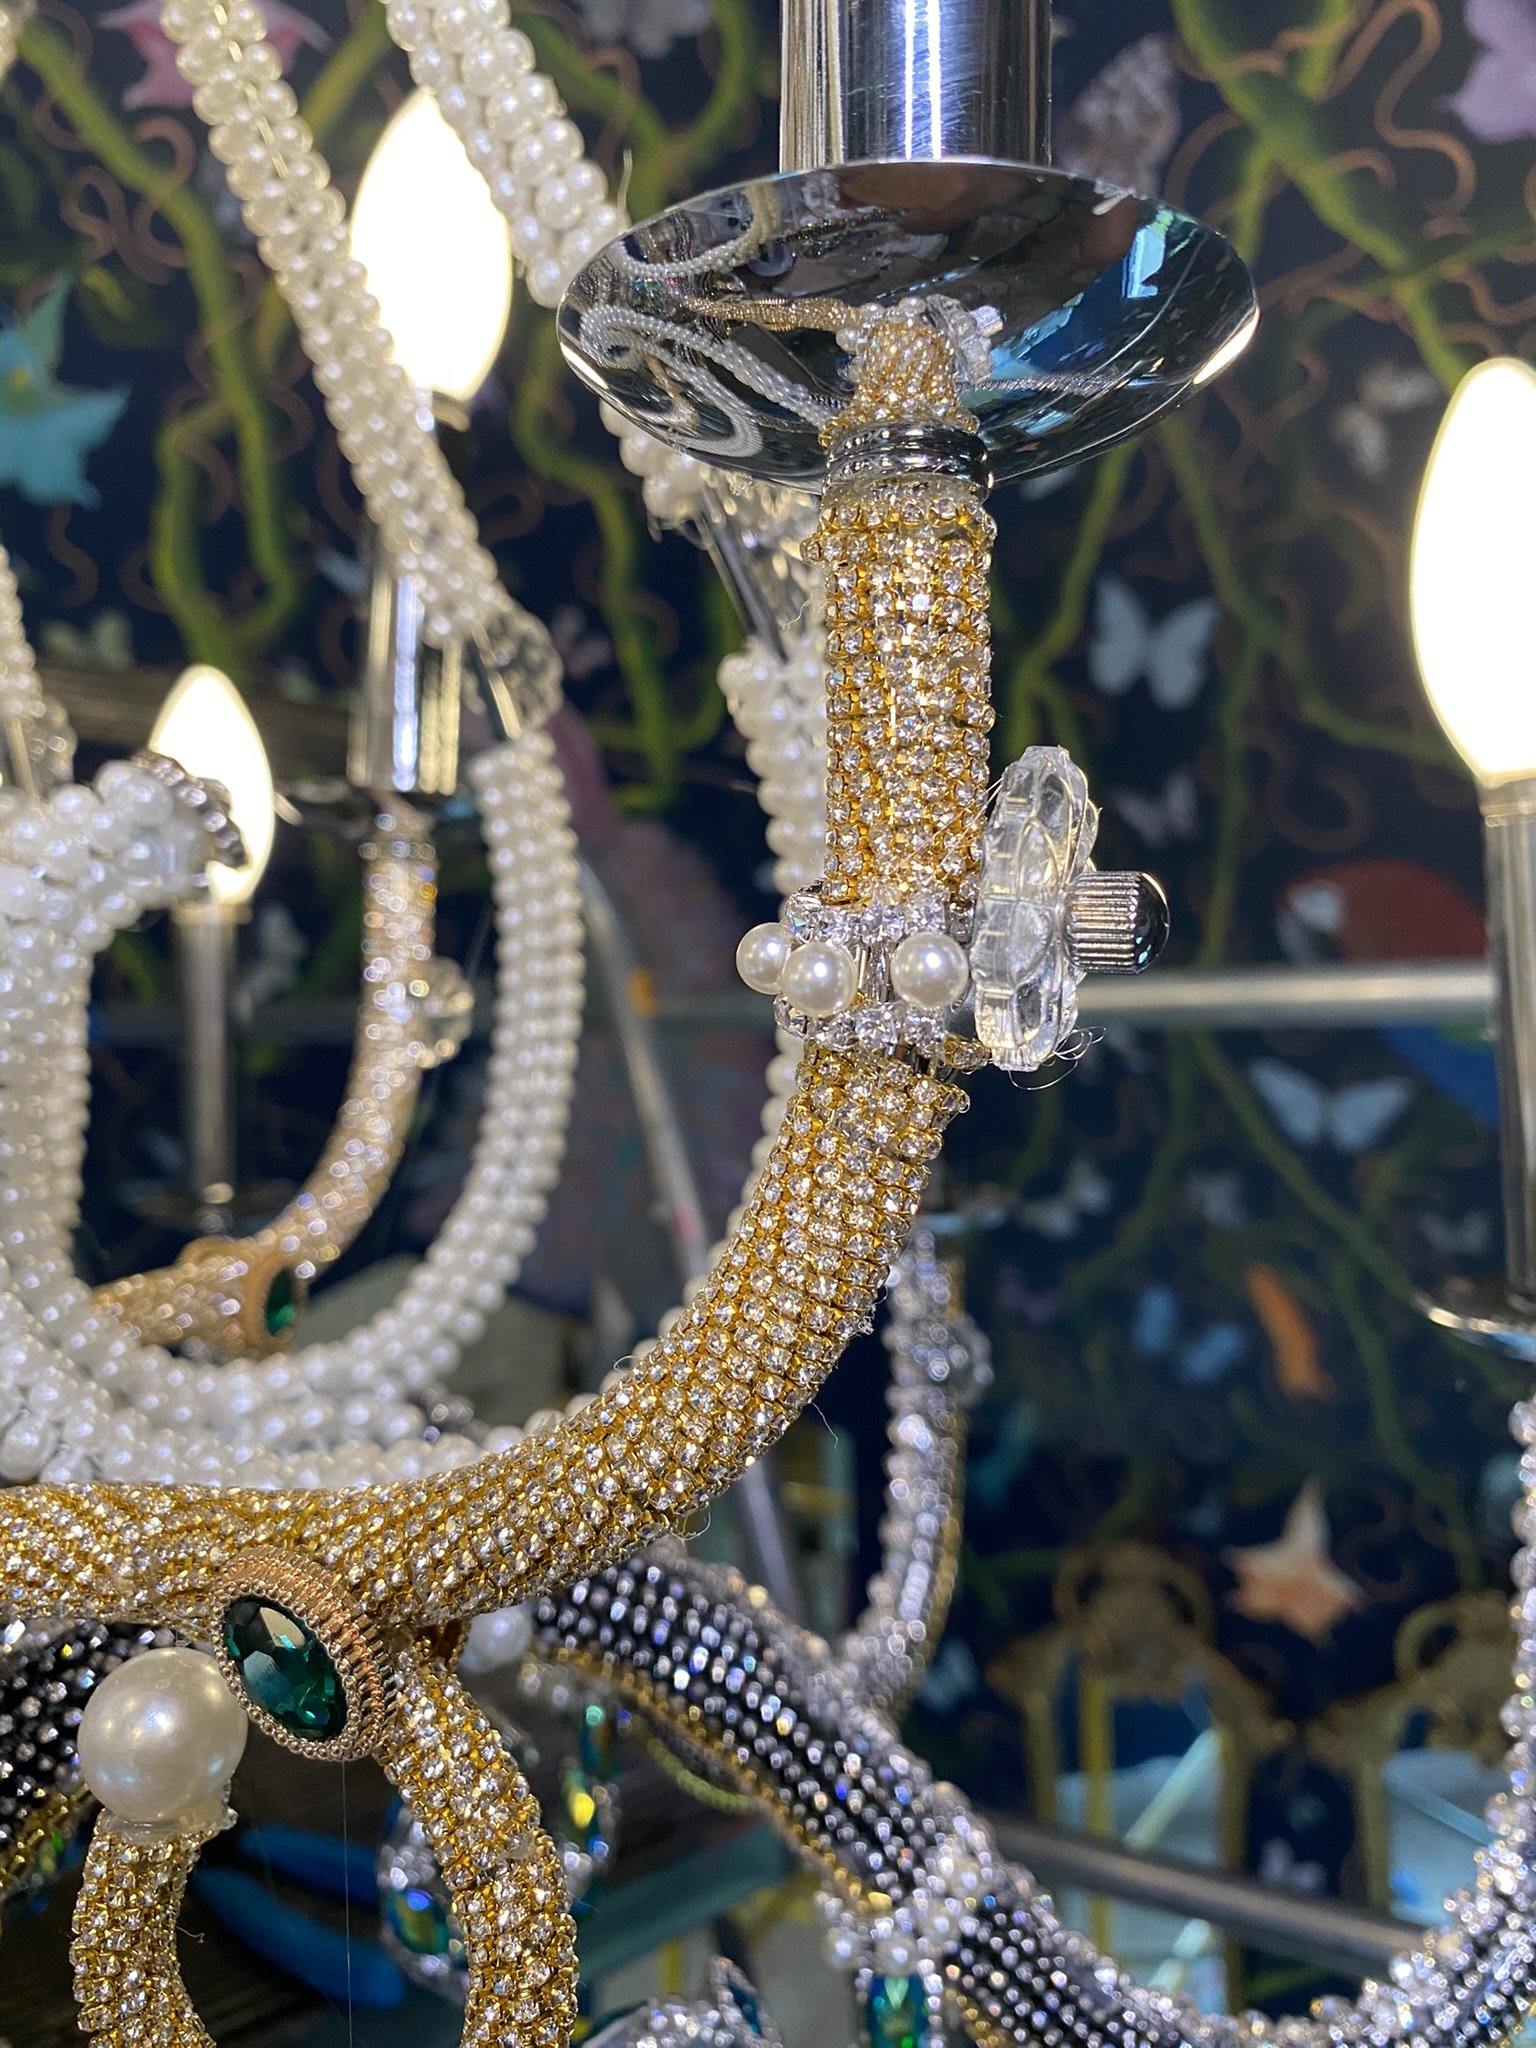
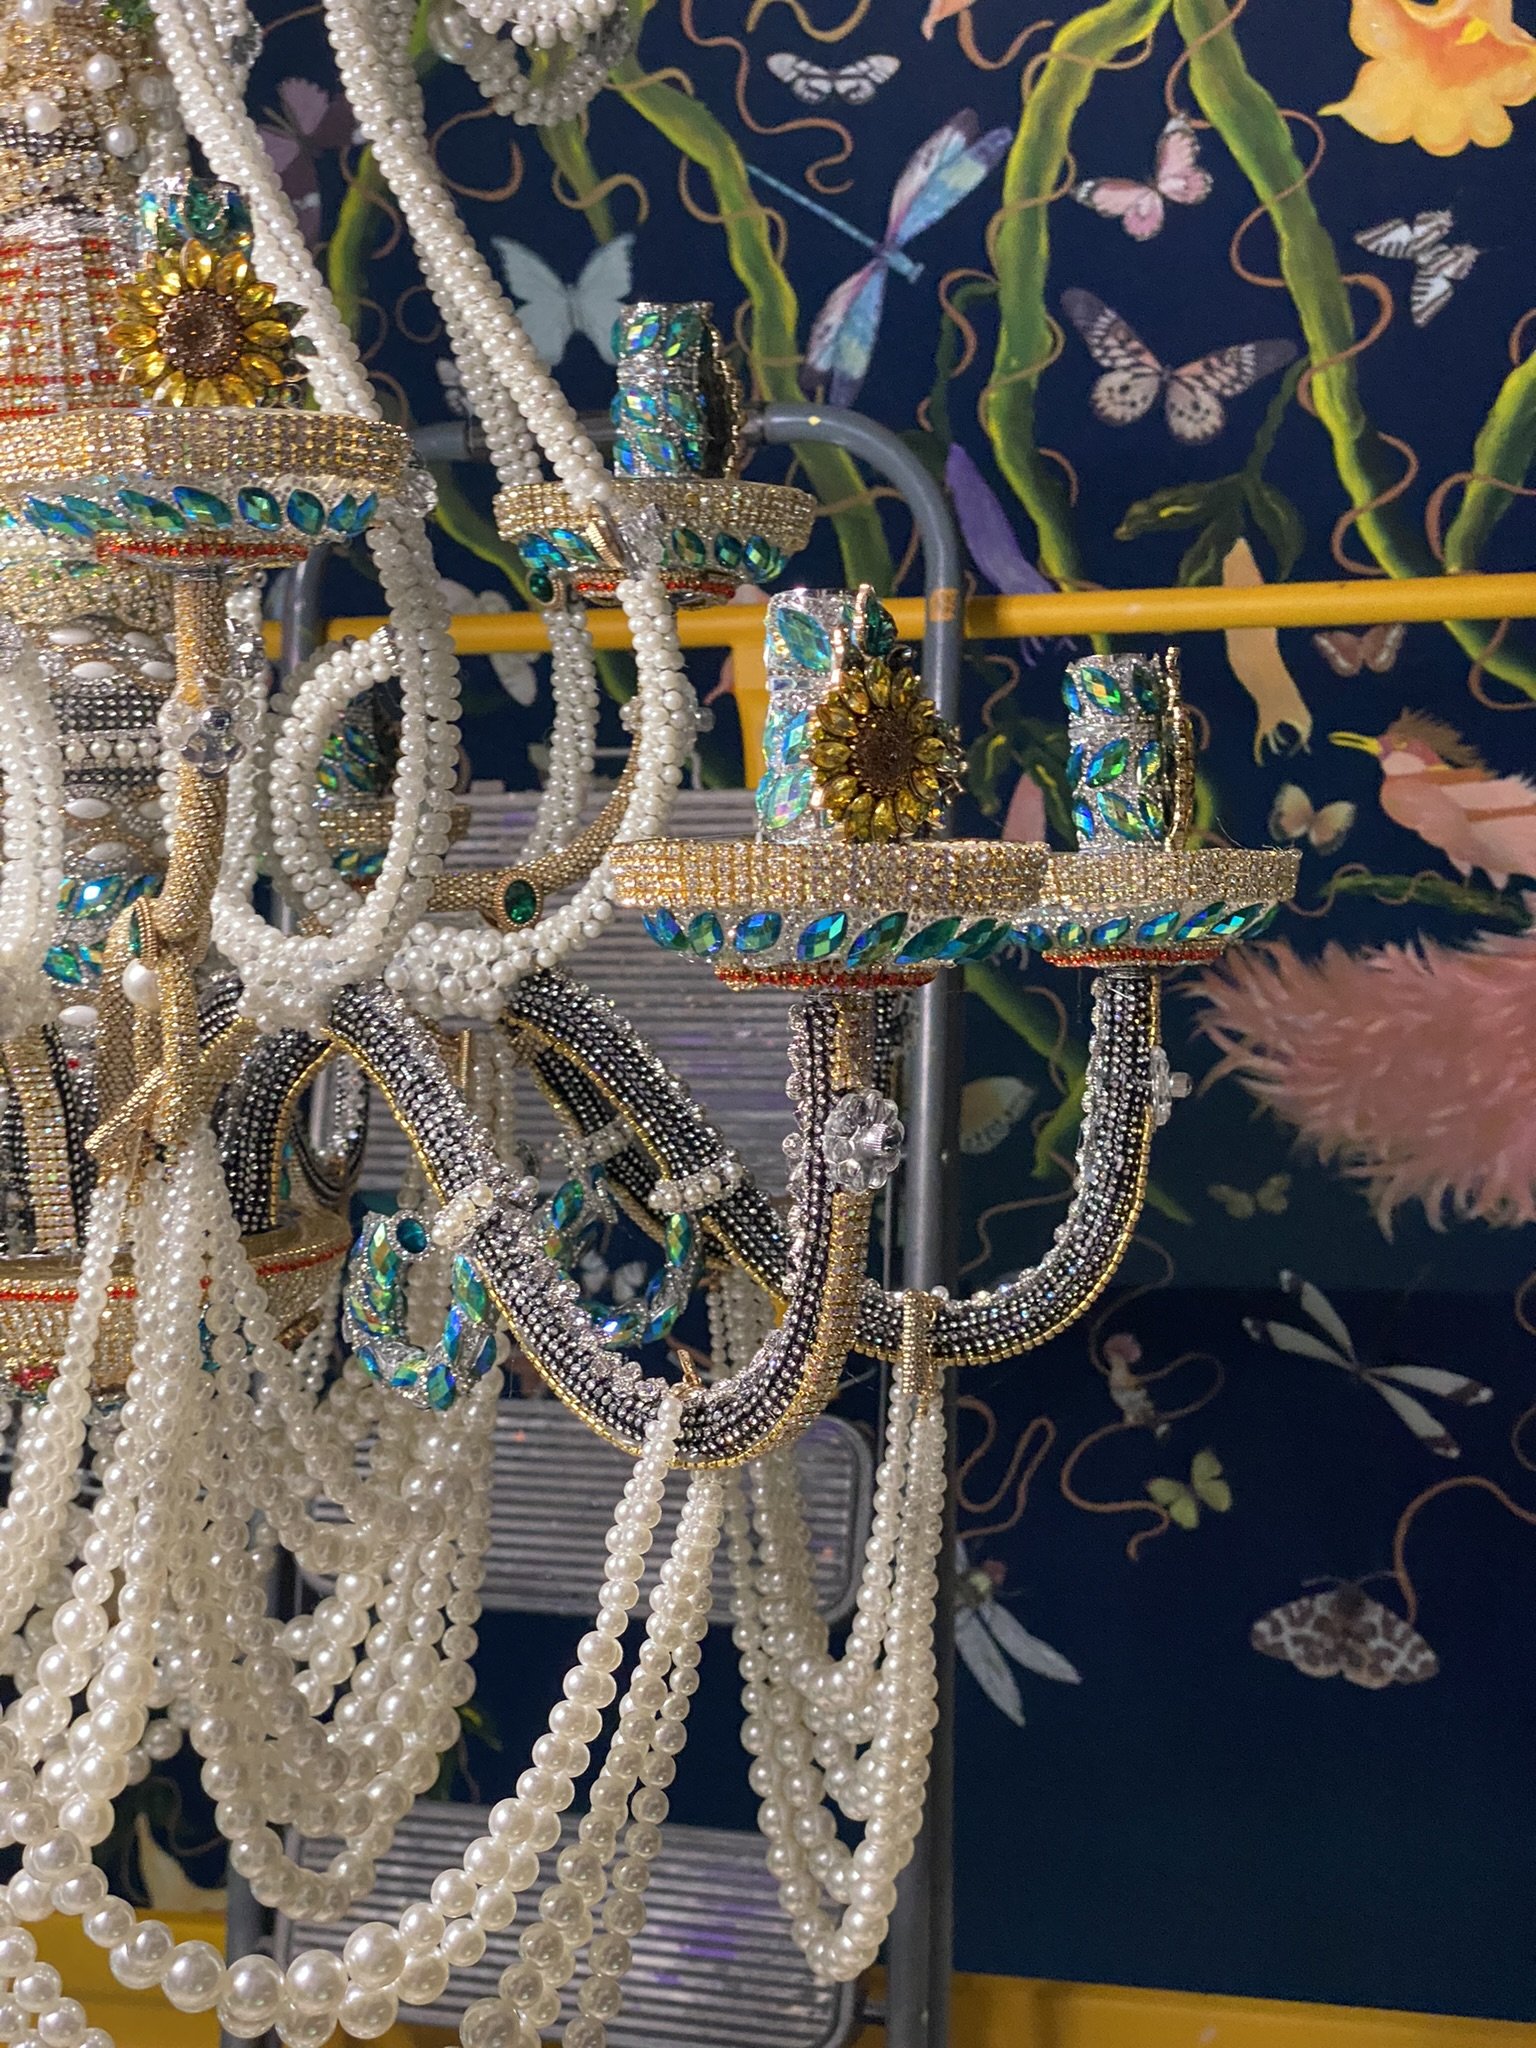
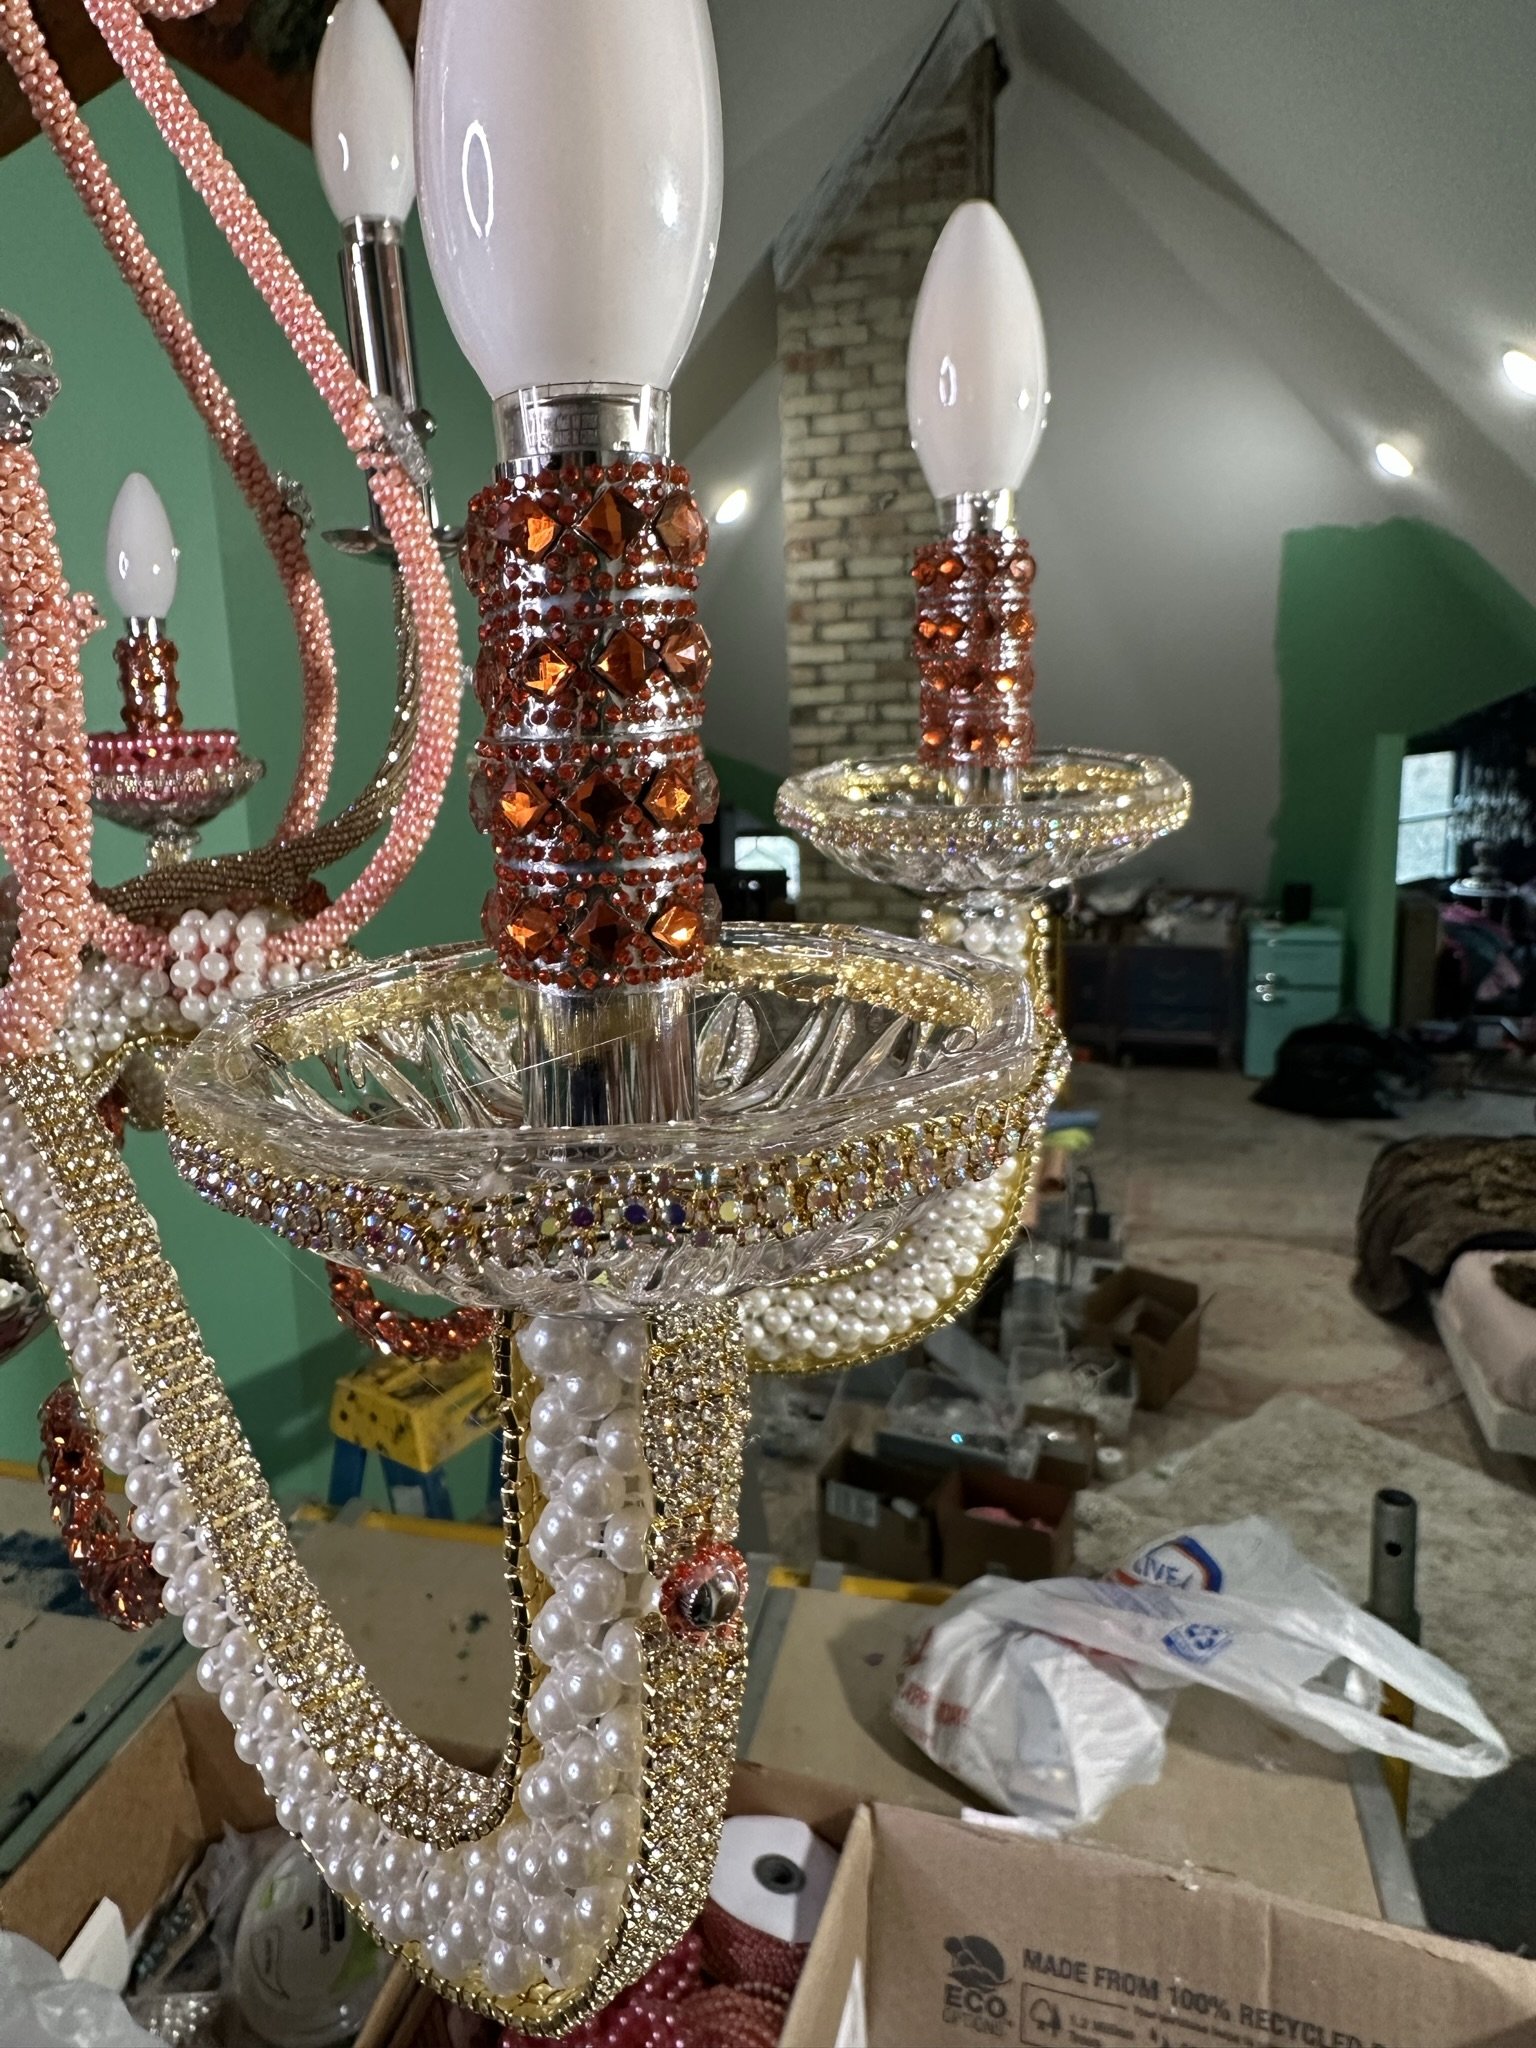
On this photo, arrow 1 points to the bobeches which I covered in four-row rhinestone trim which I bought here. The next layer down is the aqua iron-on trim and below that is the three-row colored trim which can be found here. Arrow 3 points to the insulators, which I’ve covered with the aqua iron-on trim.

The sunflowers, which I glued over the aqua trim on the insulators, are brooches from Hobby Lobby’s jewelry section. I cut the backs off with wire cutters (because these and the buttons are mostly pot tin, they cut easily). I’ve also draped pearl multi-strand necklaces on the arms which I purchased here from Amazon. These are fairly inexpensive given they come in a set with bracelets and earrings which could be repurposed elsewhere on the fixture (I used all of it on the floor lamp described above and used the bracelets on the chandelier described below). The giant pearls glued to the ends of the top scrolls are from Amazon.

As you can see, the necklaces aren’t affixed and are merely draped over the arms.
Another view.

A close up of the bottom bowl, which I covered with three-row colored trim and four-row clear trim. Over that, I glued rhinestone buttons. You also can see the crystals attached to this (I used jewelry wire to attach these to the hook on the bottom finial on the bowl).
This shows how I attached strands of crystals to the hooks using jewelry wire.

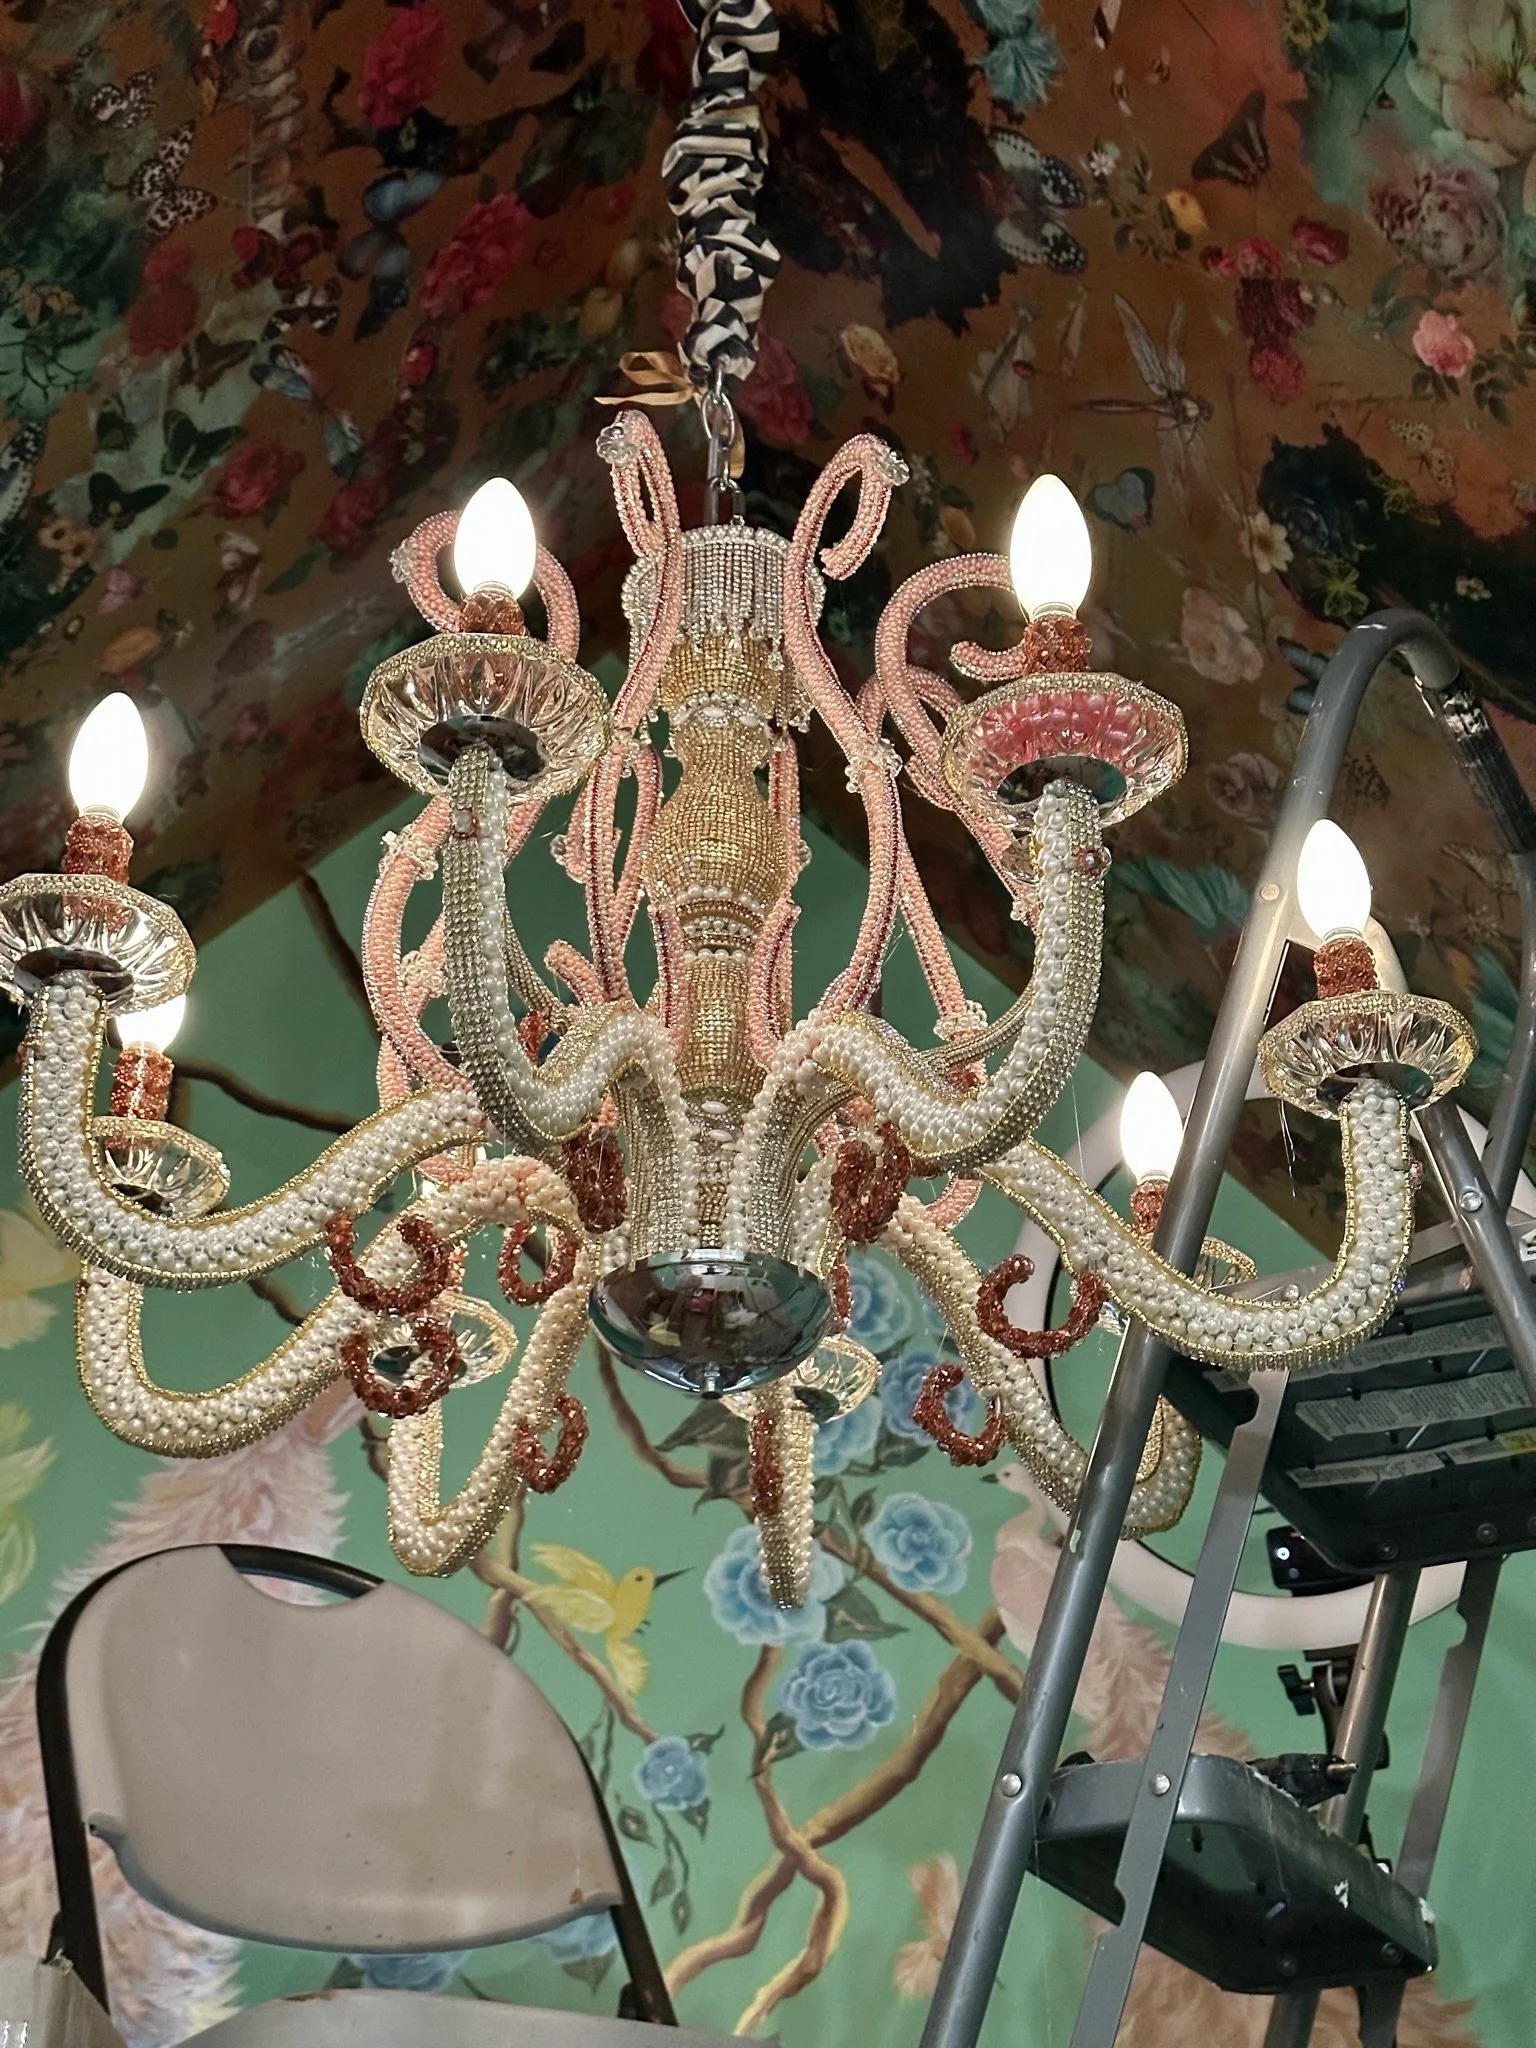
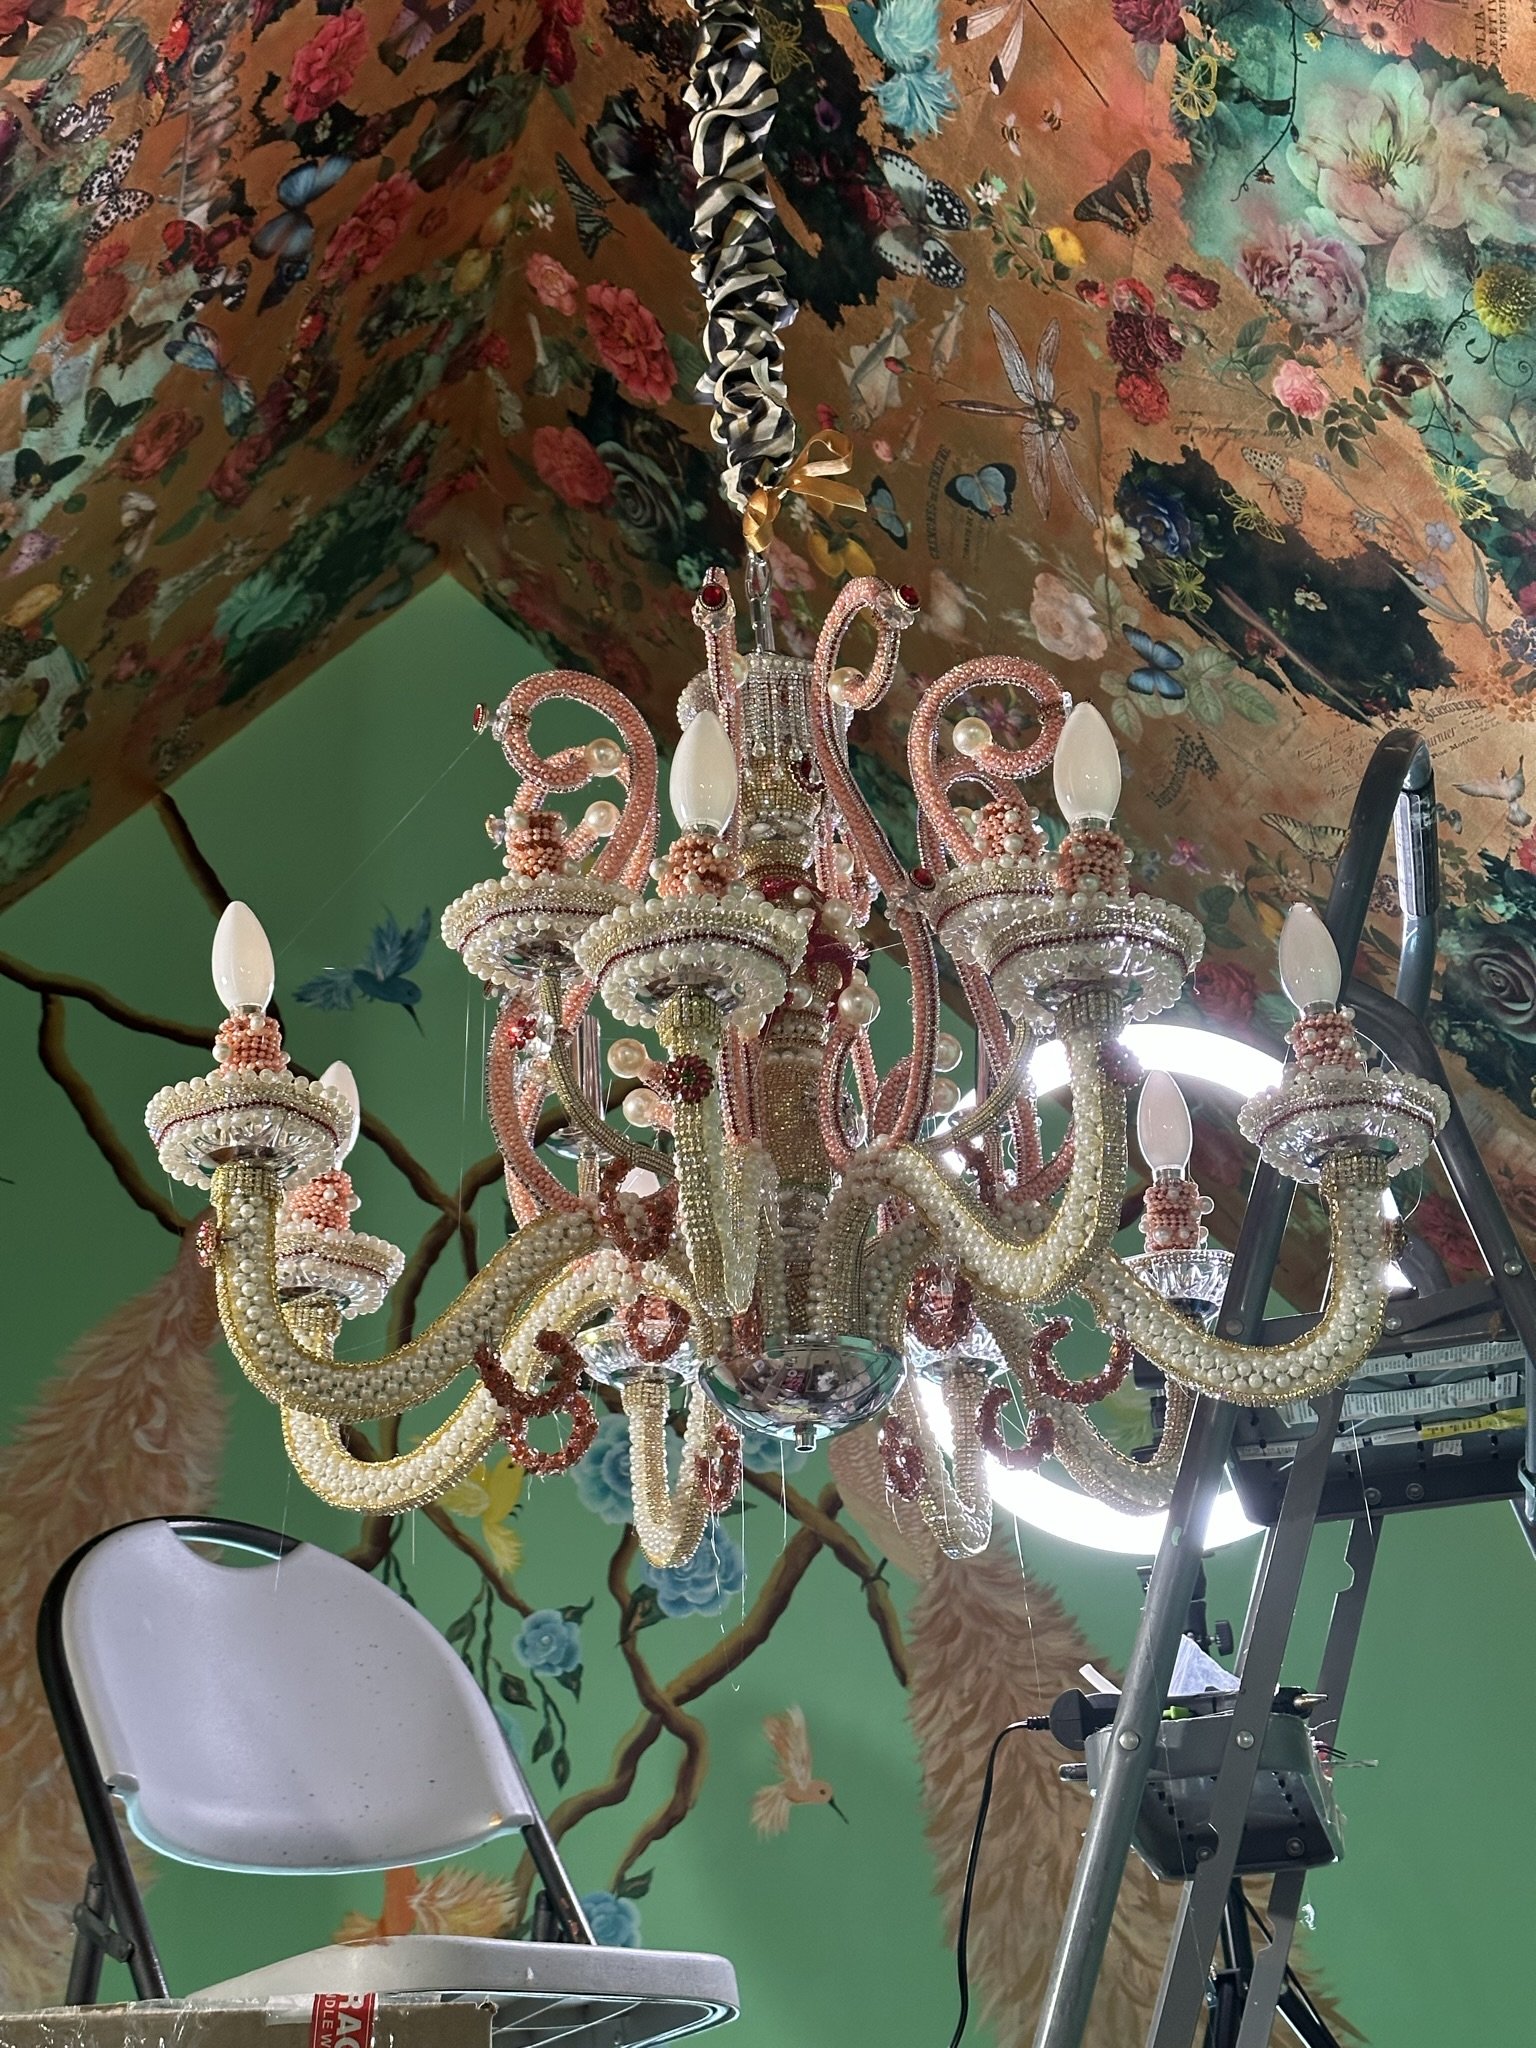
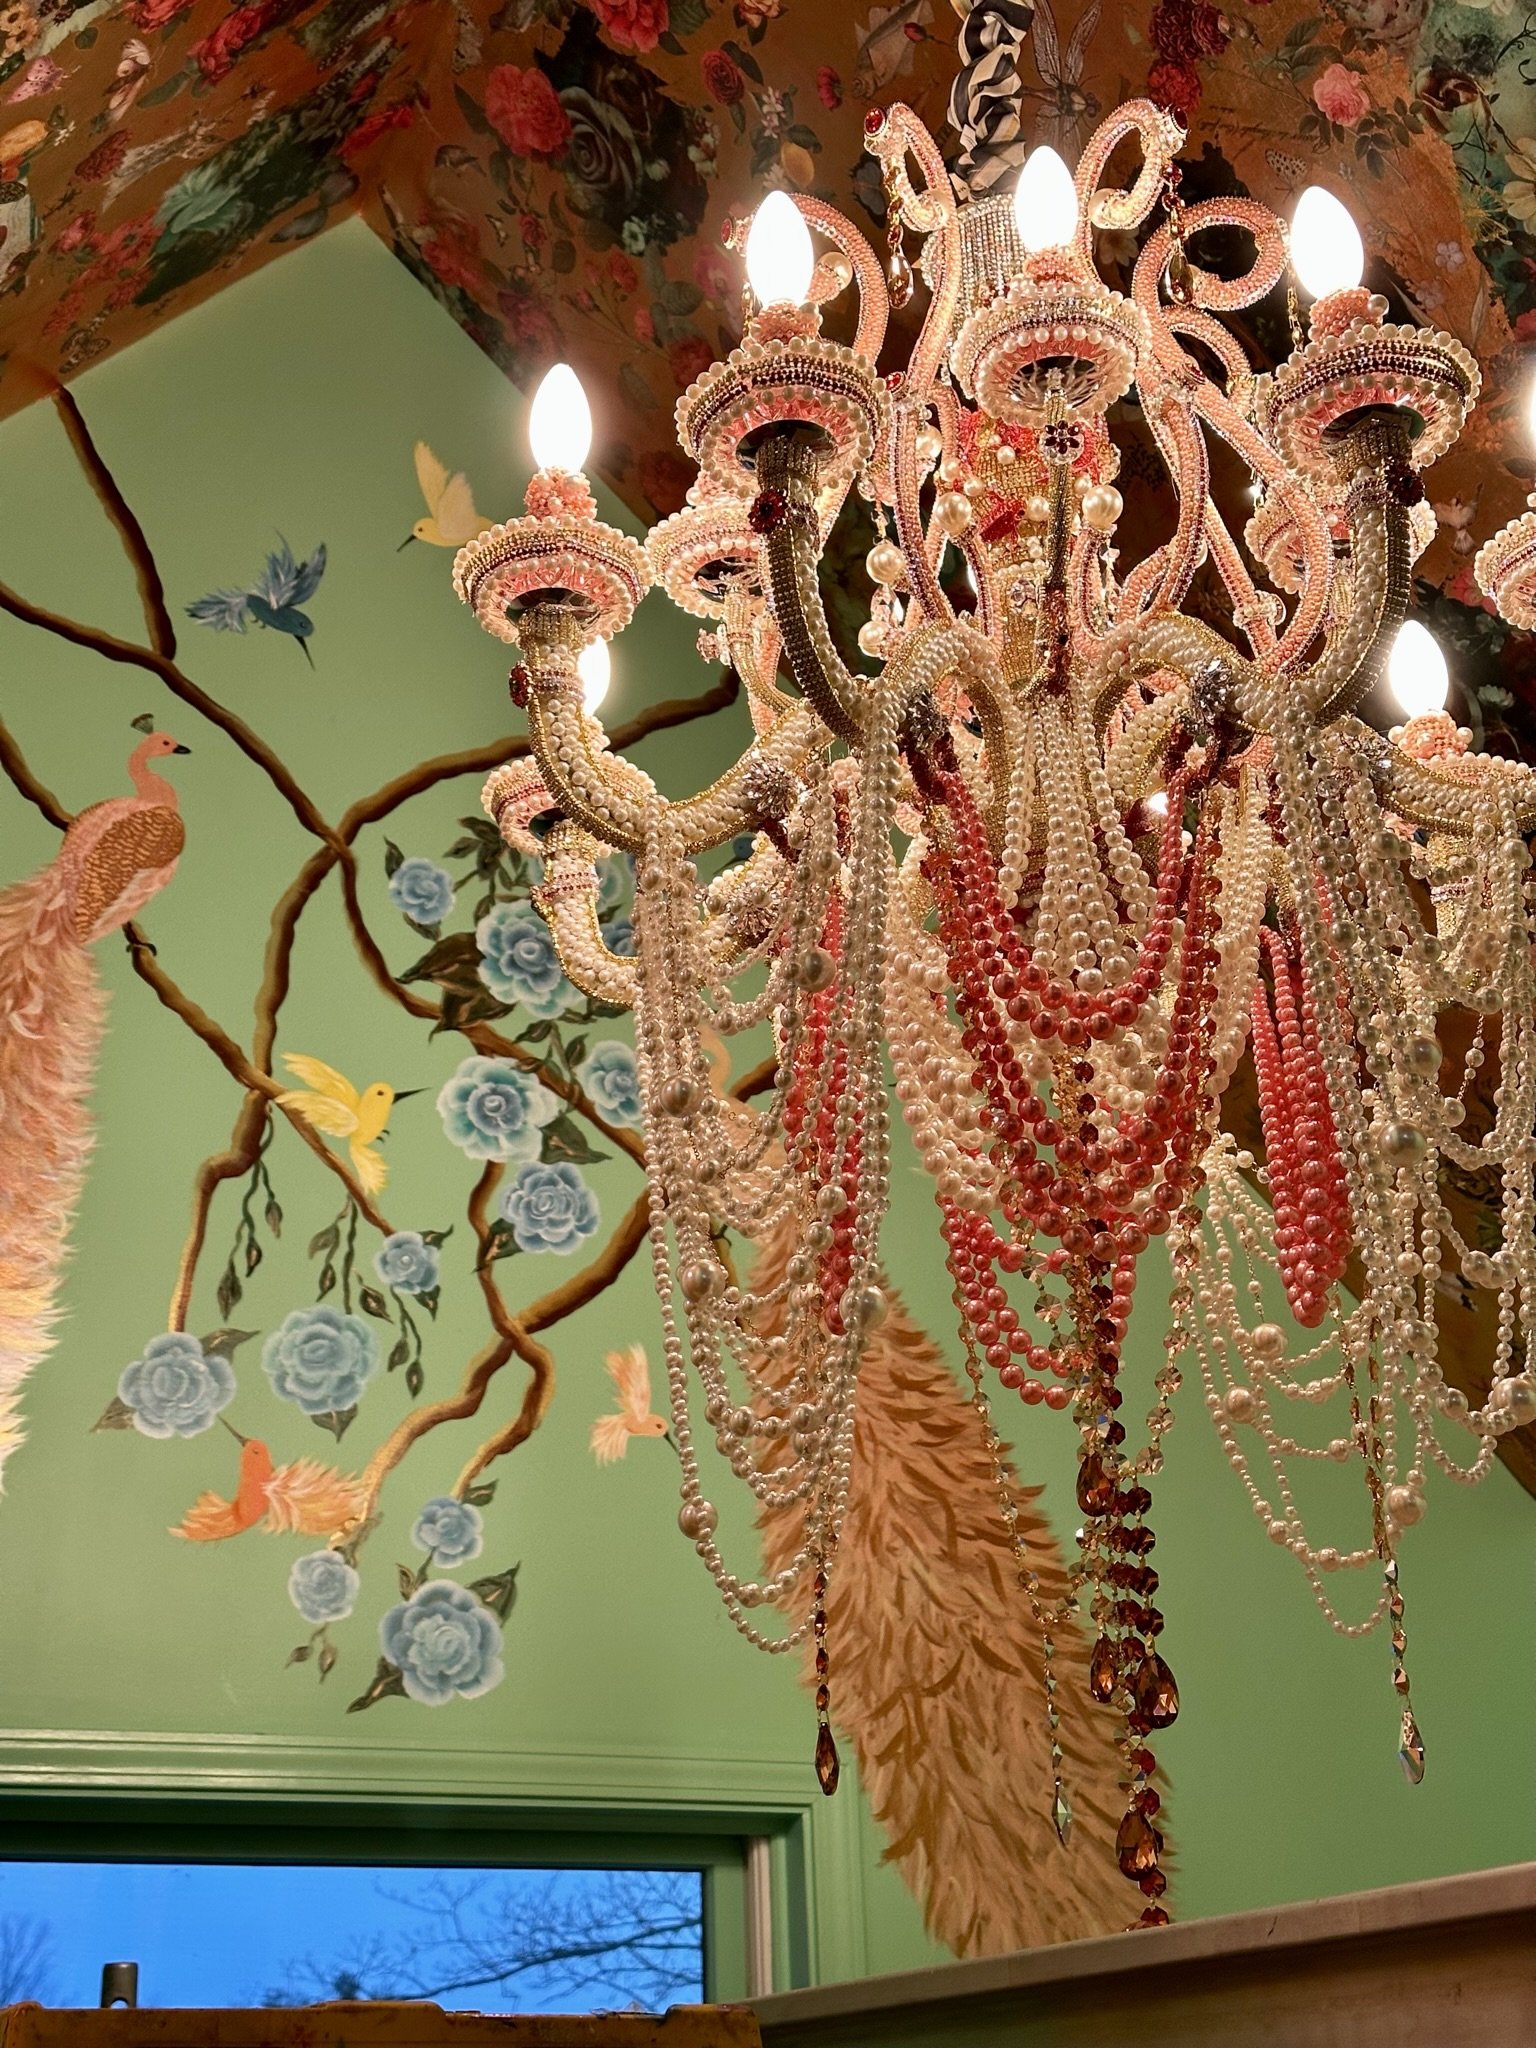
The first chandelier is complete.


The Attic bathroom chandelier
My inspiration for the attic bathroom chandelier was this colored version from Erickson Beamon.

Here’s my process, in pictures.

All the crystals are removed. This also shows how I used a step stool to hook the chandelier and keep it in place while I worked.

I wrapped the colums with iridescent (AB) four-row trim from Amazon, which I bought here. I also glued on strands of pearl trim from Hobby Lobby, and the same pearl and rhinestone trim I used on the other chandelier. Below that is leftover iron-on trim from Hobby Lobby. You can also see a strand of green rhinestone trim, as I originally was going to do this fixture in greens before I changed gears.
This photo shows the column wrapped.

For the crown, I layered on orange iron-on trim from Etsy, and over that rhinestone drop chain which I found on Amazon here. I also layered on more of the pearl and rhinestone trim.
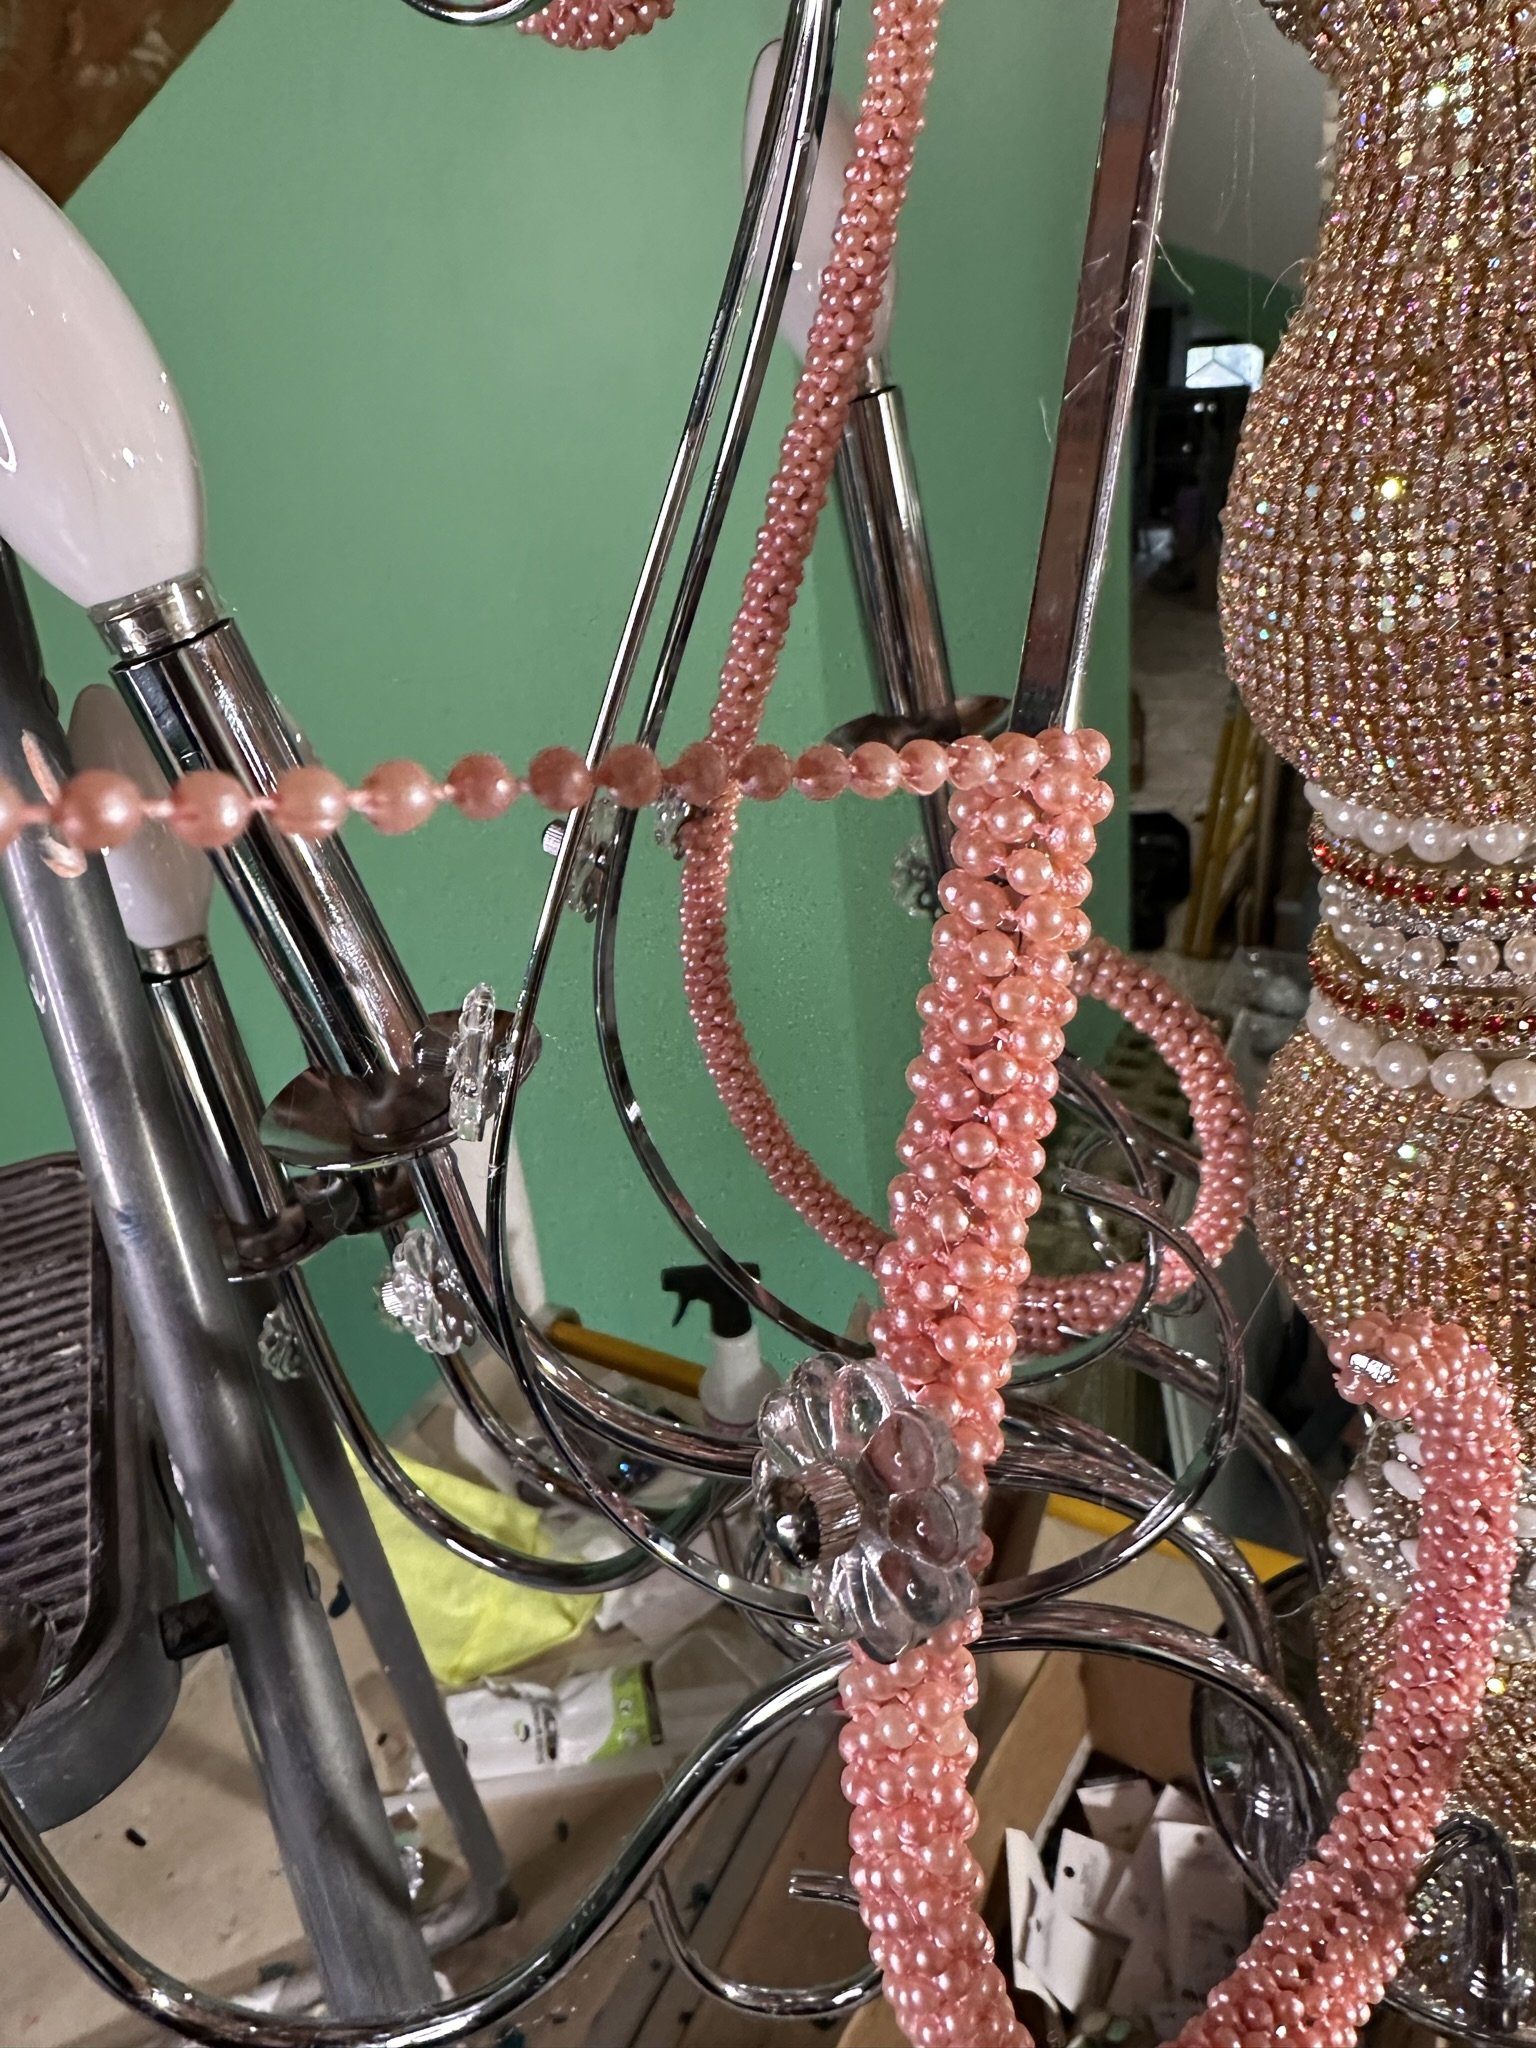
Here I’m wrapping the scrolls with peachy pink pearl strands from Amazon.

The lower arms I wrapped with gold rhinestone cup chain which I bought here from Amazon.
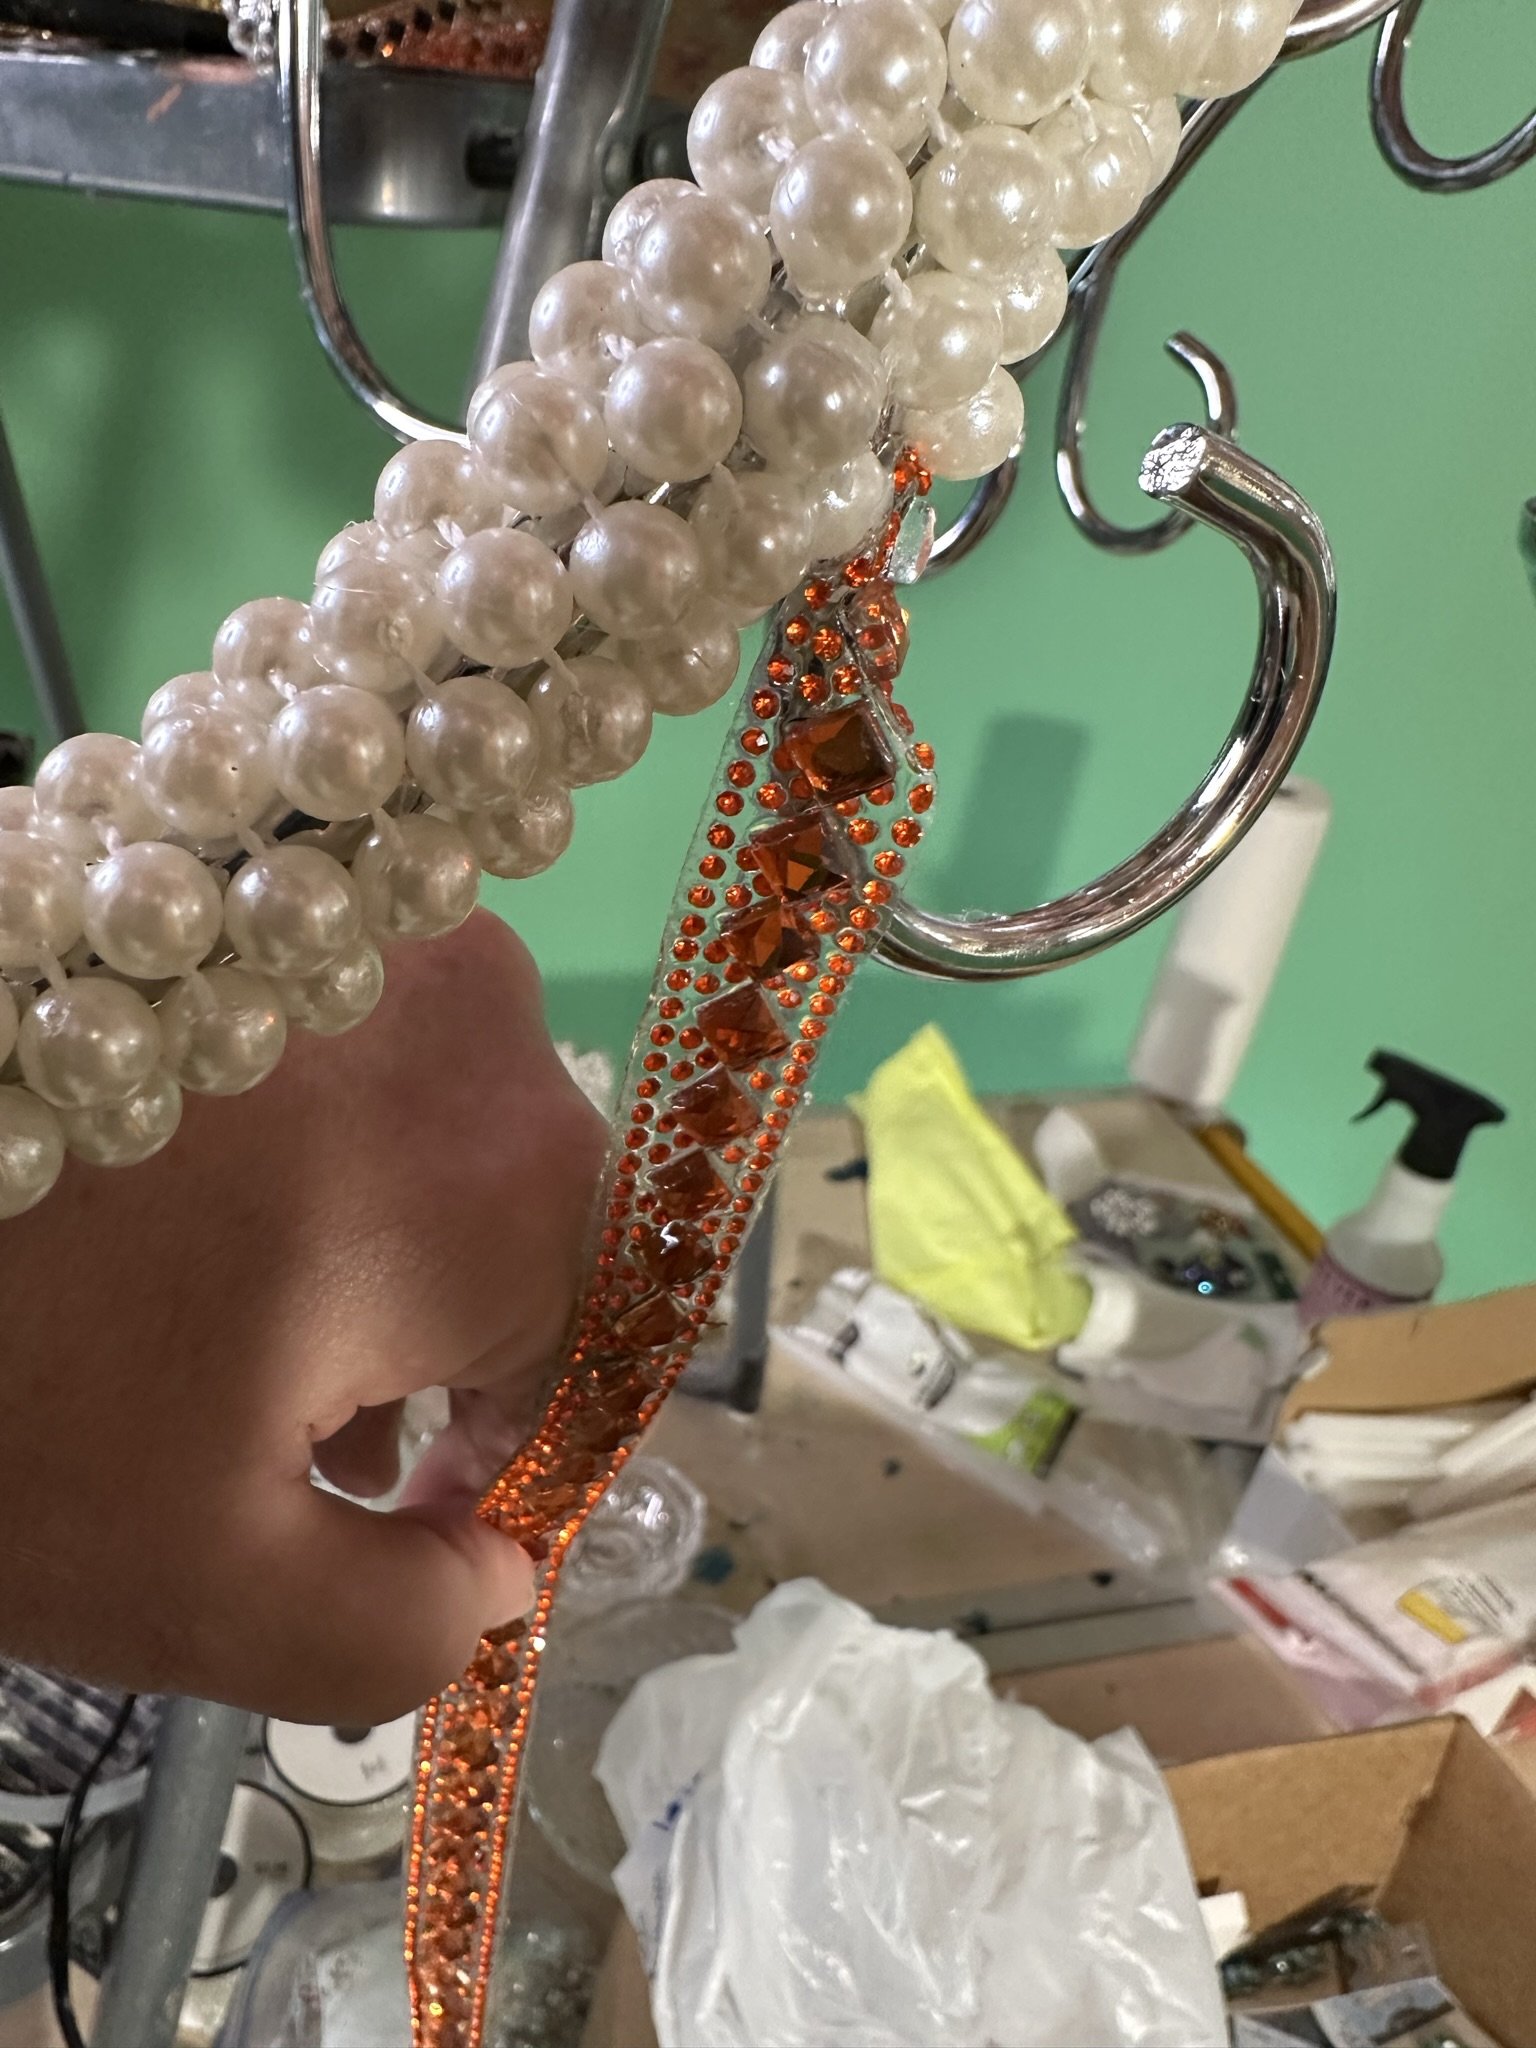
Here, I’m wrapping the hooks with orange iron-on trim (which I’ve cut down the middle) from Etsy.

The lower arms I’m wrapping with large pearl strands from the bridal section at Hobby Lobby.

Here, I’m layering four-row rhinestone trim over the pearl strands on the arms.
I then wrapped the insulators with the orange iron-on trim.

Next, I trimmed the bobeches with three-row AB chain from Amazon.

After wrapping the scrolls, I layered on three-row colored trim (again, all of this is hot glued).

For contrast, I layered the colored rhinestone trim over the pink pearl strands both on top and underneath the scrolls. More bling is better.

All gaps/open areas are wrapped, here, with pearl trim.
Gaps are inevitable, but remedied by …
… more layers of colored rhinestone trim.
By the time I reached this point, I still was deciding how I wanted to finish the insulators. I’d bought red rhinestone fish brooches here on Amazon for the insulators, but after wrapping the insulators with the orange trim, felt there wouldn’t be enough contrast.

So I decided to layer more of the pink pearl trim over the insulators.
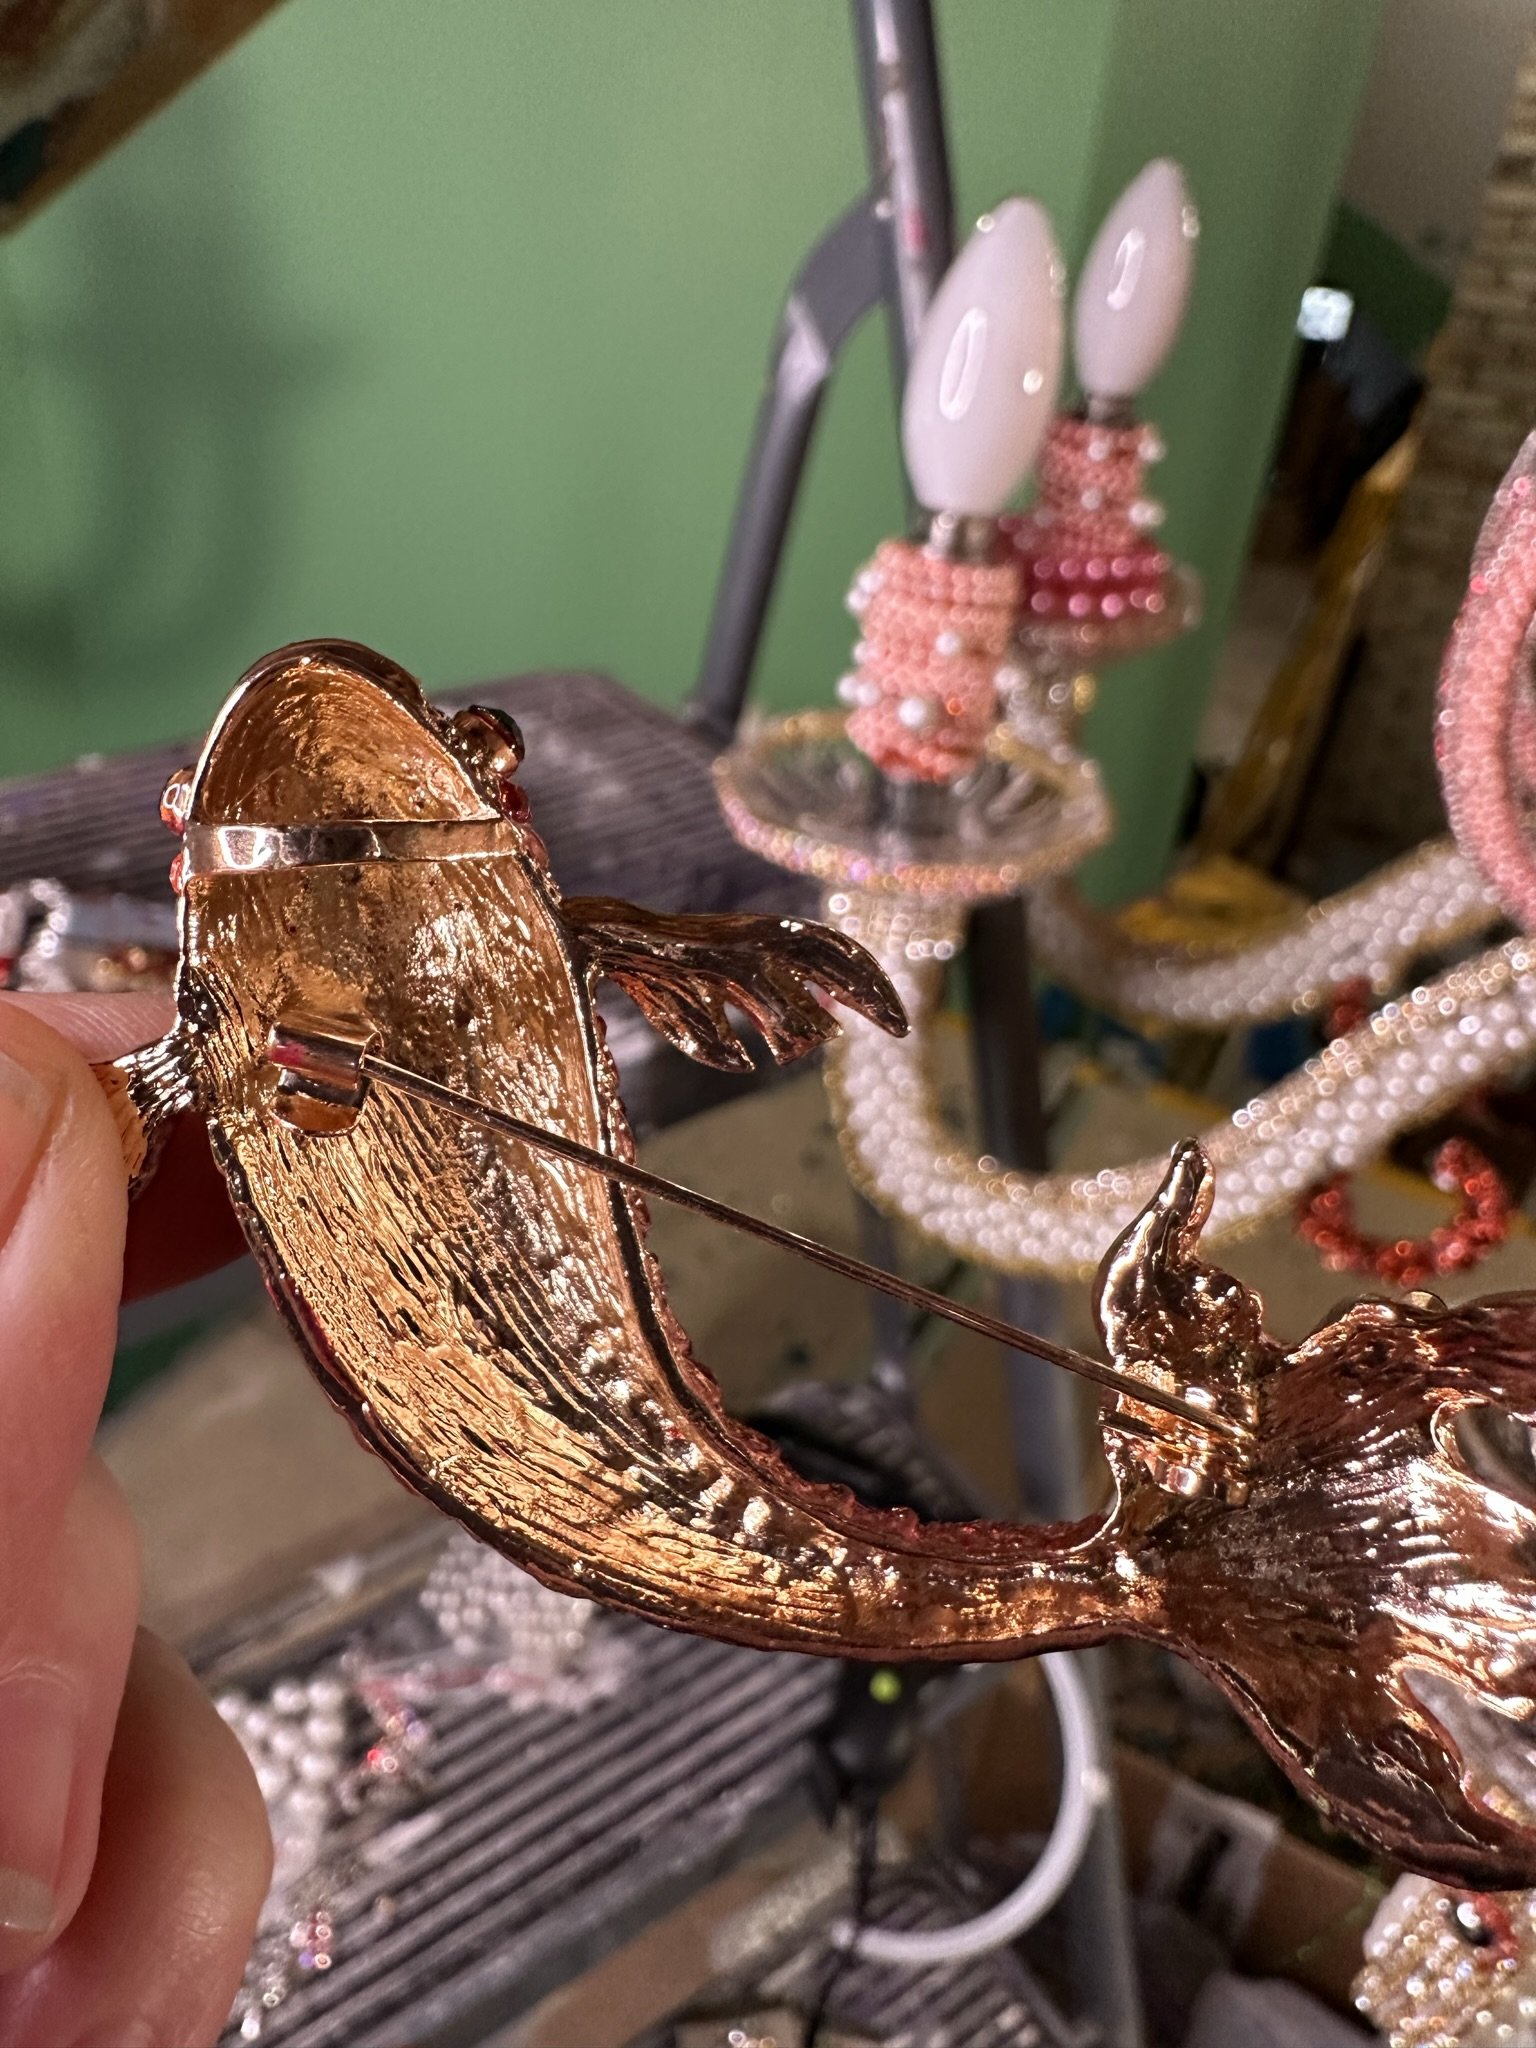
I then cut these backs off the fish brooches and . . .

. . . glued them over the trim on the columns, interspersed with pearls from Amazon which I also attached with hot glue.

I wanted the orange to show through the pearl strands, and thus wrapped the strand randomly. I glued down the first and last row.

I then randomly glued on loose pearls from Amazon in different sizes. Be sure to put the bobeche over the candle before doing work on the insulator/candle, because after you embellish it, the bobeche won’t fit. Here, I’ve also glued trim on the bobeche.
I glued the large, loose pearls from Amazon to the ends of the scrolls. The loose pearls come in packages containing four or five different sizes of pearls.

I layered crystal buttons from Hobby Lobby on the column.

It’s starting to look fancy. More please.
But still not fancy enough. So I cut the backs off these ruby red buttons from Amazon and …
. . . glued them over the rosettes.
As I looked up at this, my eye went to places which were missing bling. More work!
So, open areas like this . . .
. . . I covered with trim.

Gaps like this . . .

. . . I covered with rhinestone buttons from Hobby Lobby.

Areas where two different materials met and looked unfinished . . .

. . . I covered with these cameo buttons, also from Hobby Lobby.

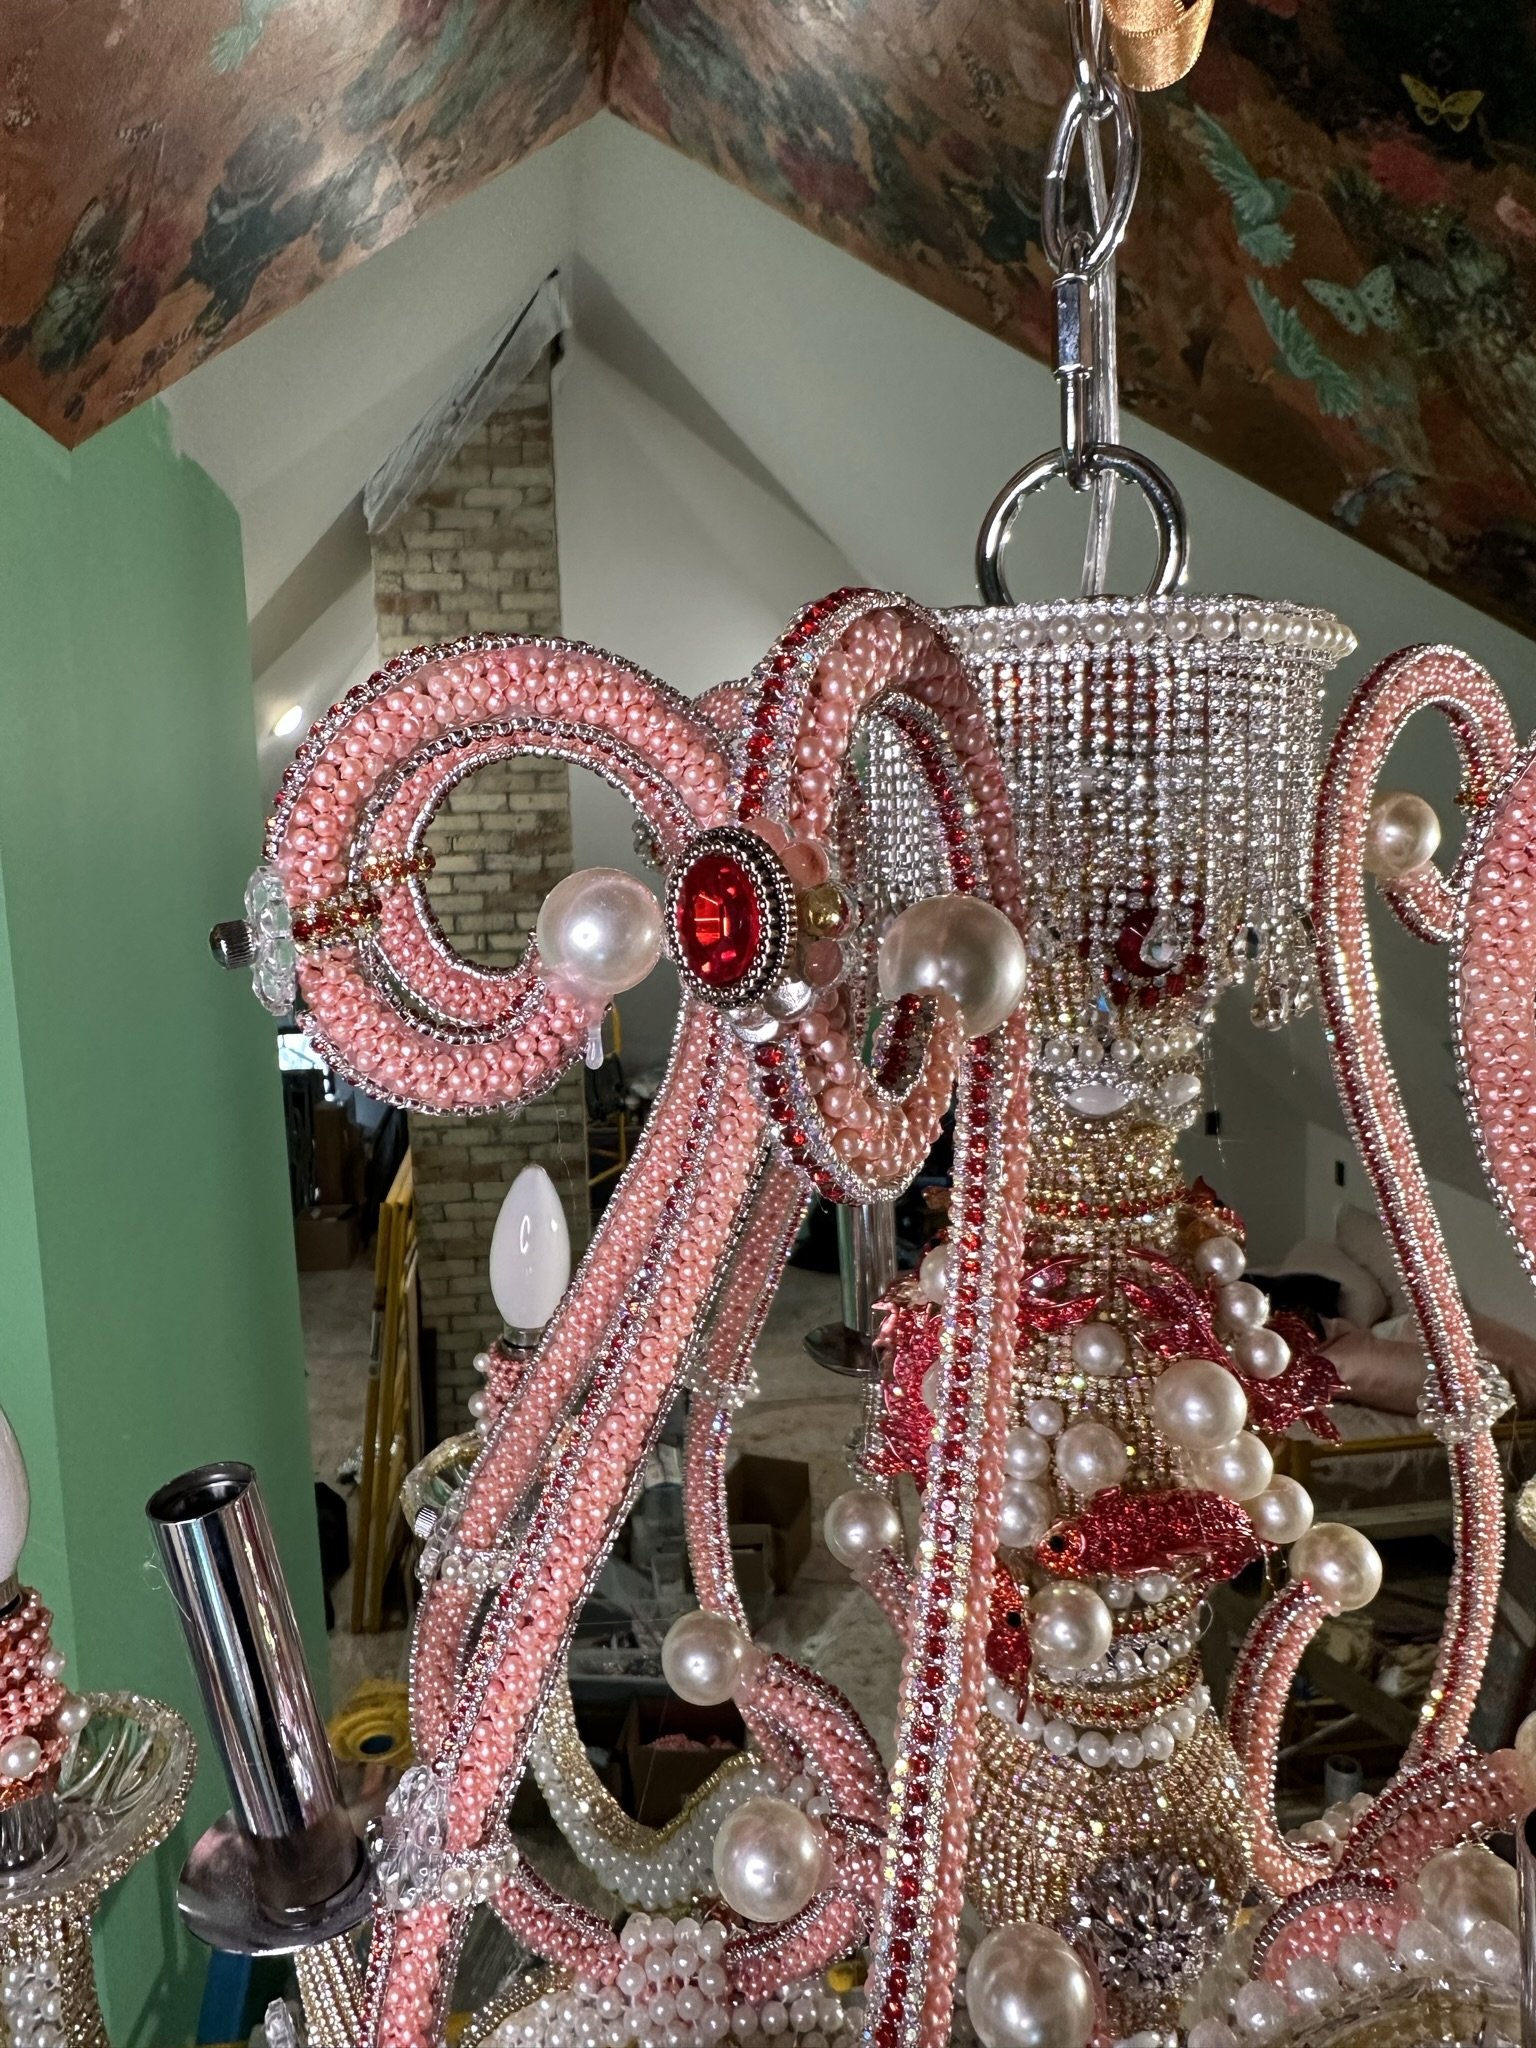
This photo shows more progress, including more rhinestone buttons added here and there, more pearls of varied sizes add to the columns, and also draped necklaces from Amazon. The pearl-colored version I bought here (they come with earrings), while the pink version I bought here. The pink version also came with earrings and also bracelets, which you can see I’ve dropped over the candles to sit inside the bobeches. I’ve also added pearl and more rhinestone trim to the bobeches.

Getting closer! But . . .

. . . it’s not done until it’s overdone. So I added these strands of colored crystals I found on eBay.

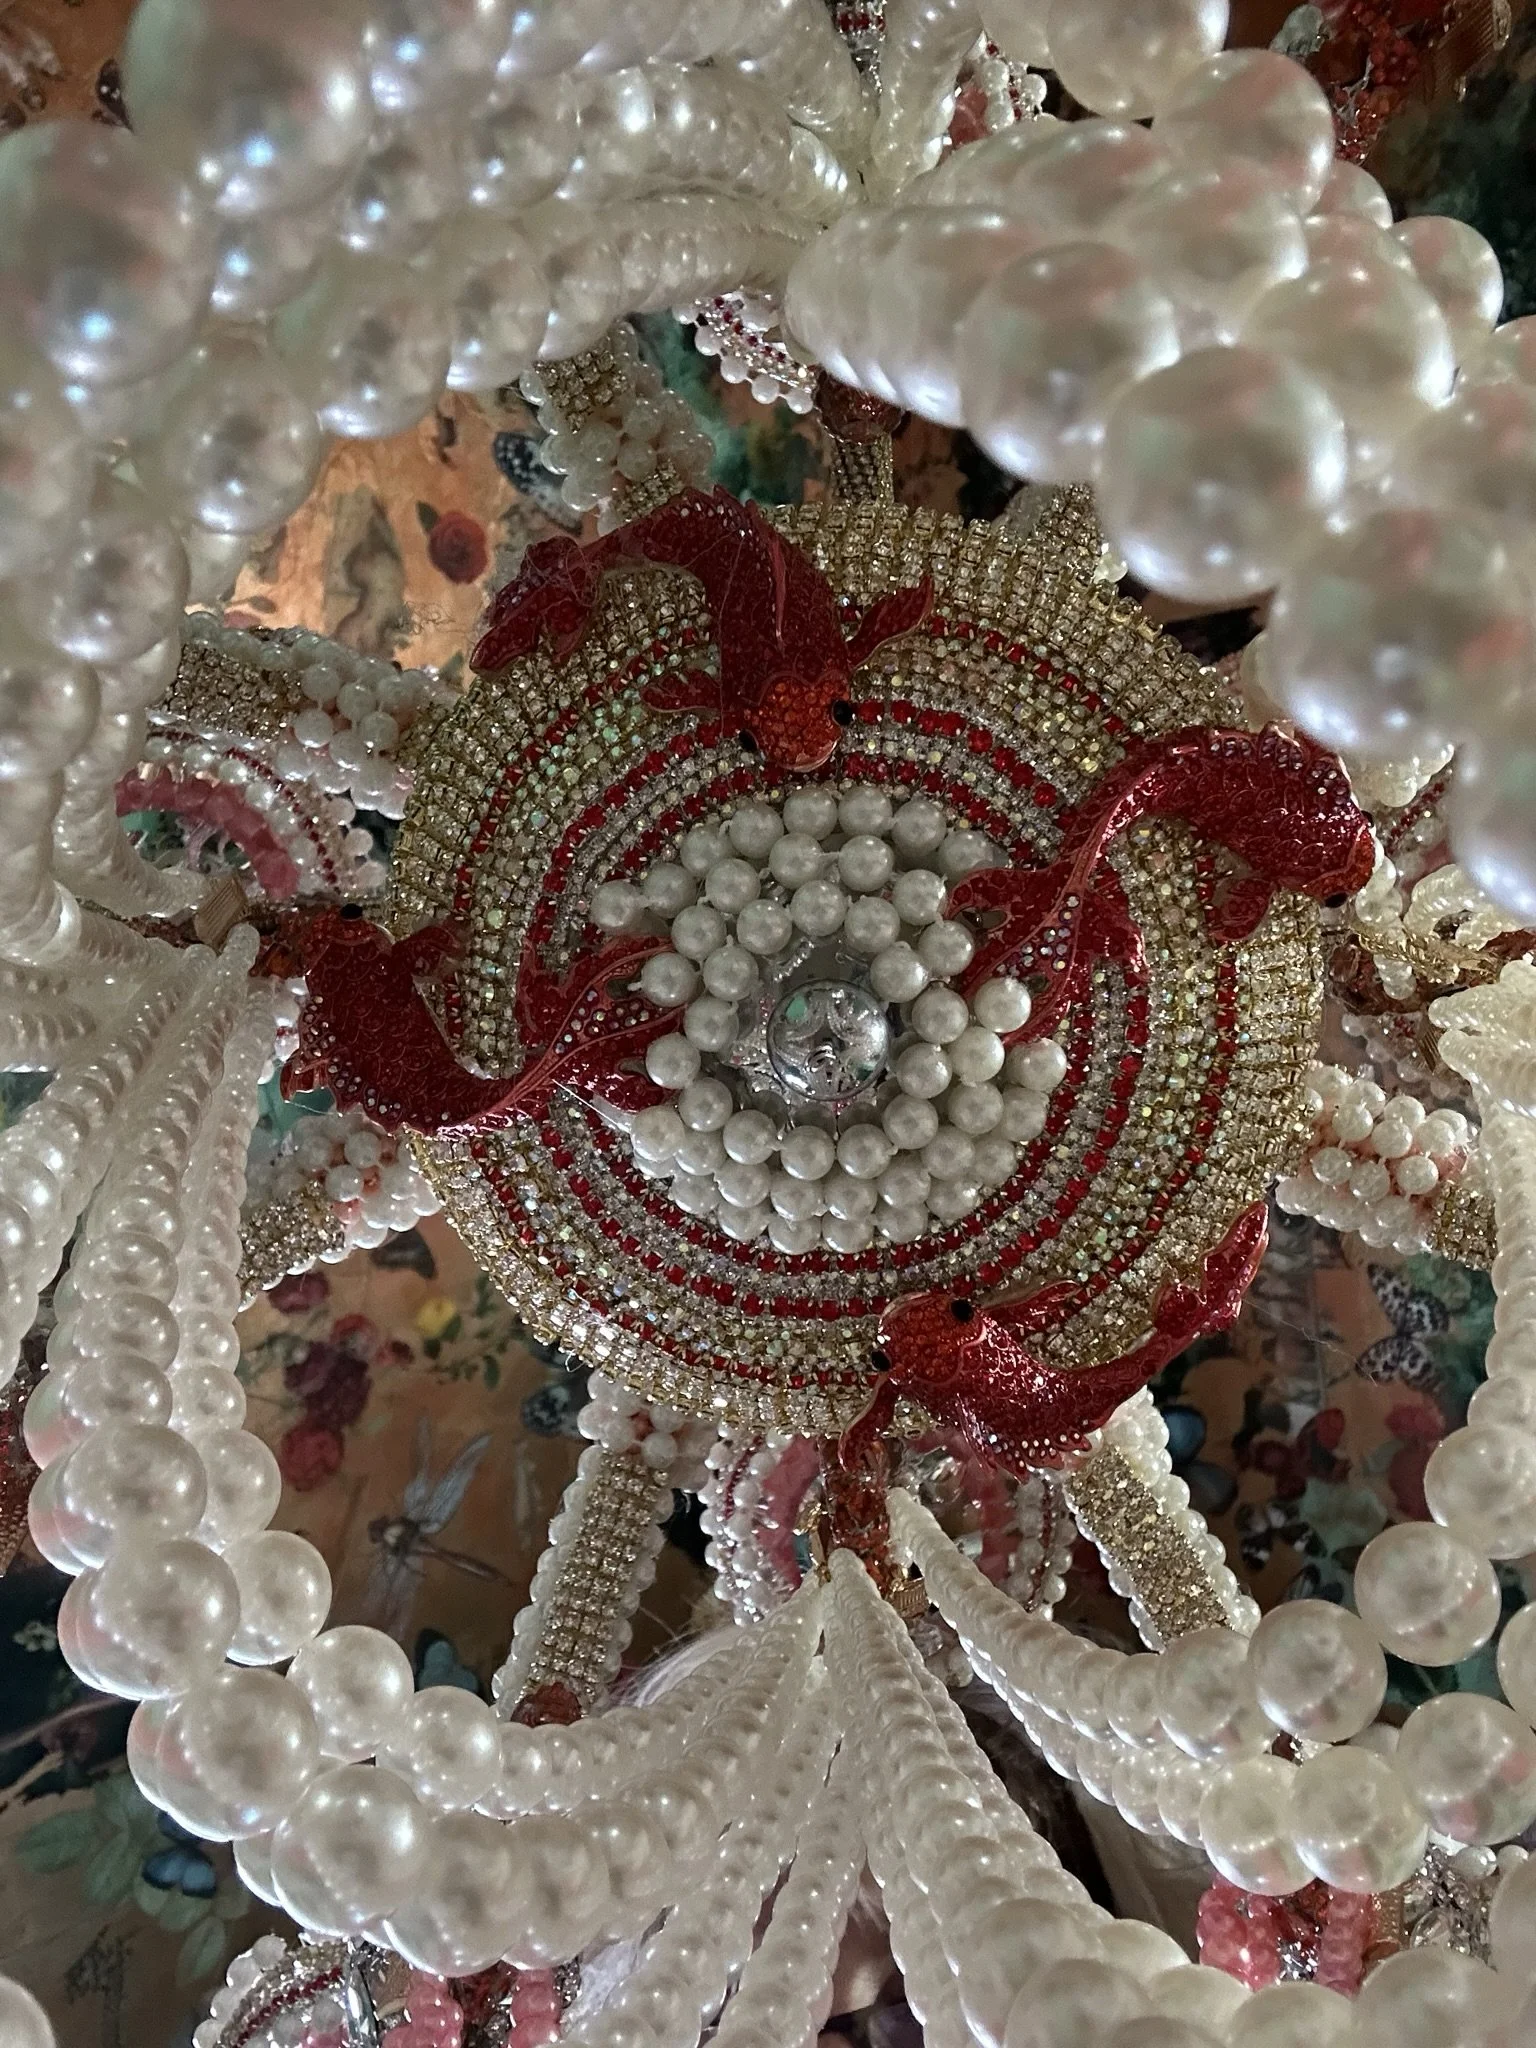
I glued more fish onto the bowl, and additional pearl trim to finish it off.

Here are more crystal strands and prisms, which I found on eBay and strung in a shape I thought would work.
I then added them in a manner that gave the fixture symmetry, using jewelry wire to attach.

Here’s how it looks from beneath.
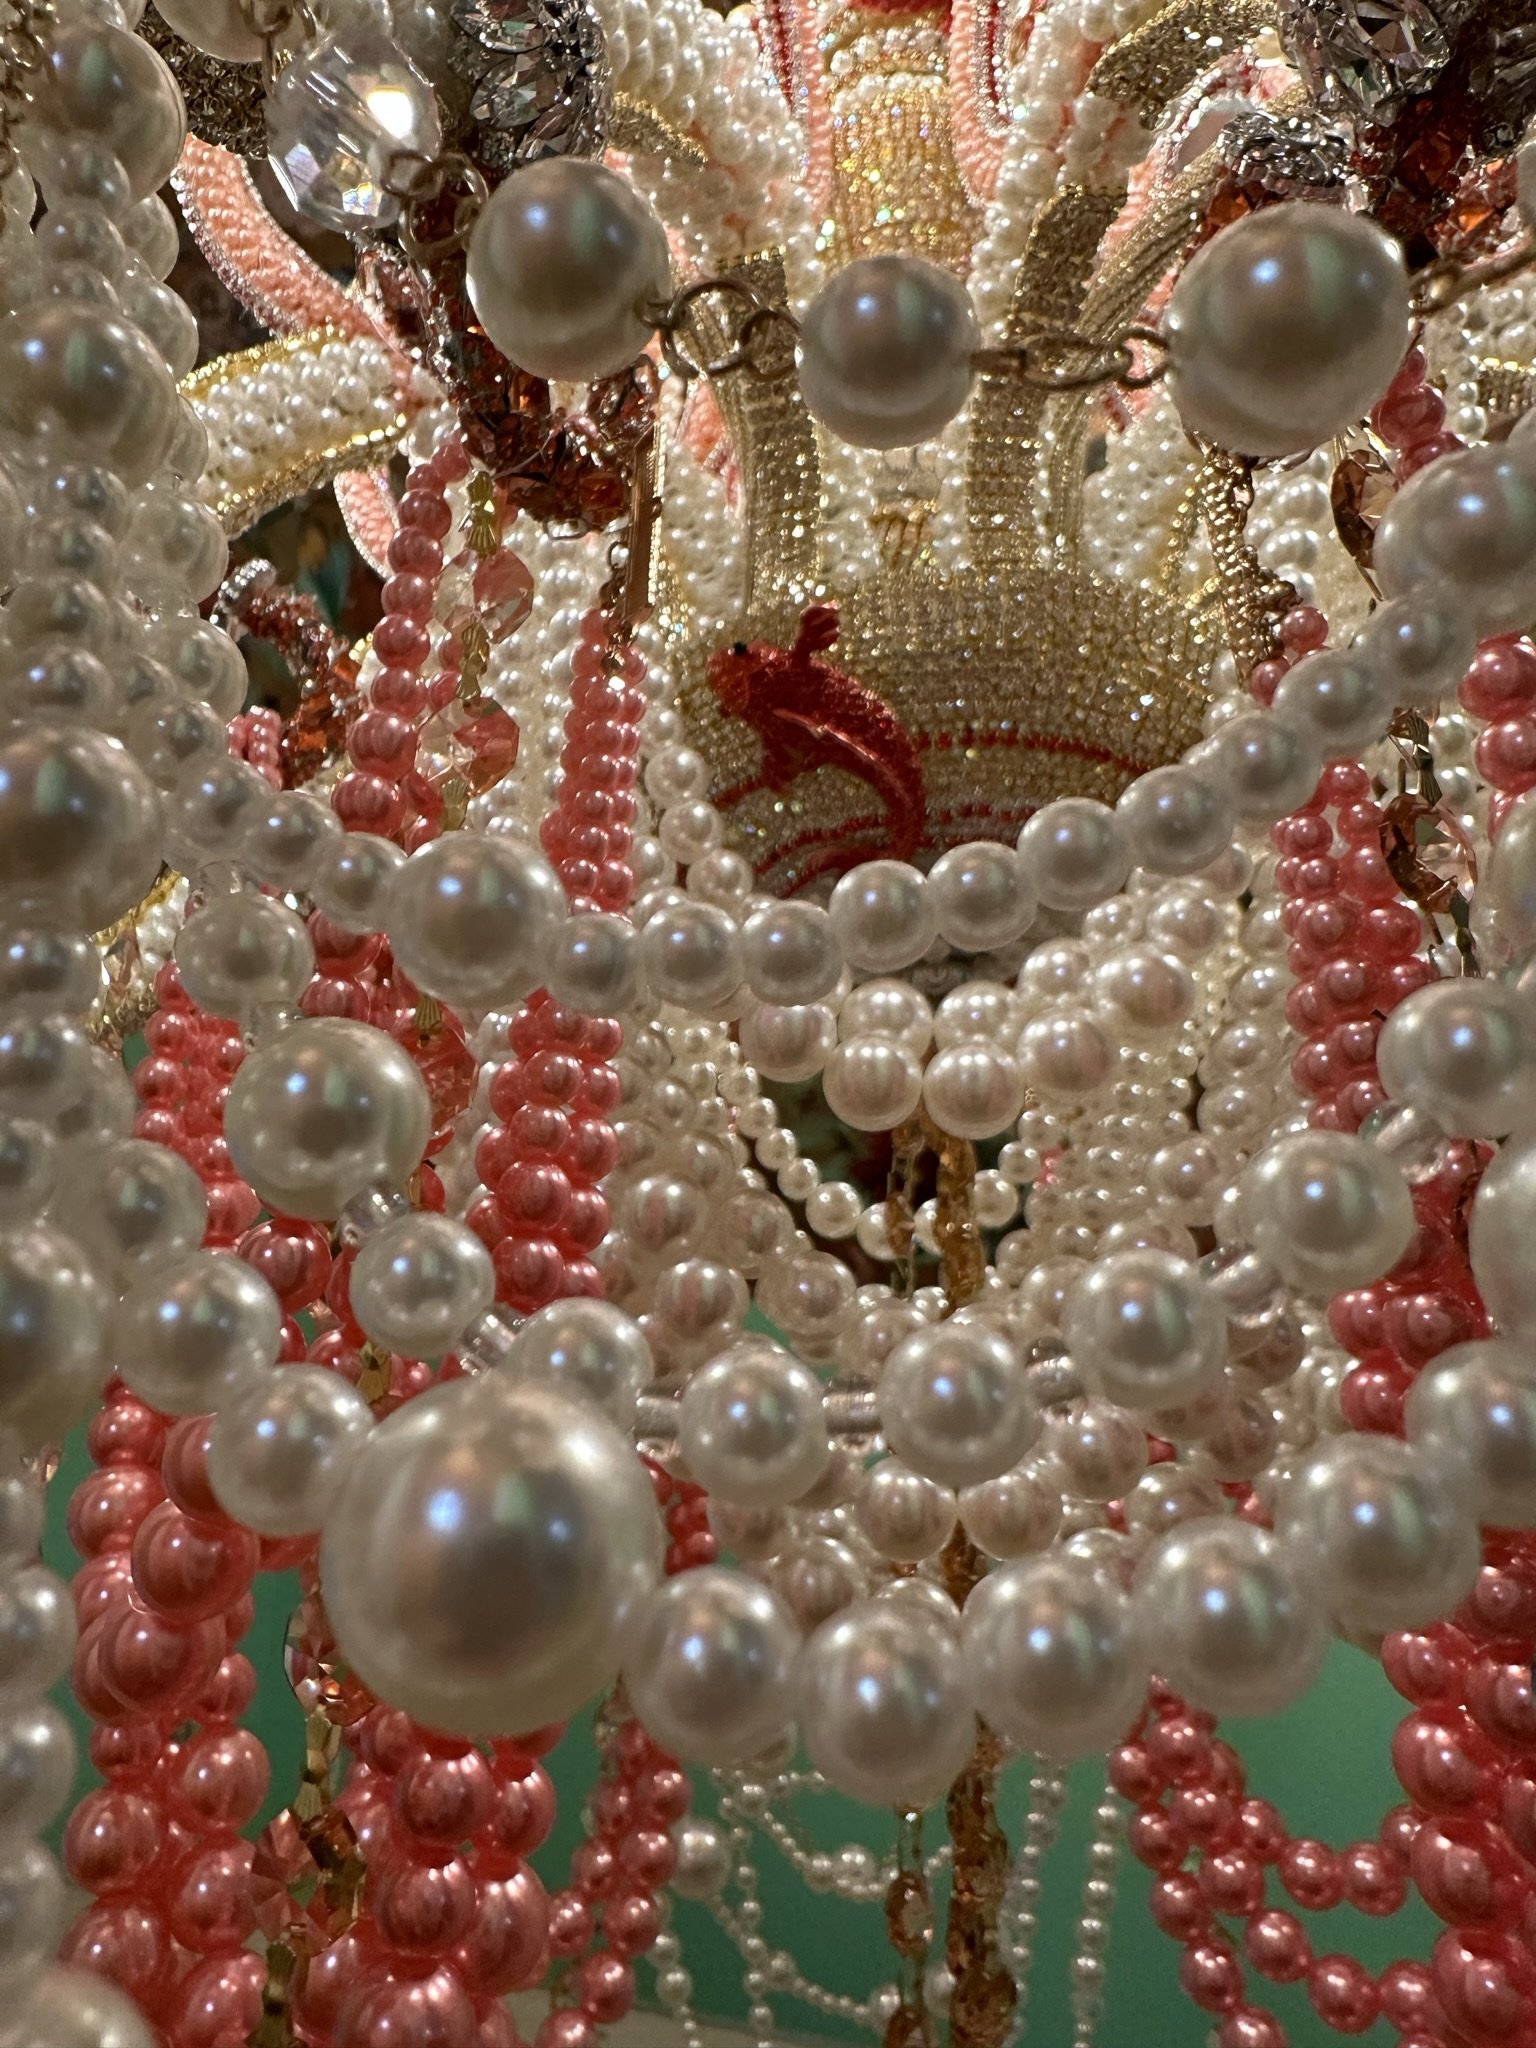
The necklaces aren’t attached, but are merely draped over the arms and hooks.
In sum, these were not necessarily difficult projects (anyone can do these), but they were time-consuming and honestly pretty tedious. Each chandelier took around 35 hours.
Was it worth the time?
Hell yes!
They work really well in our maximalist house, but also would be beautiful as statement chandeliers in a more minimal space, especially if you use all crystal and pearl-colored beads.


I have one more of these to do in the old “maid’s” room which is the second-floor entry to the attic space., although that’s down the road.
If you enjoyed this, do check in here and again for more posts regarding the attic project, including the decoupage ceiling in this bathroom and the mural work (which I’m doing myself, lol). If I don’t get around to writing a blog post, I’ll at least periodically post progress photos in the house tour section of this website.